User Manual
Page 14
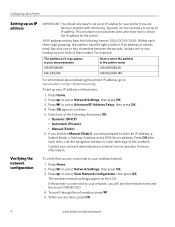
...• Dynamic (DHCP) • Automatic (Private) • Manual (Static) 6. Within each entry. Press to obtain the IP address for advanced users who know how to select Advanced IP Address Setup, then press OK. 4. Select one or two leading zeros in the printer menu 149.089.138.149 149.002.040.149...Press to select Network Settings, then press OK. 3. Use the navigation buttons to enter each digit of that you are connected to www.kodak.com/go/inkjetnetworking. Typically, it may appear in your documentation 149.89.138.149 149.2.40.149 How to enter the address in front ...
...• Dynamic (DHCP) • Automatic (Private) • Manual (Static) 6. Within each entry. Press to obtain the IP address for advanced users who know how to select Advanced IP Address Setup, then press OK. 4. Select one or two leading zeros in the printer menu 149.089.138.149 149.002.040.149...Press to select Network Settings, then press OK. 3. Use the navigation buttons to enter each digit of that you are connected to www.kodak.com/go/inkjetnetworking. Typically, it may appear in your documentation 149.89.138.149 149.2.40.149 How to enter the address in front ...
User Manual
Page 44
...). 3. Upgrading software and firmware on -screen instructions. 39 www.kodak.com/go /esp5250downloads. 2. Go to upgrade manually. Click Select in the Firmware box. 5. The drivers allow communication between the computer and printer. Upgrading software and firmware on a WINDOWS OS-based computer NOTE: Your printer must be connected to the Internet. 2. Click the Tools icon...
...). 3. Upgrading software and firmware on -screen instructions. 39 www.kodak.com/go /esp5250downloads. 2. Go to upgrade manually. Click Select in the Firmware box. 5. The drivers allow communication between the computer and printer. Upgrading software and firmware on a WINDOWS OS-based computer NOTE: Your printer must be connected to the Internet. 2. Click the Tools icon...


