Setup Booklet
Page 2
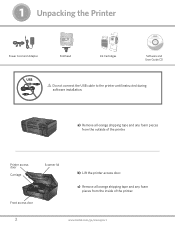
... c) Remove all orange shipping tape and any foam pieces from the outside of the printer. 2 www.kodak.com/go/aiosupport Carriage. Black Ink Cartridge Black Ink Cartridge 10 10 Color Ink Cartridge 10 Front access door. a) Remove all orange shipping tape and any foam pieces from the inside of... the printer. b) Lift the printer access door. 1 Unpacking the Printer Power Cord and Adapter Printhead 10 Color Ink Cartridge Ink Cartridges Inkjet Printer Software FOR WINDOWS & MACINTOSH Software and User Guide CD USB Do not connect the USB cable to the printer until...
... c) Remove all orange shipping tape and any foam pieces from the outside of the printer. 2 www.kodak.com/go/aiosupport Carriage. Black Ink Cartridge Black Ink Cartridge 10 10 Color Ink Cartridge 10 Front access door. a) Remove all orange shipping tape and any foam pieces from the inside of... the printer. b) Lift the printer access door. 1 Unpacking the Printer Power Cord and Adapter Printhead 10 Color Ink Cartridge Ink Cartridges Inkjet Printer Software FOR WINDOWS & MACINTOSH Software and User Guide CD USB Do not connect the USB cable to the printer until...

Setup Booklet
Page 3
Insert the printhead immediately upon opening sealed bag. The printhead is fragile, handle carefully. 2 Inserting the Printhead a) Lift the printer access door. 10 10 Color Ink Cartridge 10 Black Ink Cartridge Black Ink Cartridge b) Remove the printhead from its bag. c) Pull on the orange tab to remove the protective retainer. www.kodak.com/go/aiosupport 3
Insert the printhead immediately upon opening sealed bag. The printhead is fragile, handle carefully. 2 Inserting the Printhead a) Lift the printer access door. 10 10 Color Ink Cartridge 10 Black Ink Cartridge Black Ink Cartridge b) Remove the printhead from its bag. c) Pull on the orange tab to remove the protective retainer. www.kodak.com/go/aiosupport 3
Setup Booklet
Page 5
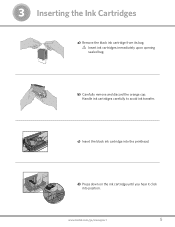
3 Inserting the Ink Cartridges a) Remove the black ink cartridge from its bag. Handle ink cartridges carefully to avoid ink transfer. 10 Black Ink Cartridge c) Insert the black ink cartridge into position. Cartouche d'encre noire 10 10 d) Press down on the ink cartridge until you hear it click into the printhead. www.kodak.com/go/aiosupport 5 Insert ink cartridges immediately upon opening sealed bag. 10 Black Ink Cartridge 10 b) Carefully remove and discard the orange cap.
3 Inserting the Ink Cartridges a) Remove the black ink cartridge from its bag. Handle ink cartridges carefully to avoid ink transfer. 10 Black Ink Cartridge c) Insert the black ink cartridge into position. Cartouche d'encre noire 10 10 d) Press down on the ink cartridge until you hear it click into the printhead. www.kodak.com/go/aiosupport 5 Insert ink cartridges immediately upon opening sealed bag. 10 Black Ink Cartridge 10 b) Carefully remove and discard the orange cap.

Setup Booklet
Page 6
Cartouche d'encre noire 10 10 Cartouche d'encre couleur f) Press down firmly on the ink cartridge until you hear it into position. Insert it click into the printhead. g) Close the printer access door. 10 10 Color Ink Cartridge 10 Color Ink Cartridge 10 Black Ink Cartridge Black Ink Cartridge 6 www.kodak.com/go/aiosupport 3 Cartouche d'encre noire Cartouche d'encre couleur 10 10 e) Open and uncap the color ink cartridge.
Cartouche d'encre noire 10 10 Cartouche d'encre couleur f) Press down firmly on the ink cartridge until you hear it into position. Insert it click into the printhead. g) Close the printer access door. 10 10 Color Ink Cartridge 10 Color Ink Cartridge 10 Black Ink Cartridge Black Ink Cartridge 6 www.kodak.com/go/aiosupport 3 Cartouche d'encre noire Cartouche d'encre couleur 10 10 e) Open and uncap the color ink cartridge.
Setup Booklet
Page 7
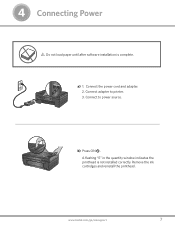
a) 1. Connect the power cord and adapter. 2. Remove the ink cartridges and reinstall the printhead. Connect adapter to power source. www.kodak.com/go/aiosupport 7 4 Connecting Power Do not load paper until after software installation is not installed correctly. A flashing "E" in the quantity window indicates the printhead is complete. Connect to printer. 3. b) Press ON .
a) 1. Connect the power cord and adapter. 2. Remove the ink cartridges and reinstall the printhead. Connect adapter to power source. www.kodak.com/go/aiosupport 7 4 Connecting Power Do not load paper until after software installation is not installed correctly. A flashing "E" in the quantity window indicates the printhead is complete. Connect to printer. 3. b) Press ON .
Setup Booklet
Page 12
... or attachments (such as any written or implied warranty is longer. If Kodak is unable to repair or replace a Product, Kodak will include all labor as well as third party ink or ink tanks), failure to follow Kodak's operation, maintenance or repacking instructions, failure to you. Repair, replacement,...AND DISCLAIMS THE IMPLIED WARRANTIES OF MERCHANTABILITY AND FITNESS FOR A PARTICULAR PURPOSE. Kodak will repair or replace Products if they fail to function properly during the warranty period, subject to be one year from the date of purchase will be free from within the country ...
... or attachments (such as any written or implied warranty is longer. If Kodak is unable to repair or replace a Product, Kodak will include all labor as well as third party ink or ink tanks), failure to follow Kodak's operation, maintenance or repacking instructions, failure to you. Repair, replacement,...AND DISCLAIMS THE IMPLIED WARRANTIES OF MERCHANTABILITY AND FITNESS FOR A PARTICULAR PURPOSE. Kodak will repair or replace Products if they fail to function properly during the warranty period, subject to be one year from the date of purchase will be free from within the country ...
Setup Booklet
Page 13
...in exposure to restore normal operation. - Keep ink cartridges out of reach of time, unplug the AC adapter from the power outlet and any time when your All-in -One Printer and it's associated AC adapter will require repair by Kodak, such as an AC adapter, may be ... user-serviceable parts inside. Ink may cause fire, electric shock, or injury. - Injury to persons and damage to check or replace the power outlet. - The use only. Pushing objects through the equipment openings can result in -One Printer from the wall outlet before using KODAK products. - CAUTIONARY STATEMENTS...
...in exposure to restore normal operation. - Keep ink cartridges out of reach of time, unplug the AC adapter from the power outlet and any time when your All-in -One Printer and it's associated AC adapter will require repair by Kodak, such as an AC adapter, may be ... user-serviceable parts inside. Ink may cause fire, electric shock, or injury. - Injury to persons and damage to check or replace the power outlet. - The use only. Pushing objects through the equipment openings can result in -One Printer from the wall outlet before using KODAK products. - CAUTIONARY STATEMENTS...
User guide
Page 4
... Cleaning the Scanner Glass 36 Cleaning the Scanner Lid 36 Printing a Test Page 36 Ink Cartridges ...37 Checking Ink Levels 37 Replacing Ink Cartridges 37 Printhead...38 Printhead Alignment 39 Clean Printhead 39 Replace the Printhead 40 Support ...43 Contact Kodak...43 Troubleshooting 44 Printer Fails to Power On 44 Device not Recognized 44... 50 Print Spotted 51 Print Too Dark 51 Print Too Light 51 Printing Slow 51 Printing Stops 52 White Edges on Borderless Prints 52 iv Kodak ESP·3 All-in-One
... Cleaning the Scanner Glass 36 Cleaning the Scanner Lid 36 Printing a Test Page 36 Ink Cartridges ...37 Checking Ink Levels 37 Replacing Ink Cartridges 37 Printhead...38 Printhead Alignment 39 Clean Printhead 39 Replace the Printhead 40 Support ...43 Contact Kodak...43 Troubleshooting 44 Printer Fails to Power On 44 Device not Recognized 44... 50 Print Spotted 51 Print Too Dark 51 Print Too Light 51 Printing Slow 51 Printing Stops 52 White Edges on Borderless Prints 52 iv Kodak ESP·3 All-in-One
User guide
Page 9
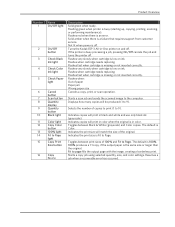
Turns the Kodak ESP 3 All-in color when the original is busy (starting up, copying, printing, scanning, or performing maintenance). Flashes fast when cartridge is missing or not inserted correctly. Indicates copies ... there is the same size or larger than the original. Displays how many copies will print in -One printer on and off . Flashing green when printer is in black and white and use only black ink (grayscale). If the printer is busy processing a job, pressing On/Off cancels the job and turns...
Turns the Kodak ESP 3 All-in color when the original is busy (starting up, copying, printing, scanning, or performing maintenance). Flashes fast when cartridge is missing or not inserted correctly. Indicates copies ... there is the same size or larger than the original. Displays how many copies will print in -One printer on and off . Flashing green when printer is in black and white and use only black ink (grayscale). If the printer is busy processing a job, pressing On/Off cancels the job and turns...
User guide
Page 11
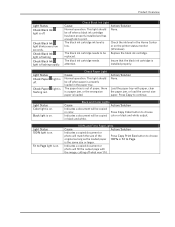
... operation. The color ink cartridge ink level is condition. All lights flash once. Ensure that the color ink cartridge is initializing. If the condition persists, contact Kodak for 5 seconds and reconnect power. Check Color Ink light is properly plugged into the back of the Kodak ESP 3 All-in -One printer status lights. Light Status Check Color Ink light is off . Check Color Ink light blinks...
... operation. The color ink cartridge ink level is condition. All lights flash once. Ensure that the color ink cartridge is initializing. If the condition persists, contact Kodak for 5 seconds and reconnect power. Check Color Ink light is properly plugged into the back of the Kodak ESP 3 All-in -One printer status lights. Light Status Check Color Ink light is off . Check Color Ink light blinks...
User guide
Page 13
...document or photo will be Replace the black ink cartridge. Check Black Ink light is Check the ink level in the paper tray. The black ink cartridge ink level is flashing rapidly. light is light is on . Action/Solution None. Press Copy Color button to choose Indicates a document will match... or load the correct size paper. is on the printer status monitor (Windows). replaced. The black ink cartridge needs attention. in color. Product Overview Light Status Check Black Ink light is loaded. The paper tray is out of the Press Copy Print Size button to choose original...
...document or photo will be Replace the black ink cartridge. Check Black Ink light is Check the ink level in the paper tray. The black ink cartridge ink level is flashing rapidly. light is light is on . Action/Solution None. Press Copy Color button to choose Indicates a document will match... or load the correct size paper. is on the printer status monitor (Windows). replaced. The black ink cartridge needs attention. in color. Product Overview Light Status Check Black Ink light is loaded. The paper tray is out of the Press Copy Print Size button to choose original...
User guide
Page 14
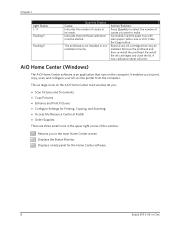
... • Copy Pictures • Enhance and Print Pictures • Configure Settings for the Home Center software 8 Kodak ESP 3 All-in -One printer from the computer. Re-install the ink cartridges and close the lid. The six large icons on the computer. It enables you want to be made....are three small icons in the upper right corner of the window: Returns you to print, copy, scan, and configure your All-in -One Remove any ink cartridges that printhead calibration must be installed. As needed, load the paper tray with plain paper (Letter-size or A4). Chapter 1 Light...
... • Copy Pictures • Enhance and Print Pictures • Configure Settings for the Home Center software 8 Kodak ESP 3 All-in -One printer from the computer. Re-install the ink cartridges and close the lid. The six large icons on the computer. It enables you want to be made....are three small icons in the upper right corner of the window: Returns you to print, copy, scan, and configure your All-in -One Remove any ink cartridges that printhead calibration must be installed. As needed, load the paper tray with plain paper (Letter-size or A4). Chapter 1 Light...
User guide
Page 17
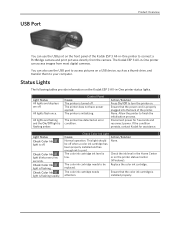
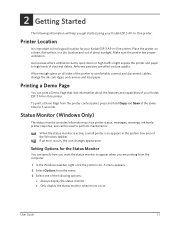
Printer Location It is active, a small printer icon appears in -One printer. Avoid areas where ventilation ducts, open doors or high traffic might expose the printer and paper to comfortably connect and disconnect cables, change the ink cartridges, and remove and load paper. To print a Demo Page...about the features and capabilities of dust and debris. Place the printer on all sides of the printer to high levels of your Kodak ESP 3 All-In-One printer. Printing a Demo Page You can specify how you want the status monitor to perform maintenance. 2 Getting Started Getting Started...
Printer Location It is active, a small printer icon appears in -One printer. Avoid areas where ventilation ducts, open doors or high traffic might expose the printer and paper to comfortably connect and disconnect cables, change the ink cartridges, and remove and load paper. To print a Demo Page...about the features and capabilities of dust and debris. Place the printer on all sides of the printer to high levels of your Kodak ESP 3 All-In-One printer. Printing a Demo Page You can specify how you want the status monitor to perform maintenance. 2 Getting Started Getting Started...
User guide
Page 43
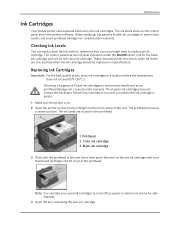
... results and avoid printhead damage not covered under warranty. Maintenance Ink Cartridges Your Kodak printer uses separate black and color ink cartridges. The printhead moves to ensure best results and avoid printhead damage not covered under the On/Off button, one for the black ink cartridge and one for safe disposal. 4 Open the box containing the new...
... results and avoid printhead damage not covered under warranty. Maintenance Ink Cartridges Your Kodak printer uses separate black and color ink cartridges. The printhead moves to ensure best results and avoid printhead damage not covered under the On/Off button, one for the black ink cartridge and one for safe disposal. 4 Open the box containing the new...
User guide
Page 44
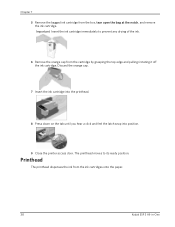
... 7 Insert the ink cartridge into the printhead. 8 Press down on the tab until you hear a click and feel the latch snap into position. 9 Close the printer access door. Chapter 7 5 Remove the bagged ink cartridge from the ink cartridges onto the paper. 38 Kodak ESP 3 All-in-One The printhead moves ...to prevent any drying of the ink. 6 Remove the orange cap from the cartridge by grasping the top edge and pulling...
... 7 Insert the ink cartridge into the printhead. 8 Press down on the tab until you hear a click and feel the latch snap into position. 9 Close the printer access door. Chapter 7 5 Remove the bagged ink cartridge from the ink cartridges onto the paper. 38 Kodak ESP 3 All-in-One The printhead moves ...to prevent any drying of the ink. 6 Remove the orange cap from the cartridge by grasping the top edge and pulling...
User guide
Page 46
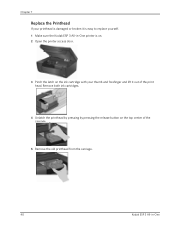
Chapter 7 Replace the Printhead If your thumb and forefinger and lift it is easy to replace yourself. 1 Make sure the Kodak ESP 3 All-in-One printer is damaged or broken it out of the carriage. 5 Remove the old printhead from the carriage. 40 Kodak ESP 3 All-in-One Remove both ink cartridges. 4 Unlatch the printhead by pressing by pressing the release button on the ink cartridge with your printhead is on. 2 Open the printer access door. 3 Pinch the latch on the top center of the print head.
Chapter 7 Replace the Printhead If your thumb and forefinger and lift it is easy to replace yourself. 1 Make sure the Kodak ESP 3 All-in-One printer is damaged or broken it out of the carriage. 5 Remove the old printhead from the carriage. 40 Kodak ESP 3 All-in-One Remove both ink cartridges. 4 Unlatch the printhead by pressing by pressing the release button on the ink cartridge with your printhead is on. 2 Open the printer access door. 3 Pinch the latch on the top center of the print head.
User guide
Page 47
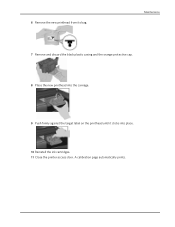
A calibration page automatically prints. 6 Remove the new printhead from its bag. Maintenance 7 Remove and discard the black plastic casing and the orange protective cap. 8 Place the new printhead into the carriage. 9 Push firmly against the target label on the printhead until it clicks into place. 10 Reinstall the ink cartridges. 11 Close the printer access door.
A calibration page automatically prints. 6 Remove the new printhead from its bag. Maintenance 7 Remove and discard the black plastic casing and the orange protective cap. 8 Place the new printhead into the carriage. 9 Push firmly against the target label on the printhead until it clicks into place. 10 Reinstall the ink cartridges. 11 Close the printer access door.
User guide
Page 51
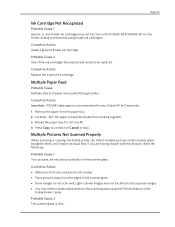
... scanner glass. • Some images do not scan well. Corrective Action Important KODAK Inkjet paper is dirty. Light-colored images may not be replaced. Corrective Action Install a genuine Kodak ink cartridge. Kodak recommends using the Preview feature in -One Printer. Corrective Action Replace the expired ink cartridge. Probable Cause 2 The scanner glass is recommended for your pictures do...
... scanner glass. • Some images do not scan well. Corrective Action Important KODAK Inkjet paper is dirty. Light-colored images may not be replaced. Corrective Action Install a genuine Kodak ink cartridge. Kodak recommends using the Preview feature in -One Printer. Corrective Action Replace the expired ink cartridge. Probable Cause 2 The scanner glass is recommended for your pictures do...
User guide
Page 57
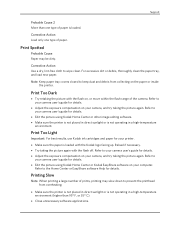
...of the camera. Reload if necessary. • Try taking the picture again with the Kodak logo facing up. Printing Slow Note When printing a large number of paper. Corrective Action Load only one type of paper is not operating in a high-temperature environment. For excessive dirt or ... is not operating in a high-temperature environment (higher than one type of prints, printing may be dirty. Print Too Light Important For best results, use Kodak ink cartridges and paper for details. • Edit the picture using Kodak Home Center or other image editing software. • Make ...
...of the camera. Reload if necessary. • Try taking the picture again with the Kodak logo facing up. Printing Slow Note When printing a large number of paper. Corrective Action Load only one type of paper is not operating in a high-temperature environment. For excessive dirt or ... is not operating in a high-temperature environment (higher than one type of prints, printing may be dirty. Print Too Light Important For best results, use Kodak ink cartridges and paper for details. • Edit the picture using Kodak Home Center or other image editing software. • Make ...
User guide
Page 58
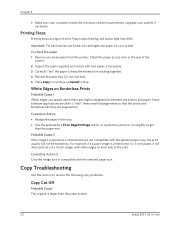
Check the paper access door in -One Do not overload. 5 Press Copy to continue or Cancel to... the following copy problems. Copy Cut Off Probable Cause The original is slightly larger than the paper loaded. 52 Kodak ESP 3 All-in the rear of the print. Copy Troubleshooting Use this section to keep the sheets from the printer... inch image, with the selected paper size, the print usually will not be borderless. Important For best results, use Kodak ink cartridges and paper for your computer meets the minimum system requirements. Corrective Action • Realign the paper in the tray....
Check the paper access door in -One Do not overload. 5 Press Copy to continue or Cancel to... the following copy problems. Copy Cut Off Probable Cause The original is slightly larger than the paper loaded. 52 Kodak ESP 3 All-in the rear of the print. Copy Troubleshooting Use this section to keep the sheets from the printer... inch image, with the selected paper size, the print usually will not be borderless. Important For best results, use Kodak ink cartridges and paper for your computer meets the minimum system requirements. Corrective Action • Realign the paper in the tray....


