
User's Guide
Page 5
...Setting up the Projector 17 Connecting the Projector 18 Starting the Projector 22 Turning Off the Projector 23 Using the Projector 25 Basic Image Adjustment 25 Adjusting the Projector 26 Using the Remote Control 27 Using the Keypad and Remote Buttons 29 Using... the On-Screen Menus 32 Display Menu 33 Audio Menu 35 Image Menu 35 Controls Menu 38 Language Menu 40 Status Menu 41 Using KODAK...
...Setting up the Projector 17 Connecting the Projector 18 Starting the Projector 22 Turning Off the Projector 23 Using the Projector 25 Basic Image Adjustment 25 Adjusting the Projector 26 Using the Remote Control 27 Using the Keypad and Remote Buttons 29 Using... the On-Screen Menus 32 Display Menu 33 Audio Menu 35 Image Menu 35 Controls Menu 38 Language Menu 40 Status Menu 41 Using KODAK...

User's Guide
Page 12
... is missing. The contents of your dealer of KODAK products immediately if anything is included in the box. Remote control 6. Audio cable 9. Contact your shipping box may vary depending on the projector configuration you've ordered. 2 1 3 4 5 6 7 9 8 1. M1-DA analog computer cable 7. User Guide KODAK DP2900 Digital Projector Unpacking the Projector The projector comes with the items shown. Audio cable...
... is missing. The contents of your dealer of KODAK products immediately if anything is included in the box. Remote control 6. Audio cable 9. Contact your shipping box may vary depending on the projector configuration you've ordered. 2 1 3 4 5 6 7 9 8 1. M1-DA analog computer cable 7. User Guide KODAK DP2900 Digital Projector Unpacking the Projector The projector comes with the items shown. Audio cable...
User's Guide
Page 19
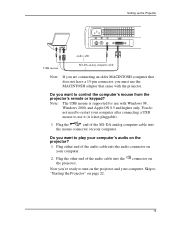
... your computer. 2. Now you want to restart your computer. You do not need to control the computer's mouse from the projector's remote or keypad? Plug the end of the M1-DA analog computer cable into the mouse connector on your computer. Plug either end of the ...audio cable into the audio connector on your computer after connecting a USB mouse to "Starting the Projector" on the projector. Setting up the Projector in in audio cable USB mouse M1-DA analog computer cable Note: If you are connecting an older MACINTOSH computer that came with...
... your computer. 2. Now you want to restart your computer. You do not need to control the computer's mouse from the projector's remote or keypad? Plug the end of the M1-DA analog computer cable into the mouse connector on your computer. Plug either end of the ...audio cable into the audio connector on your computer after connecting a USB mouse to "Starting the Projector" on the projector. Setting up the Projector in in audio cable USB mouse M1-DA analog computer cable Note: If you are connecting an older MACINTOSH computer that came with...

User's Guide
Page 22
... appears. 4. Plug the power cord into the side of the projector lights orange until the software has initialized. User Guide KODAK DP2900 Digital Projector Starting the Projector We recommend using a surge protector power strip when connecting your electrical... outlet. The fans start to the projector, the computer may appear. A green Lamp LED indicates that new hardware was found. on the top of the projector, then plug it on the remote...
... appears. 4. Plug the power cord into the side of the projector lights orange until the software has initialized. User Guide KODAK DP2900 Digital Projector Starting the Projector We recommend using a surge protector power strip when connecting your electrical... outlet. The fans start to the projector, the computer may appear. A green Lamp LED indicates that new hardware was found. on the top of the projector, then plug it on the remote...
User's Guide
Page 23
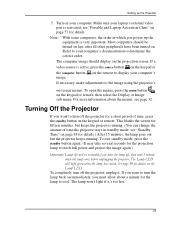
...on page 57 for details.) After 15 minutes, the lamp goes out but keeps the projector running . Note: With some computers, the order in standby mode; Most computers should display on the keypad or remote. The lamp won't light if it . If a video source is activated; Turning... Off the Projector If you power up the Projector 5. This blanks the screen for a short period of time the projector stays in which you want to display your ...
...on page 57 for details.) After 15 minutes, the lamp goes out but keeps the projector running . Note: With some computers, the order in standby mode; Most computers should display on the keypad or remote. The lamp won't light if it . If a video source is activated; Turning... Off the Projector If you power up the Projector 5. This blanks the screen for a short period of time the projector stays in which you want to display your ...
User's Guide
Page 25
...adjust the sync (page 37) and/or the tracking (page 37) manually. • If the colors don't look right, check the KODAK Image Manager settings. Be sure the projector is at a 90 degree angle to the screen. • If the image is not rectangular, adjust the keystoning (page 35). •...), adjust the height of the video source image appear jagged, adjust the overscan (page 35). 25 See "Using KODAK Image Manager" on page 43. Using the Projector This section describes how to use and make adjustments to the keypad and remote buttons and the options available from the on-screen menus.
...adjust the sync (page 37) and/or the tracking (page 37) manually. • If the colors don't look right, check the KODAK Image Manager settings. Be sure the projector is at a 90 degree angle to the screen. • If the image is not rectangular, adjust the keystoning (page 35). •...), adjust the height of the video source image appear jagged, adjust the overscan (page 35). 25 See "Using KODAK Image Manager" on page 43. Using the Projector This section describes how to use and make adjustments to the keypad and remote buttons and the options available from the on-screen menus.
User's Guide
Page 27
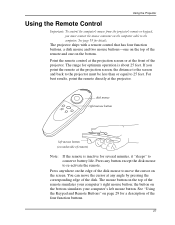
...inactive for a description of the four function buttons. 27 For best results, point the remote directly at the front of the projector. Point the remote control at the projection screen or at the projector. The mouse button on the bottom. Press any angle by pressing the corresponding edge ...of the disk. Using the Remote Control Using the Projector The projector ships with a remote control that has four function buttons, a disk mouse and two mouse buttons-one on the top of the remote and one on the top of the remote simulates your computer's left mouse button (...
...inactive for a description of the four function buttons. 27 For best results, point the remote directly at the front of the projector. Point the remote control at the projection screen or at the projector. The mouse button on the bottom. Press any angle by pressing the corresponding edge ...of the disk. Using the Remote Control Using the Projector The projector ships with a remote control that has four function buttons, a disk mouse and two mouse buttons-one on the top of the remote and one on the top of the remote simulates your computer's left mouse button (...

User's Guide
Page 28
User Guide KODAK DP2900 Digital Projector If you can use the remote control mouse buttons to the previous slide (other POWERPOINT modes are creating presentations in the Slide Show section, then click OK. To configure the POWERPOINT ...
User Guide KODAK DP2900 Digital Projector If you can use the remote control mouse buttons to the previous slide (other POWERPOINT modes are creating presentations in the Slide Show section, then click OK. To configure the POWERPOINT ...

User's Guide
Page 29
... LED lamp on page 32 for details. toggles back and forth between video and computer sources volume decreases volume The Remote Control Buttons menu button displays a menu of projector options on the keypad act as menu navigation buttons. turns off the image without turning off source button - Using ...the Projector Using the Keypad and Remote Buttons While the menus are displayed, the volume, source, and standby buttons on the screen volume increases volume standby - See "Using...
... LED lamp on page 32 for details. toggles back and forth between video and computer sources volume decreases volume The Remote Control Buttons menu button displays a menu of projector options on the keypad act as menu navigation buttons. turns off the image without turning off source button - Using ...the Projector Using the Keypad and Remote Buttons While the menus are displayed, the volume, source, and standby buttons on the screen volume increases volume standby - See "Using...

User's Guide
Page 30
...the menus, the projector saves any changes you have more information about the on /off button when the LED is orange. User Guide KODAK DP2900 Digital Projector Lamp on/off (keypad only) Press the lamp on/off button to turn the lamp on, or the lamp is currently on the remote. 30 Source ...(keypad only) or Computer and Video (remote only) When you made. A green Lamp LED ...
...the menus, the projector saves any changes you have more information about the on /off button when the LED is orange. User Guide KODAK DP2900 Digital Projector Lamp on/off (keypad only) Press the lamp on/off button to turn the lamp on, or the lamp is currently on the remote. 30 Source ...(keypad only) or Computer and Video (remote only) When you made. A green Lamp LED ...
User's Guide
Page 32
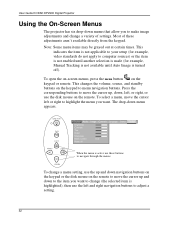
... through the menus To change a menu setting, use the up and down navigation buttons on the keypad or the disk mouse on the remote to move the cursor left or right to highlight the menu you to make image adjustments and change (the selected item is highlighted), then...for example, video standards do not apply to the item you want . User Guide KODAK DP2900 Digital Projector Using the On-Screen Menus The projector has six drop-down , left, or right, or use the disk mouse on the remote. The drop-down menu appears. >Display Audio Brightness Contrast Tint Color Sharpness Blank screen ...
... through the menus To change a menu setting, use the up and down navigation buttons on the keypad or the disk mouse on the remote to move the cursor left or right to highlight the menu you to make image adjustments and change (the selected item is highlighted), then...for example, video standards do not apply to the item you want . User Guide KODAK DP2900 Digital Projector Using the On-Screen Menus The projector has six drop-down , left, or right, or use the disk mouse on the remote. The drop-down menu appears. >Display Audio Brightness Contrast Tint Color Sharpness Blank screen ...

User's Guide
Page 39
...signal detected" or "Standby Active" appear in Default Source. This determines which source the projector checks first for the projector to toggle among Computer analog, Computer digital, and Video. If the projector's display constantly changes between On and Off. Highlight Default Source and click the left or ...or the computer or video button on some older computers. Click the left or right navigation button to display properly on the remote. To display another source, you may need to set the monitor resolution and refresh rate accordingly. When this feature is On,...
...signal detected" or "Standby Active" appear in Default Source. This determines which source the projector checks first for the projector to toggle among Computer analog, Computer digital, and Video. If the projector's display constantly changes between On and Off. Highlight Default Source and click the left or ...or the computer or video button on some older computers. Click the left or right navigation button to display properly on the remote. To display another source, you may need to set the monitor resolution and refresh rate accordingly. When this feature is On,...

User's Guide
Page 45
... the Lens Follow these steps to clean the projection lens: 1. Lightly wipe the cleaning cloth over the lens in the remote • use the projector immediately, replace the lens cap. 45 Apply a non-abrasive camera lens cleaner to a soft, dry cloth. • Avoid using an excessive amount of cleaner. • ...
... the Lens Follow these steps to clean the projection lens: 1. Lightly wipe the cleaning cloth over the lens in the remote • use the projector immediately, replace the lens cap. 45 Apply a non-abrasive camera lens cleaner to a soft, dry cloth. • Avoid using an excessive amount of cleaner. • ...
User's Guide
Page 49
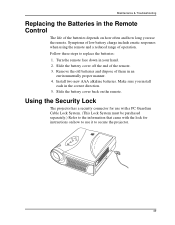
... the old batteries and dispose of them in the correct direction. 5. Maintenance & Troubleshooting Replacing the Batteries in the Remote Control The life of the batteries depends on the remote. Using the Security Lock The projector has a security connector for use with a PC Guardian Cable Lock System. (This Lock System must be purchased separately...
... the old batteries and dispose of them in the correct direction. 5. Maintenance & Troubleshooting Replacing the Batteries in the Remote Control The life of the batteries depends on the remote. Using the Security Lock The projector has a security connector for use with a PC Guardian Cable Lock System. (This Lock System must be purchased separately...

User's Guide
Page 50
.... • Make sure that the total distance from the remote to the projector is no more than 25 feet (7.6 m). • Point the remote control at the screen or at www.kodak.com/go/projectors for the latest updates on troubleshooting. User Guide KODAK DP2900 Digital Projector Troubleshooting If you are not able to connect audio to your computer is...
.... • Make sure that the total distance from the remote to the projector is no more than 25 feet (7.6 m). • Point the remote control at the screen or at www.kodak.com/go/projectors for the latest updates on troubleshooting. User Guide KODAK DP2900 Digital Projector Troubleshooting If you are not able to connect audio to your computer is...

User's Guide
Page 73
... Language menu 40 Status menu 41 overscan 35 P PAL video 34, 38 Plug and Play 39 positioning projector viii power cord connecting 22 power up sequence 23 PowerBook video mirroring 67 R rear projection 38 remote control replacing the batteries 49 using 27, 29 replacing projection lamp module 46 re-positioning image 37... connecting 20 T Technical Support information to have on hand before you call 14 technical support 14 temperature limits 55 tint, adjusting 34 turning off the projector 23 U USB mouse 19 V vertical lines 37 video mirroring 67 73
... Language menu 40 Status menu 41 overscan 35 P PAL video 34, 38 Plug and Play 39 positioning projector viii power cord connecting 22 power up sequence 23 PowerBook video mirroring 67 R rear projection 38 remote control replacing the batteries 49 using 27, 29 replacing projection lamp module 46 re-positioning image 37... connecting 20 T Technical Support information to have on hand before you call 14 technical support 14 temperature limits 55 tint, adjusting 34 turning off the projector 23 U USB mouse 19 V vertical lines 37 video mirroring 67 73

