User Manual
Page 2
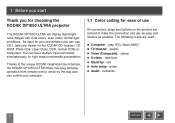
... All connectors, plugs and buttons on the product are used: x Computer - You can control your computer. 1.1 Color coding for choosing the KODAK DP1050 ULTRA projector The KODAK DP1050 ULTRA will display high brightness images with vivid colors, even under normal light conditions. purple x Video (Composite) - dark blue x Stand by...red/white 2 Contents gray (PC) /black (MAC) x TV/channel - red x Auto setup - The following colors are colored to the unique KODAK Graphical User Interface, the KODAK DP1050 ULTRA offers true plug and play operation from remote control, which by -
... All connectors, plugs and buttons on the product are used: x Computer - You can control your computer. 1.1 Color coding for choosing the KODAK DP1050 ULTRA projector The KODAK DP1050 ULTRA will display high brightness images with vivid colors, even under normal light conditions. purple x Video (Composite) - dark blue x Stand by...red/white 2 Contents gray (PC) /black (MAC) x TV/channel - red x Auto setup - The following colors are colored to the unique KODAK Graphical User Interface, the KODAK DP1050 ULTRA offers true plug and play operation from remote control, which by -
User Manual
Page 3
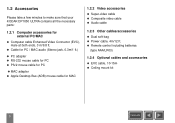
x Remote control including batteries (type AAA/LR03) 1.2.4 Optional cables and accessories x EVC cable, 10-15m x Ceiling mount kit 3 Contents 1.2 Accessories Please take a few minutes to make sure that your KODAK DP1050 ULTRA contains all the necessary parts: 1.2.1 Computer accessories for MAC 1.2.2 Video accessories x Super-video cable x Composite video cable x Audio cable 1.2.3 Other cables/accessories...
x Remote control including batteries (type AAA/LR03) 1.2.4 Optional cables and accessories x EVC cable, 10-15m x Ceiling mount kit 3 Contents 1.2 Accessories Please take a few minutes to make sure that your KODAK DP1050 ULTRA contains all the necessary parts: 1.2.1 Computer accessories for MAC 1.2.2 Video accessories x Super-video cable x Composite video cable x Audio cable 1.2.3 Other cables/accessories...
User Manual
Page 4
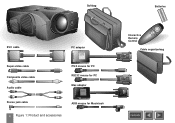
Softbag Batteries S-V V ZOOM FOCUS CHAN TV PC EVC cable PC adapter Super-video cable Composite video cable Audio cable PS/2 mouse for PC RS232 mouse for PC Mac adapter Stereo jack cable ADB mouse for Macintosh 4 Figure 1: Product and accessories Interactive Remote Control Cable organizerbag Contents
Softbag Batteries S-V V ZOOM FOCUS CHAN TV PC EVC cable PC adapter Super-video cable Composite video cable Audio cable PS/2 mouse for PC RS232 mouse for PC Mac adapter Stereo jack cable ADB mouse for Macintosh 4 Figure 1: Product and accessories Interactive Remote Control Cable organizerbag Contents
User Manual
Page 5
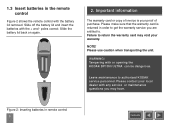
... insert the batteries with or opening the KODAK DP1050 ULTRA can be dangerous. Please make sure that the warranty card is your local dealer with the battery lid removed. Please contact your proof of purchase. poles correct. 1.3 Insert batteries in the remote control Figure 2 shows the remote control with any service or maintenance questions...
... insert the batteries with or opening the KODAK DP1050 ULTRA can be dangerous. Please make sure that the warranty card is your local dealer with the battery lid removed. Please contact your proof of purchase. poles correct. 1.3 Insert batteries in the remote control Figure 2 shows the remote control with any service or maintenance questions...
User Manual
Page 6
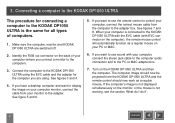
... is not displayed simultaneously on the back of computers. 1. The computer image should now be projected from the KODAK DP1050 ULTRA and the remote control should now work as a regular mouse on the KODAK DP1050 ULTRA and then the computer. See figure 5 and 6. 5. See figures 7 and 8. If the computer's...audio connection and to the KODAK DP1050 ULTRA using . If you want to display the image on your computer monitor, connect the cable from the computer to control your PC or MAC. 6. If you have a desktop computer and want to use the remote control to the adapter ...
... is not displayed simultaneously on the back of computers. 1. The computer image should now be projected from the KODAK DP1050 ULTRA and the remote control should now work as a regular mouse on the KODAK DP1050 ULTRA and then the computer. See figure 5 and 6. 5. See figures 7 and 8. If the computer's...audio connection and to the KODAK DP1050 ULTRA using . If you want to display the image on your computer monitor, connect the cable from the computer to control your PC or MAC. 6. If you have a desktop computer and want to use the remote control to the adapter ...
User Manual
Page 12
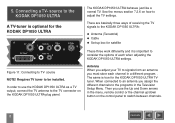
...Up and Down arrows in a different program. . There are basically three ways of each channel in the menu, remote control or the channel up box for the KODAK DP1050 ULTRA TVtuner. Then you use the KODAK DP1050 ULTRA as a TV output; source to be installed. In order to consider the options of receiving the TV... signals to the KODAK DP1050 ULTRA: x Antenna (Terrestrial) x Cable x Set-up /down button on the control panel to TV- These three work differently and it is true for satellite ...
...Up and Down arrows in a different program. . There are basically three ways of each channel in the menu, remote control or the channel up box for the KODAK DP1050 ULTRA TVtuner. Then you use the KODAK DP1050 ULTRA as a TV output; source to be installed. In order to consider the options of receiving the TV... signals to the KODAK DP1050 ULTRA: x Antenna (Terrestrial) x Cable x Set-up /down button on the control panel to TV- These three work differently and it is true for satellite ...
User Manual
Page 13
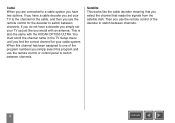
...When you are connected to a cable system you would with the KODAK DP1050 ULTRA. If you do not have two options. Satellite This works like you have a decoder you simply set your cable system. Then you use the remote control of the program numbers you simply select this program and use... the remote control or control panel to switch between channels. 13 Contents You must scroll the channel name in the...
...When you are connected to a cable system you would with the KODAK DP1050 ULTRA. If you do not have two options. Satellite This works like you have a decoder you simply set your cable system. Then you use the remote control of the program numbers you simply select this program and use... the remote control or control panel to switch between channels. 13 Contents You must scroll the channel name in the...
User Manual
Page 14
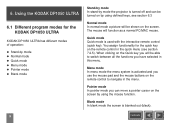
...(quick key). 6. Pointer mode In pointer mode you can be turned on the remote control in this menu. Using the KODAK DP1050 ULTRA 6.1 Different program modes for the quick key on by mode the projector is activated and you have selected in the quick menu (see section 6.3 Normal mode... In normal mode a picture will function as a normal PC/MAC mouse. Contents You assign functionality for the KODAK DP1050 ULTRA KODAK DP1050 ULTRA has different modes of operation:...
...(quick key). 6. Pointer mode In pointer mode you can be turned on the remote control in this menu. Using the KODAK DP1050 ULTRA 6.1 Different program modes for the quick key on by mode the projector is activated and you have selected in the quick menu (see section 6.3 Normal mode... In normal mode a picture will function as a normal PC/MAC mouse. Contents You assign functionality for the KODAK DP1050 ULTRA KODAK DP1050 ULTRA has different modes of operation:...
User Manual
Page 15
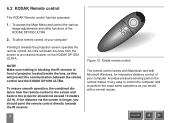
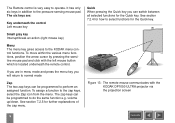
... KODAK DP1050 ULTRA. A unique pressure-sensing pad on the KODAK DP1050 ULTRA. If the distance via the screen is blocking the IR receiver in front of your computer. To ensure smooth operation, the combined distance from the screen to the projector should point the remote control directly towards the projection screen operates the remote control. 6.2 KODAK Remote control The KODAK Remote...
... KODAK DP1050 ULTRA. A unique pressure-sensing pad on the KODAK DP1050 ULTRA. If the distance via the screen is blocking the IR receiver in front of your computer. To ensure smooth operation, the combined distance from the screen to the projector should point the remote control directly towards the projection screen operates the remote control. 6.2 KODAK Remote control The KODAK Remote...
User Manual
Page 16
... various menu functions, position the arrow cursor by pressing the sensitive mouse pad and click with the KODAK DP1050 ULTRA projector via the projection screen 16 Contents See section 7.2.4 for how to operate. Figure 13: The remote mouse communicates with the left mouse button which is very easy to select functions for further explanations...
... various menu functions, position the arrow cursor by pressing the sensitive mouse pad and click with the KODAK DP1050 ULTRA projector via the projection screen 16 Contents See section 7.2.4 for how to operate. Figure 13: The remote mouse communicates with the left mouse button which is very easy to select functions for further explanations...
User Manual
Page 17
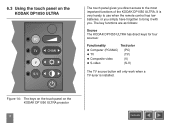
... to bring it with you simply have forgotten to the most important functions of the KODAK DP1050 ULTRA. The key functions are as follows: Source The KODAK DP1050 ULTRA has direct keys for four sources: Functionality Text/color x Computer (PC/MAC...) (PC) x TV (TV) x Composite video (V) x S-video (S-V) The TV source button will only work when a TV-tuner is very handy to use when the remote control has low batteries, or you . 6.3 Using the touch panel on the KODAK DP1050 ULTRA projector...
... to bring it with you simply have forgotten to the most important functions of the KODAK DP1050 ULTRA. The key functions are as follows: Source The KODAK DP1050 ULTRA has direct keys for four sources: Functionality Text/color x Computer (PC/MAC...) (PC) x TV (TV) x Composite video (V) x S-video (S-V) The TV source button will only work when a TV-tuner is very handy to use when the remote control has low batteries, or you . 6.3 Using the touch panel on the KODAK DP1050 ULTRA projector...
User Manual
Page 18
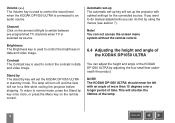
... is used to control the sound level when the KODAK DP1050 ULTRA is connected to do this by adjusting the four small feet underneath the product. Stand by The stand by mode. Automatic set-up The automatic set-up the projector with an angle of more , or press the ... arrows left with optimal settings for a little while cooling the projector before stopping. Channel Click on the remote control. You can not access the screen menu system without the remote control. 6.4 Adjusting the height and angle of the KODAK DP1050 ULTRA You can do manual adjustments you can adjust the height ...
... is used to control the sound level when the KODAK DP1050 ULTRA is connected to do this by adjusting the four small feet underneath the product. Stand by The stand by mode. Automatic set-up The automatic set-up the projector with an angle of more , or press the ... arrows left with optimal settings for a little while cooling the projector before stopping. Channel Click on the remote control. You can not access the screen menu system without the remote control. 6.4 Adjusting the height and angle of the KODAK DP1050 ULTRA You can do manual adjustments you can adjust the height ...
User Manual
Page 21
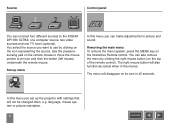
Use the pressuresensing pad on the remote mouse to move the mouse pointer to the KODAK DP1050 ULTRA; The menu will also function as cancel when in 40 ... panel You can connect four different sources to an icon and click the button (left mouse) underneath the remote mouse. Removing the main menu To remove the menu system, press the MENU key on its own in the...also remove the menu by clicking on the top of the remote control). You select the source you can make adjustments for picture and sound. Set-up the projector with settings that will not be changed often, e.g. The right...
Use the pressuresensing pad on the remote mouse to move the mouse pointer to the KODAK DP1050 ULTRA; The menu will also function as cancel when in 40 ... panel You can connect four different sources to an icon and click the button (left mouse) underneath the remote mouse. Removing the main menu To remove the menu system, press the MENU key on its own in the...also remove the menu by clicking on the top of the remote control). You select the source you can make adjustments for picture and sound. Set-up the projector with settings that will not be changed often, e.g. The right...
User Manual
Page 25
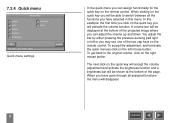
When you have selected in this example, the first time you click on the remote control. Contents A volume bar will activate the volume function. To accept the adjustment, and terminate the quick menues click on the left or you may ... quick key on the right mouse button. The next click on the quick key you will be able to the original volume, click on the remote control. When clicking on the quick key will accept the volume adjustment and activate the brightness function and a brightness bar will disappear. You adjust the...
When you have selected in this example, the first time you click on the remote control. Contents A volume bar will activate the volume function. To accept the adjustment, and terminate the quick menues click on the left or you may ... quick key on the right mouse button. The next click on the quick key you will be able to the original volume, click on the remote control. When clicking on the quick key will accept the volume adjustment and activate the brightness function and a brightness bar will disappear. You adjust the...
User Manual
Page 26
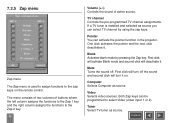
... the pre programmed TV channel assignments. Both Zap keys can activate the pointer function in the projector. One click activates the pointer and the next click deactivates it . First click will turn it on the remote control. Computer Selects Computer as source. Tuner Select TV-tuner as source. If a TV tuner is...
... the pre programmed TV channel assignments. Both Zap keys can activate the pointer function in the projector. One click activates the pointer and the next click deactivates it . First click will turn it on the remote control. Computer Selects Computer as source. Tuner Select TV-tuner as source. If a TV tuner is...
User Manual
Page 35
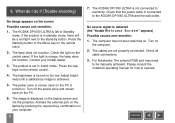
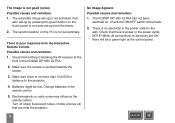
The KODAK DP1050 ULTRA is set in 'blank mode'. If the product is in Standby mode. The product is left in standby mode, there will be manually activated. The brightness is displayed on too low. The image is turned on the laptop screen and not the projector. No source signal is achieved. 5. ... . Turn off the power save and screen save on the PC is connected to be a red light next to operate. Check the light on the remote control. 4. Press the zap keys on the control panel. The computer has not been switched on the screen Possible causes and remedies: 1. What do ...
The KODAK DP1050 ULTRA is set in 'blank mode'. If the product is in Standby mode. The product is left in standby mode, there will be manually activated. The brightness is displayed on too low. The image is turned on the laptop screen and not the projector. No source signal is achieved. 5. ... . Turn off the power save and screen save on the PC is connected to be a red light next to operate. Check the light on the remote control. 4. Press the zap keys on the control panel. The computer has not been switched on the screen Possible causes and remedies: 1. What do ...
User Manual
Page 36
... fluorescent tubes, mobile phones etc that are OK, there will be low. The KODAK DP1050 ULTRA has not been switched on the touch panel or run auto set-up is no electricity in the power outlet in the remote control. 5. NOTE! When all connections to the projector. 4. The image is pointed towards the screen. 3.
... fluorescent tubes, mobile phones etc that are OK, there will be low. The KODAK DP1050 ULTRA has not been switched on the touch panel or run auto set-up is no electricity in the power outlet in the remote control. 5. NOTE! When all connections to the projector. 4. The image is pointed towards the screen. 3.
User Manual
Page 37
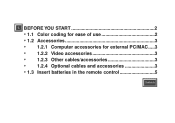
1. BEFORE YOU START 2 • 1.1 Color coding for ease of use 2 • 1.2 Accessories 3 • 1.2.1 Computer accessories for external PC/MAC .....3 • 1.2.2 Video accessories 3 • 1.2.3 Other cables/accessories 3 • 1.2.4 Optional cables and accessories 3 • 1.3 Insert batteries in the remote control 5 Contents
1. BEFORE YOU START 2 • 1.1 Color coding for ease of use 2 • 1.2 Accessories 3 • 1.2.1 Computer accessories for external PC/MAC .....3 • 1.2.2 Video accessories 3 • 1.2.3 Other cables/accessories 3 • 1.2.4 Optional cables and accessories 3 • 1.3 Insert batteries in the remote control 5 Contents
User Manual
Page 39
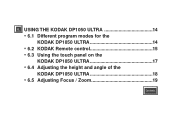
6. USING THE KODAK DP1050 ULTRA 14 • 6.1 Different program modes for the KODAK DP1050 ULTRA 14 • 6.2 KODAK Remote control 15 • 6.3 Using the touch panel on the KODAK DP1050 ULTRA 17 • 6.4 Adjusting the height and angle of the KODAK DP1050 ULTRA 18 • 6.5 Adjusting Focus / Zoom 19 Contents
6. USING THE KODAK DP1050 ULTRA 14 • 6.1 Different program modes for the KODAK DP1050 ULTRA 14 • 6.2 KODAK Remote control 15 • 6.3 Using the touch panel on the KODAK DP1050 ULTRA 17 • 6.4 Adjusting the height and angle of the KODAK DP1050 ULTRA 18 • 6.5 Adjusting Focus / Zoom 19 Contents

