User Manual
Page 15
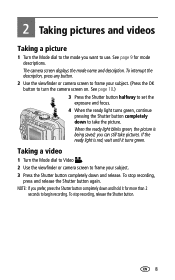
... video 1 Turn the Mode dial to Video . 2 Use the viewfinder or camera screen to turn the camera screen on. To stop recording, press and release the Shutter button again. When the ready light blinks green, the picture is red, wait until it for mode descriptions. See page 9 for more than 2 ...seconds to begin recording. To interrupt the description, press any button. 2 Use the viewfinder or camera screen to frame your subject. (Press the...
... video 1 Turn the Mode dial to Video . 2 Use the viewfinder or camera screen to turn the camera screen on. To stop recording, press and release the Shutter button again. When the ready light blinks green, the picture is red, wait until it for mode descriptions. See page 9 for more than 2 ...seconds to begin recording. To interrupt the description, press any button. 2 Use the viewfinder or camera screen to frame your subject. (Press the...

User Manual
Page 18
... focus on the desired subject (or if the framing marks disappear and the Ready light blinks red), release your finger, recompose the scene, and go to Step 2. NOTE: Framing marks appear only when the camera screen is not focusing on foreground subjects, even if the subjects are not centered .... When the framing marks turn on . Taking pictures and videos Using the auto-focus framing marks When using the camera screen as a viewfinder, framing marks indicate where the camera is accomplished. Framing marks do not appear in the scene. NOTE: This procedure does not apply to videos. 1...
... focus on the desired subject (or if the framing marks disappear and the Ready light blinks red), release your finger, recompose the scene, and go to Step 2. NOTE: Framing marks appear only when the camera screen is not focusing on foreground subjects, even if the subjects are not centered .... When the framing marks turn on . Taking pictures and videos Using the auto-focus framing marks When using the camera screen as a viewfinder, framing marks indicate where the camera is accomplished. Framing marks do not appear in the scene. NOTE: This procedure does not apply to videos. 1...
User Manual
Page 48
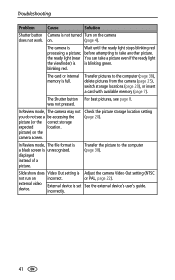
...light (near You can take another picture. Transfer pictures to the computer (page 38). Transfer the picture to the computer (page 38), delete pictures from the camera (page 25), switch storage locations (page 20), or insert a card with available memory (page 7). incorrectly. 41 on the camera screen. The camera is blinking... Video Out setting is not turned Turn on the camera does not work. blinking red. picture) on . (page 4). Troubleshooting Problem Cause Solution Shutter button Camera is Adjust the camera Video Out setting (NTSC not run on incorrect. ...
...light (near You can take another picture. Transfer pictures to the computer (page 38). Transfer the picture to the computer (page 38), delete pictures from the camera (page 25), switch storage locations (page 20), or insert a card with available memory (page 7). incorrectly. 41 on the camera screen. The camera is blinking... Video Out setting is not turned Turn on the camera does not work. blinking red. picture) on . (page 4). Troubleshooting Problem Cause Solution Shutter button Camera is Adjust the camera Video Out setting (NTSC not run on incorrect. ...
User Manual
Page 53
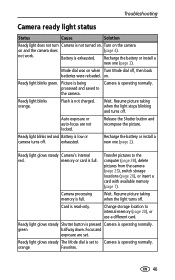
Mode dial was on . Ready light blinks green. Ready light blinks orange. Release the Shutter button and recompose the picture. Ready light blinks red and Battery is low or camera turns off , then back batteries were reloaded. Ready light glows steady Shutter button is pressed Camera is read-only. orange Favorites. 46 on and the camera does (page 4). processed and saved to...
Mode dial was on . Ready light blinks green. Ready light blinks orange. Release the Shutter button and recompose the picture. Ready light blinks red and Battery is low or camera turns off , then back batteries were reloaded. Ready light glows steady Shutter button is pressed Camera is read-only. orange Favorites. 46 on and the camera does (page 4). processed and saved to...


