
User Manual
Page 3
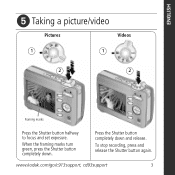
To stop recording, press and release the Shutter button again. www.kodak.com/go/c913support, cd93support 3 ENGLISH ᕥ Taking a picture/video Pictures Videos 1 1 2 2 Framing marks Press the Shutter button halfway to focus and set exposure. When the framing marks turn green, press the Shutter button completely down and release. Press the Shutter button completely down .
To stop recording, press and release the Shutter button again. www.kodak.com/go/c913support, cd93support 3 ENGLISH ᕥ Taking a picture/video Pictures Videos 1 1 2 2 Framing marks Press the Shutter button halfway to focus and set exposure. When the framing marks turn green, press the Shutter button completely down and release. Press the Shutter button completely down .
User Manual
Page 4
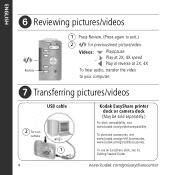
... /cd93accessories. To purchase accessories, visit www.kodak.com/go/c913accessories, www.kodak.com/go /easysharecenter ENGLISH ᕦ Reviewing pictures/videos 1 Press Review. (Press again to your computer. ᕧ Transferring pictures/videos USB cable 2 Turn on camera 1 4 Kodak EasyShare printer dock or camera dock (May be sold separately.) For dock compatibility, visit www.kodak.com/go/dockcompatibility. To use an...
... /cd93accessories. To purchase accessories, visit www.kodak.com/go/c913accessories, www.kodak.com/go /easysharecenter ENGLISH ᕦ Reviewing pictures/videos 1 Press Review. (Press again to your computer. ᕧ Transferring pictures/videos USB cable 2 Turn on camera 1 4 Kodak EasyShare printer dock or camera dock (May be sold separately.) For dock compatibility, visit www.kodak.com/go/dockcompatibility. To use an...

User Manual
Page 5
... your computer Keep learning! You have: • set up your camera • taken pictures • transferred pictures to your best pictures! Congratulations! To better understand each menu option, use camera Help. (Highlight a menu choice, then press the button.) Visit www.kodak.com/go/c913support or www.kodak.com/go/cd93support for: • the extended user's guide •...
... your computer Keep learning! You have: • set up your camera • taken pictures • transferred pictures to your best pictures! Congratulations! To better understand each menu option, use camera Help. (Highlight a menu choice, then press the button.) Visit www.kodak.com/go/c913support or www.kodak.com/go/cd93support for: • the extended user's guide •...

User Manual
Page 8
CAUTION: A card can purchase an SD card to store more with your camera Storing pictures on the camera. If you insert or remove a card while the camera is accessing it may be inserted one way; We recommend Kodak SD cards. 1 Turn off the camera. 2 Insert or remove the optional card. 3 Turn on an SD card Your camera has internal memory. forcing it , the card, pictures, or camera may cause damage. 1 Doing more pictures and videos (www.kodak.com/go/c913accessories, www.kodak.com/go /easysharecenter You can only be damaged. 8 www.kodak.com/go /cd93accessories).
CAUTION: A card can purchase an SD card to store more with your camera Storing pictures on the camera. If you insert or remove a card while the camera is accessing it may be inserted one way; We recommend Kodak SD cards. 1 Turn off the camera. 2 Insert or remove the optional card. 3 Turn on an SD card Your camera has internal memory. forcing it , the card, pictures, or camera may cause damage. 1 Doing more pictures and videos (www.kodak.com/go/c913accessories, www.kodak.com/go /easysharecenter You can only be damaged. 8 www.kodak.com/go /cd93accessories).
User Manual
Page 9
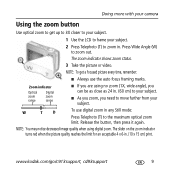
...kodak.com/go/c913support, cd93support 9 Doing more with your camera Using the zoom button Use optical zoom to get a focused picture every time, remember: I Always use digital zoom in any Still mode: Press Telephoto (T) to zoom out. Release the button, then press it again. The slider on the zoom indicator turns red when the picture... as 24 in. (60 cm) to zoom in . (10 x 15 cm) print. The zoom indicator shows zoom status. 3 Take the picture or video. I If you need to move further from your subject. 2 Press Telephoto (T) to your subject. Press Wide Angle (W) to the ...
...kodak.com/go/c913support, cd93support 9 Doing more with your camera Using the zoom button Use optical zoom to get a focused picture every time, remember: I Always use digital zoom in any Still mode: Press Telephoto (T) to zoom out. Release the button, then press it again. The slider on the zoom indicator turns red when the picture... as 24 in. (60 cm) to zoom in . (10 x 15 cm) print. The zoom indicator shows zoom status. 3 Take the picture or video. I If you need to move further from your subject. 2 Press Telephoto (T) to your subject. Press Wide Angle (W) to the ...
User Manual
Page 10
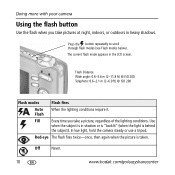
... 200 Flash modes Flash fires Auto When the lighting conditions require it. Off Never. 10 www.kodak.com/go/easysharecenter Doing more with your camera Using the flash button Use the flash when you take pictures at night, indoors, or outdoors in the LCD screen. Press the button repeatedly to scroll through flash...
... 200 Flash modes Flash fires Auto When the lighting conditions require it. Off Never. 10 www.kodak.com/go/easysharecenter Doing more with your camera Using the flash button Use the flash when you take pictures at night, indoors, or outdoors in the LCD screen. Press the button repeatedly to scroll through flash...
User Manual
Page 11
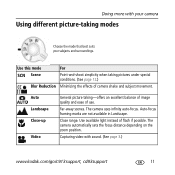
... infinity auto-focus. Use available light instead of camera shake and subject movement. Doing more with sound. (See page 3.) www.kodak.com/go/c913support, cd93support 11 Close range. Auto Landscape Close-up Video General picture taking modes Choose the mode that best suits your ... Blur Reduction Minimizing the effects of flash if possible. Capturing video with your camera Using different picture-taking -offers an excellent balance of image quality and ease of use. The camera automatically sets the focus distance depending on the zoom position. Auto-focus framing marks...
... infinity auto-focus. Use available light instead of camera shake and subject movement. Doing more with sound. (See page 3.) www.kodak.com/go/c913support, cd93support 11 Close range. Auto Landscape Close-up Video General picture taking modes Choose the mode that best suits your ... Blur Reduction Minimizing the effects of flash if possible. Capturing video with your camera Using different picture-taking -offers an excellent balance of image quality and ease of use. The camera automatically sets the focus distance depending on the zoom position. Auto-focus framing marks...
User Manual
Page 12
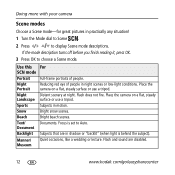
Place the camera on a flat, steady Landscape surface or use a tripod. Snow Bright snow scenes. If the mode description ... Focus is behind the subject). Document Backlight Subjects that are disabled. 12 www.kodak.com/go/easysharecenter Doing more with your camera Scene modes Choose a Scene mode-for great pictures in motion. Beach Bright beach scenes. Use this For SCN mode Portrait Full-...Manner/ Museum Quiet occasions, like a wedding or lecture. Night Distant scenery at night. Place the camera on a flat, steady surface or use a tripod. Text/ Documents.
Place the camera on a flat, steady Landscape surface or use a tripod. Snow Bright snow scenes. If the mode description ... Focus is behind the subject). Document Backlight Subjects that are disabled. 12 www.kodak.com/go/easysharecenter Doing more with your camera Scene modes Choose a Scene mode-for great pictures in motion. Beach Bright beach scenes. Use this For SCN mode Portrait Full-...Manner/ Museum Quiet occasions, like a wedding or lecture. Night Distant scenery at night. Place the camera on a flat, steady surface or use a tripod. Text/ Documents.
User Manual
Page 13
... bright light. Focus is set to exit the menu. SelfPortrait Close-ups of flowers or other small subjects in bright light. www.kodak.com/go/c913support, cd93support 13 I Press the Menu button to Auto. NOTE: Some settings remain until you change settings to get the... displays. Sunset Capturing the deep hues seen at sunset. Flash does not fire. Children Action pictures of children in low-light scenes. Using the menu button You can change them; Doing more with your camera. 1 Press the Menu button. 2 Press to highlight a setting, then press OK. 3...
... bright light. Focus is set to exit the menu. SelfPortrait Close-ups of flowers or other small subjects in bright light. www.kodak.com/go/c913support, cd93support 13 I Press the Menu button to Auto. NOTE: Some settings remain until you change settings to get the... displays. Sunset Capturing the deep hues seen at sunset. Flash does not fire. Children Action pictures of children in low-light scenes. Using the menu button You can change them; Doing more with your camera. 1 Press the Menu button. 2 Press to highlight a setting, then press OK. 3...
User Manual
Page 14
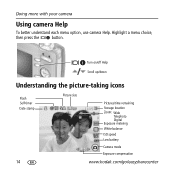
Doing more with your camera Using camera Help To better understand each menu option, use camera Help. Highlight a menu choice, then press the button. Turn on/off Help Scroll up/down Understanding the picture-taking icons Flash Self-timer Date stamp 14 Picture size Pictures/time remaining Storage location Zoom: Wide Telephoto Digital Exposure metering White balance ISO speed Low battery Camera mode Exposure compensation www.kodak.com/go/easysharecenter
Doing more with your camera Using camera Help To better understand each menu option, use camera Help. Highlight a menu choice, then press the button. Turn on/off Help Scroll up/down Understanding the picture-taking icons Flash Self-timer Date stamp 14 Picture size Pictures/time remaining Storage location Zoom: Wide Telephoto Digital Exposure metering White balance ISO speed Low battery Camera mode Exposure compensation www.kodak.com/go/easysharecenter
User Manual
Page 15
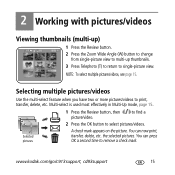
... OK a second time to select pictures/videos. www.kodak.com/go/c913support, cd93support 15 Selecting multiple pictures/videos Use the multi-select feature when you have two or more pictures/videos to single-picture view. You can now print, transfer, delete, etc. Selected pictures A check mark appears on the picture. the selected pictures. to find a 2 Press the OK...
... OK a second time to select pictures/videos. www.kodak.com/go/c913support, cd93support 15 Selecting multiple pictures/videos Use the multi-select feature when you have two or more pictures/videos to single-picture view. You can now print, transfer, delete, etc. Selected pictures A check mark appears on the picture. the selected pictures. to find a 2 Press the OK...
User Manual
Page 16
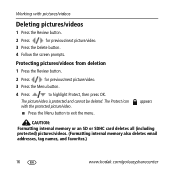
... Follow the screen prompts. The Protect icon with pictures/videos Deleting pictures/videos 1 Press the Review button. 2 Press for previous/next picture/video. 3 Press the Menu button. 4 Press to exit the menu. Working with the protected picture/video. I Press the Menu button to highlight ... CAUTION: Formatting internal memory or an SD or SDHC card deletes all (including protected) pictures/videos. (Formatting internal memory also deletes email addresses, tag names, and favorites.) 16 www.kodak.com/go/easysharecenter The picture/video is protected and cannot be deleted.
... Follow the screen prompts. The Protect icon with pictures/videos Deleting pictures/videos 1 Press the Review button. 2 Press for previous/next picture/video. 3 Press the Menu button. 4 Press to exit the menu. Working with the protected picture/video. I Press the Menu button to highlight ... CAUTION: Formatting internal memory or an SD or SDHC card deletes all (including protected) pictures/videos. (Formatting internal memory also deletes email addresses, tag names, and favorites.) 16 www.kodak.com/go/easysharecenter The picture/video is protected and cannot be deleted.
User Manual
Page 17
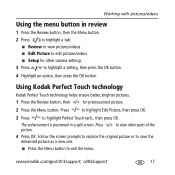
...OK. Press picture. I Setup for previous/next picture. 2 Press the Menu button. Working with pictures/videos Using the menu button in a split screen. www.kodak.com/go/c913support, cd93support 17 Press to highlight Edit Picture, then press OK. 3 Press to save the enhanced picture as a...Press to highlight a tab: I Review to view pictures/videos I Edit Picture to edit pictures/videos I Press the Menu button to highlight a setting, then press the OK button. 4 Highlight an option, then press the OK button. to view other camera settings 3 Press to exit the menu.
...OK. Press picture. I Setup for previous/next picture. 2 Press the Menu button. Working with pictures/videos Using the menu button in a split screen. www.kodak.com/go/c913support, cd93support 17 Press to highlight Edit Picture, then press OK. 3 Press to save the enhanced picture as a...Press to highlight a tab: I Review to view pictures/videos I Edit Picture to edit pictures/videos I Press the Menu button to highlight a setting, then press the OK button. 4 Highlight an option, then press the OK button. to view other camera settings 3 Press to exit the menu.
User Manual
Page 18
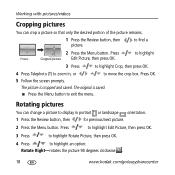
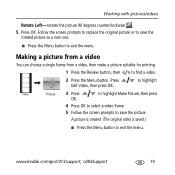
... display in , or to highlight an option: Rotate Right-rotates the picture 90 degrees clockwise . 18 www.kodak.com/go/easysharecenter Press OK. 5 Follow the screen prompts. Working with pictures/videos Cropping pictures You can change a picture to find a 2 Press the Menu button. I Press the Menu button to exit the menu. The original is cropped...
... display in , or to highlight an option: Rotate Right-rotates the picture 90 degrees clockwise . 18 www.kodak.com/go/easysharecenter Press OK. 5 Follow the screen prompts. Working with pictures/videos Cropping pictures You can change a picture to find a 2 Press the Menu button. I Press the Menu button to exit the menu. The original is cropped...
User Manual
Page 19
..., then to exit the menu. Press Edit Video, then press OK. A picture is created. (The original video is saved.) I Press the Menu button to save the picture. to highlight Video Picture 3 Press to highlight Make Picture, then press OK. 4 Press OK to select a video frame. 5 Follow... the screen prompts to save the rotated picture as a new one. Follow the screen prompts to replace the original picture or to exit the menu. I Press the Menu button to find a video. 2 Press the Menu button. www.kodak...
..., then to exit the menu. Press Edit Video, then press OK. A picture is created. (The original video is saved.) I Press the Menu button to save the picture. to highlight Video Picture 3 Press to highlight Make Picture, then press OK. 4 Press OK to select a video frame. 5 Follow... the screen prompts to save the rotated picture as a new one. Follow the screen prompts to replace the original picture or to exit the menu. I Press the Menu button to find a video. 2 Press the Menu button. www.kodak...
User Manual
Page 20
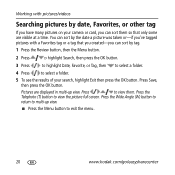
...Press the Menu button to multi-up view. Press the Wide Angle (W) button to return to exit the menu. 20 www.kodak.com/go/easysharecenter Press to view the picture full-screen. Press Save, then press the OK button. Press the Telephoto (T) button to view them so that you created..., or Tag, then to select a folder. 4 Press to select a folder. 5 To see the results of your camera or card, you can sort them . Working with pictures/videos Searching pictures by date, Favorites, or other tag If you have many pictures on your search, highlight Exit then press the OK button.
...Press the Menu button to multi-up view. Press the Wide Angle (W) button to return to exit the menu. 20 www.kodak.com/go/easysharecenter Press to view the picture full-screen. Press Save, then press the OK button. Press the Telephoto (T) button to view them so that you created..., or Tag, then to select a folder. 4 Press to select a folder. 5 To see the results of your camera or card, you can sort them . Working with pictures/videos Searching pictures by date, Favorites, or other tag If you have many pictures on your search, highlight Exit then press the OK button.
User Manual
Page 21
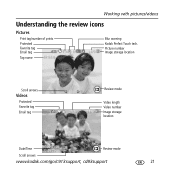
Working with pictures/videos Understanding the review icons Pictures Print tag/number of prints Protected Favorite tag Email tag Tag name Blur warning Kodak Perfect Touch tech. Picture number Image storage location Scroll arrows Videos Protected Favorite tag Email tag Review mode Video length Video number Image storage location Date/Time Review mode Scroll arrows www.kodak.com/go/c913support, cd93support 21
Working with pictures/videos Understanding the review icons Pictures Print tag/number of prints Protected Favorite tag Email tag Tag name Blur warning Kodak Perfect Touch tech. Picture number Image storage location Scroll arrows Videos Protected Favorite tag Email tag Review mode Video length Video number Image storage location Date/Time Review mode Scroll arrows www.kodak.com/go/c913support, cd93support 21
User Manual
Page 22
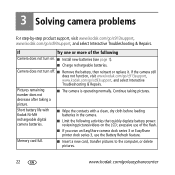
I Wipe the contacts with Kodak Ni-MH rechargeable digital camera batteries. Continue taking a picture. Short battery life with a clean, dry cloth before loading batteries in the camera. I Charge rechargeable batteries. I Install new batteries (see page 1). Memory card full. 3 Solving camera problems For step-by-step product support, visit www.kodak.com/go/c913support, www.kodak.com/go /cd93support, and...
I Wipe the contacts with Kodak Ni-MH rechargeable digital camera batteries. Continue taking a picture. Short battery life with a clean, dry cloth before loading batteries in the camera. I Charge rechargeable batteries. I Install new batteries (see page 1). Memory card full. 3 Solving camera problems For step-by-step product support, visit www.kodak.com/go/c913support, www.kodak.com/go /cd93support, and...


