
User Manual
Page 6
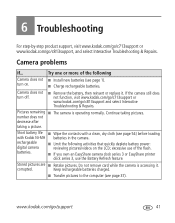
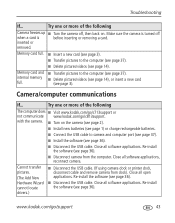
Table of contents 5 Transferring and printing pictures 36 Installing the software 36 Transferring pictures with the USB cable 37 Printing pictures 38 Dock compatibility for your camera 40 6 Troubleshooting 41 Camera problems 41 Camera/computer communications 43 LCD screen messages 44 7 Getting help 47 Helpful links 47 8 Appendix 49 Camera specifications 49 Care and maintenance 51 Upgrading your software and firmware 52 Storage capacities 52 Important safety instructions 52 Battery life 53 Limited Warranty 54 Regulatory compliance 56 iv www.kodak.com/go/support
Table of contents 5 Transferring and printing pictures 36 Installing the software 36 Transferring pictures with the USB cable 37 Printing pictures 38 Dock compatibility for your camera 40 6 Troubleshooting 41 Camera problems 41 Camera/computer communications 43 LCD screen messages 44 7 Getting help 47 Helpful links 47 8 Appendix 49 Camera specifications 49 Care and maintenance 51 Upgrading your software and firmware 52 Storage capacities 52 Important safety instructions 52 Battery life 53 Limited Warranty 54 Regulatory compliance 56 iv www.kodak.com/go/support
User Manual
Page 11
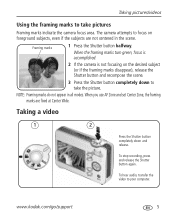
... Using the framing marks to your computer. To hear audio, transfer the video to take the picture. When you use AF Zone and set Center Zone, the framing marks are not centered in all modes. www.kodak.com/go/support 5 Taking a video 1 2 Press the Shutter button ...marks disappear), release the Shutter button and recompose the scene. 3 Press the Shutter button completely down and release. The camera attempts to take pictures Framing marks indicate the camera focus area. NOTE: Framing marks do not appear in the scene. Framing marks 1 Press the Shutter button halfway....
... Using the framing marks to your computer. To hear audio, transfer the video to take the picture. When you use AF Zone and set Center Zone, the framing marks are not centered in all modes. www.kodak.com/go/support 5 Taking a video 1 2 Press the Shutter button ...marks disappear), release the Shutter button and recompose the scene. 3 Press the Shutter button completely down and release. The camera attempts to take pictures Framing marks indicate the camera focus area. NOTE: Framing marks do not appear in the scene. Framing marks 1 Press the Shutter button halfway....
User Manual
Page 19
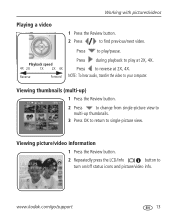
...Press to play at 2X, 4X. NOTE: To hear audio, transfer the video to turn on/off status icons and picture/video info. Viewing thumbnails (multi-up) 1 Press the Review button. 2 Press to change from single-picture view to multi-up thumbnails. 3 Press OK to return to find... previous/next video. www.kodak.com/go/support 13 Working with pictures/videos Playing a video 1 Press the Review button. 2 Press to single-picture view. Press to reverse at 2X, 4X.
...Press to play at 2X, 4X. NOTE: To hear audio, transfer the video to turn on/off status icons and picture/video info. Viewing thumbnails (multi-up) 1 Press the Review button. 2 Press to change from single-picture view to multi-up thumbnails. 3 Press OK to return to find... previous/next video. www.kodak.com/go/support 13 Working with pictures/videos Playing a video 1 Press the Review button. 2 Press to single-picture view. Press to reverse at 2X, 4X.
User Manual
Page 34
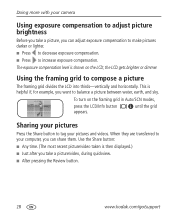
.../Info button appears. Doing more with your camera Using exposure compensation to adjust picture brightness Before you take a picture/video, during quickview. ■ After pressing the Review button. 28 www.kodak.com/go/support Using the framing grid to your pictures and videos. When they are transferred to compose a picture The framing grid divides the LCD into...
.../Info button appears. Doing more with your camera Using exposure compensation to adjust picture brightness Before you take a picture/video, during quickview. ■ After pressing the Review button. 28 www.kodak.com/go/support Using the framing grid to your pictures and videos. When they are transferred to compose a picture The framing grid divides the LCD into...
User Manual
Page 35
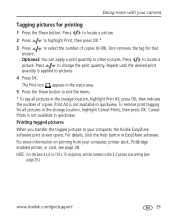
..., press OK, then indicate the number of copies (0-99). For more with your camera Tagging pictures for that picture. Optional: You can apply a print quantity to your computer, the Kodak EasyShare software print screen opens. Printing tagged pictures When you transfer the tagged pictures to other pictures. NOTE: For the best 4 x 6 in quickview. Print All is applied to exit...
..., press OK, then indicate the number of copies (0-99). For more with your camera Tagging pictures for that picture. Optional: You can apply a print quantity to your computer, the Kodak EasyShare software print screen opens. Printing tagged pictures When you transfer the tagged pictures to other pictures. NOTE: For the best 4 x 6 in quickview. Print All is applied to exit...
User Manual
Page 36
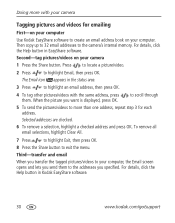
...Kodak EasyShare software. 30 www.kodak.com/go/support When the picture you want is displayed, press OK. To remove all email selections, highlight Clear All. 7 Press to highlight Exit, then press OK. 8 Press the Share button to highlight Email, then press OK. Second-tag pictures/videos on your computer. Third-transfer... and email When you transfer the tagged pictures/videos to your camera 1 Press the Share button. Press to locate a picture/video. 2 Press to exit the menu. The ...
...Kodak EasyShare software. 30 www.kodak.com/go/support When the picture you want is displayed, press OK. To remove all email selections, highlight Clear All. 7 Press to highlight Exit, then press OK. 8 Press the Share button to highlight Email, then press OK. Second-tag pictures/videos on your computer. Third-transfer... and email When you transfer the tagged pictures/videos to your camera 1 Press the Share button. Press to locate a picture/video. 2 Press to exit the menu. The ...
User Manual
Page 37
... your camera's internal memory. 3. Then, your pictures are loaded to the computer. Favorite pictures (smaller versions of the originals) are transferred to the Favorites section of your camera's internal memory, then share them with this camera. (See page 36.) 2 Connect the camera to the computer using the USB cable (see page 37) or an EasyShare dock. www.kodak.com...
... your camera's internal memory. 3. Then, your pictures are loaded to the computer. Favorite pictures (smaller versions of the originals) are transferred to the Favorites section of your camera's internal memory, then share them with this camera. (See page 36.) 2 Connect the camera to the computer using the USB cable (see page 37) or an EasyShare dock. www.kodak.com...
User Manual
Page 38
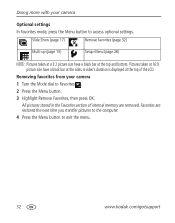
... your camera Optional settings In Favorites mode, press the Menu button to access optional settings. Pictures taken at 16:9 picture size have a black bar at the top and bottom. All pictures stored ...in the Favorites section of the LCD. Favorites are removed. Doing more with your camera 1... Setup Menu (page 26) NOTE: Pictures taken at a 3:2 picture size have a black bar at the top of internal memory are restored the next time you transfer pictures to the computer. 4 Press the ...
... your camera Optional settings In Favorites mode, press the Menu button to access optional settings. Pictures taken at 16:9 picture size have a black bar at the top and bottom. All pictures stored ...in the Favorites section of the LCD. Favorites are removed. Doing more with your camera 1... Setup Menu (page 26) NOTE: Pictures taken at a 3:2 picture size have a black bar at the top of internal memory are restored the next time you transfer pictures to the computer. 4 Press the ...
User Manual
Page 39
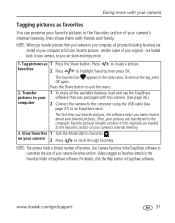
... pictures/videos in Favorites mode. Tagging pictures/videos for albums Use the Album feature in Review mode to 4 x 6 in. (10 x 15 cm). www.kodak.com/go/support 33 To delete favorites from another source) are good for details. See EasyShare software Help for prints up to 32 album names to create albums on this camera...
... pictures/videos in Favorites mode. Tagging pictures/videos for albums Use the Album feature in Review mode to 4 x 6 in. (10 x 15 cm). www.kodak.com/go/support 33 To delete favorites from another source) are good for details. See EasyShare software Help for prints up to 32 album names to create albums on this camera...
User Manual
Page 40
..., then press OK. 4 Press to your computer, EasyShare software opens and categorizes your pictures/videos in the appropriate album folder. See EasyShare software Help for details. 34 www.kodak.com/go/support Then, all album selections, select Clear All. Third-transfer to your computer When you connect the camera to the computer, copy up to 32...
..., then press OK. 4 Press to your computer, EasyShare software opens and categorizes your pictures/videos in the appropriate album folder. See EasyShare software Help for details. 34 www.kodak.com/go/support Then, all album selections, select Clear All. Third-transfer to your computer When you connect the camera to the computer, copy up to 32...
User Manual
Page 41
... Help for albums. Selected albums are saved. Third-transfer to your computer, EasyShare software opens and categorizes your pictures in the appropriate album. Your selections are noted with your camera 1 In any mode, press the Menu button. 2 Press to highlight Set Album, then press OK. 3 Press to exit the menu....OK. If you transfer the tagged pictures or videos to your computer When you turn on the LCD, your album selection is selected. 6 Press the Menu button to highlight an album name, then press OK. www.kodak.com/go/support 35 Repeat to mark pictures or videos for ...
... Help for albums. Selected albums are saved. Third-transfer to your computer, EasyShare software opens and categorizes your pictures in the appropriate album. Your selections are noted with your camera 1 In any mode, press the Menu button. 2 Press to highlight Set Album, then press OK. 3 Press to exit the menu....OK. If you transfer the tagged pictures or videos to your computer When you turn on the LCD, your album selection is selected. 6 Press the Menu button to highlight an album name, then press OK. www.kodak.com/go/support 35 Repeat to mark pictures or videos for ...
User Manual
Page 42
... the CD icon on the desktop, then click the Install icon. 4 Follow the on your camera and software. To register later, visit www.kodak.com/go /support 5 Transferring and printing pictures Installing the software CAUTION: Install EasyShare software before connecting the camera to install the software. NOTE: When prompted, take few minutes to load incorrectly. 1 Close...
... the CD icon on the desktop, then click the Install icon. 4 Follow the on your camera and software. To register later, visit www.kodak.com/go /support 5 Transferring and printing pictures Installing the software CAUTION: Install EasyShare software before connecting the camera to install the software. NOTE: When prompted, take few minutes to load incorrectly. 1 Close...
User Manual
Page 43
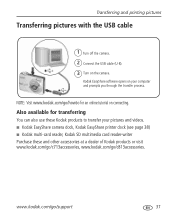
Also available for an online tutorial on connecting. Kodak EasyShare software opens on the camera. Transferring and printing pictures Transferring pictures with the USB cable 1 Turn off the camera. 2 Connect the USB cable (U-8). 3 Turn on your pictures and videos. ■ Kodak EasyShare camera dock, Kodak EasyShare printer dock (see page 38) ■ Kodak multi-card reader, Kodak SD multimedia card reader-writer Purchase these and other accessories...
Also available for an online tutorial on connecting. Kodak EasyShare software opens on the camera. Transferring and printing pictures Transferring pictures with the USB cable 1 Turn off the camera. 2 Connect the USB cable (U-8). 3 Turn on your pictures and videos. ■ Kodak EasyShare camera dock, Kodak EasyShare printer dock (see page 38) ■ Kodak multi-card reader, Kodak SD multimedia card reader-writer Purchase these and other accessories...
User Manual
Page 44
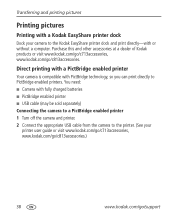
Transferring and printing pictures Printing pictures Printing with a Kodak EasyShare printer dock Dock your camera to the Kodak EasyShare printer dock and print directly-with PictBridge technology, so you can print directly to the printer. (See your printer user guide or visit www.kodak.com/go/c713accessories, www.kodak.com/go/c813accessories.) 38 www.kodak.com/go /c813accessories. Direct printing with a PictBridge...
Transferring and printing pictures Printing pictures Printing with a Kodak EasyShare printer dock Dock your camera to the Kodak EasyShare printer dock and print directly-with PictBridge technology, so you can print directly to the printer. (See your printer user guide or visit www.kodak.com/go/c713accessories, www.kodak.com/go/c813accessories.) 38 www.kodak.com/go /c813accessories. Direct printing with a PictBridge...
User Manual
Page 45
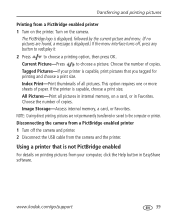
... or printer. Index Print-Print thumbnails of copies. NOTE: During direct printing, pictures are found, a message is capable, choose a print size. Choose the number of all pictures in EasyShare software. Image Storage-Access internal memory, a card, or Favorites. Turn on ...internal memory, on the camera. The PictBridge logo is displayed, followed by the current picture and menu. (If no pictures are not permanently transferred or saved to choose a picture. www.kodak.com/go/support 39 All Pictures-Print all pictures. Disconnecting the camera from a PictBridge enabled ...
... or printer. Index Print-Print thumbnails of copies. NOTE: During direct printing, pictures are found, a message is capable, choose a print size. Choose the number of all pictures in EasyShare software. Image Storage-Access internal memory, a card, or Favorites. Turn on ...internal memory, on the camera. The PictBridge logo is displayed, followed by the current picture and menu. (If no pictures are not permanently transferred or saved to choose a picture. www.kodak.com/go/support 39 All Pictures-Print all pictures. Disconnecting the camera from a PictBridge enabled ...
User Manual
Page 46
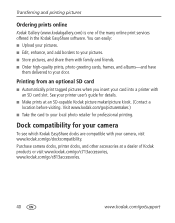
...Printing from an optional SD card ■ Automatically print tagged pictures when you insert your printer user's guide for professional printing. Dock compatibility for your camera To see which Kodak EasyShare docks are compatible with family and friends. ■ Order high... Kodak EasyShare software. Purchase camera docks, printer docks, and other accessories at an SD-capable Kodak picture maker/picture kiosk. (Contact a location before visiting. Visit www.kodak.com/go/picturemaker.) ■ Take the card to your door. Transferring and printing pictures Ordering prints online Kodak ...
...Printing from an optional SD card ■ Automatically print tagged pictures when you insert your printer user's guide for professional printing. Dock compatibility for your camera To see which Kodak EasyShare docks are compatible with family and friends. ■ Order high... Kodak EasyShare software. Purchase camera docks, printer docks, and other accessories at an SD-capable Kodak picture maker/picture kiosk. (Contact a location before visiting. Visit www.kodak.com/go/picturemaker.) ■ Take the card to your door. Transferring and printing pictures Ordering prints online Kodak ...
User Manual
Page 47
...; rechargeable digital camera ■ Limit the following Camera does not ■ Install new batteries (see page 1). Keep rechargeable batteries charged. ■ Transfer pictures to the computer (see page 54) before loading with Kodak Ni-MH batteries in the camera. turn off. ■ Remove the battery, then reinsert or replace it . batteries. ■ If you own an EasyShare camera dock...
...; rechargeable digital camera ■ Limit the following Camera does not ■ Install new batteries (see page 1). Keep rechargeable batteries charged. ■ Transfer pictures to the computer (see page 54) before loading with Kodak Ni-MH batteries in the camera. turn off. ■ Remove the battery, then reinsert or replace it . batteries. ■ If you own an EasyShare camera dock...

User Manual
Page 48
...camera and the subject. ■ Place the camera on the camera (see page 2). ■ Transfer pictures to the computer (see page 37), delete pictures from the camera (see page 14), switch image storage locations (see page 25), or insert a card with available memory (see page 3). 42 www.kodak.com/go/support Camera... does not ■ Purchase a certified SD card. recognize SD card. ■ Insert a card into the slot, then push to the computer (see a picture (or the expected picture) on the flash (see page 7). ■...
...camera and the subject. ■ Place the camera on the camera (see page 2). ■ Transfer pictures to the computer (see page 37), delete pictures from the camera (see page 14), switch image storage locations (see page 25), or insert a card with available memory (see page 3). 42 www.kodak.com/go/support Camera... does not ■ Purchase a certified SD card. recognize SD card. ■ Insert a card into the slot, then push to the computer (see a picture (or the expected picture) on the flash (see page 7). ■...
User Manual
Page 49
...kodak.com/go /c813support. inserted or removed. Re-install the software (see page 14). Memory card full. ■ Insert a new card (see page 3). ■ Transfer pictures to the computer (see page 37). ■ Delete pictures/videos (see page 36). ■ Disconnect the USB cable. Re-install the software (see page 36). ■ Disconnect camera...with the camera. ■ Turn on . Try one or more of the following Camera freezes up ■ Turn the camera off when a card is before inserting or removing a card. Memory card and ■ Transfer pictures to camera and ...
...kodak.com/go /c813support. inserted or removed. Re-install the software (see page 14). Memory card full. ■ Insert a new card (see page 3). ■ Transfer pictures to the computer (see page 37). ■ Delete pictures/videos (see page 36). ■ Disconnect the USB cable. Re-install the software (see page 36). ■ Disconnect camera...with the camera. ■ Turn on . Try one or more of the following Camera freezes up ■ Turn the camera off when a card is before inserting or removing a card. Memory card and ■ Transfer pictures to camera and ...
User Manual
Page 52
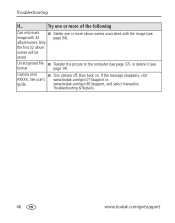
Troubleshooting If... Camera error ■ Turn camera off, then back on. www.kodak.com/go/c813support, and select Interactive Troubleshooting & Repairs. 46 www.kodak.com/go /c713support or guide. Try one or more of the following Can only mark image with 32 ■ Delete one ...associated with the image (see format page 14). If the message reappears, visit #XXXX. See user's www.kodak.com/go /support album names. Only the first 32 album names will be saved Unrecognized file ■ Transfer the picture to the computer (see page 37), or delete it (see page 34).
Troubleshooting If... Camera error ■ Turn camera off, then back on. www.kodak.com/go/c813support, and select Interactive Troubleshooting & Repairs. 46 www.kodak.com/go /c713support or guide. Try one or more of the following Can only mark image with 32 ■ Delete one ...associated with the image (see format page 14). If the message reappears, visit #XXXX. See user's www.kodak.com/go /support album names. Only the first 32 album names will be saved Unrecognized file ■ Transfer the picture to the computer (see page 37), or delete it (see page 34).


