
User Manual
Page 1
After installing the software, return to this user guide. ᕢ Loading the batteries See the Extended user guide www.kodak.com/go/c160support, www.kodak.com/go/c180support www.kodak.com/go/c180support 1 Follow the on-screen instructions. ENGLISH ᕡ Installing the software Before connecting any cables, install the software that was included with your camera.
After installing the software, return to this user guide. ᕢ Loading the batteries See the Extended user guide www.kodak.com/go/c160support, www.kodak.com/go/c180support www.kodak.com/go/c180support 1 Follow the on-screen instructions. ENGLISH ᕡ Installing the software Before connecting any cables, install the software that was included with your camera.

User Manual
Page 2
for previous/next field. Date/Time: At the prompt, press OK. to accept. OK to change . See the Extended user guide www.kodak.com/go/c160support, www.kodak.com/go/c180support 2 www.kodak.com/go/easysharecenter ENGLISH ᕣ Turning on the camera Press the Power button. ᕤ Setting the language and date/time OK (press) Language: to accept. OK to change current field.
for previous/next field. Date/Time: At the prompt, press OK. to accept. OK to change . See the Extended user guide www.kodak.com/go/c160support, www.kodak.com/go/c180support 2 www.kodak.com/go/easysharecenter ENGLISH ᕣ Turning on the camera Press the Power button. ᕤ Setting the language and date/time OK (press) Language: to accept. OK to change current field.

User Manual
Page 3
When the framing marks turn green, press the Shutter button completely down. ENGLISH ᕥ Taking a picture 1 Turn the Mode dial to focus and set exposure. Framing marks To learn more about Auto and other modes, see page 10. Compose the picture. 2 Press the Shutter button halfway to Auto . See the Extended user guide www.kodak.com/go/c160support, www.kodak.com/go/c180support www.kodak.com/go/c180support 3
When the framing marks turn green, press the Shutter button completely down. ENGLISH ᕥ Taking a picture 1 Turn the Mode dial to focus and set exposure. Framing marks To learn more about Auto and other modes, see page 10. Compose the picture. 2 Press the Shutter button halfway to Auto . See the Extended user guide www.kodak.com/go/c160support, www.kodak.com/go/c180support www.kodak.com/go/c180support 3

User Manual
Page 4
View previous/next picture/video. OK Play a video. See the Extended user guide www.kodak.com/go/c160support, www.kodak.com/go/c180support 4 www.kodak.com/go/easysharecenter ENGLISH ᕦ Reviewing pictures/videos Review Press the Review button to enter/exit Review.
View previous/next picture/video. OK Play a video. See the Extended user guide www.kodak.com/go/c160support, www.kodak.com/go/c180support 4 www.kodak.com/go/easysharecenter ENGLISH ᕦ Reviewing pictures/videos Review Press the Review button to enter/exit Review.

User Manual
Page 6
... Great news! ENGLISH ᕨ Getting help from your camera. It describes every setting for you ■ And how to use on-camera Help. Scroll through a Help topic See the Extended user guide www.kodak.com/go/c160support, www.kodak.com/go/c180support 6 www.kodak.com/go/easysharecenter Your camera offers a built-in Help system. You want the...
... Great news! ENGLISH ᕨ Getting help from your camera. It describes every setting for you ■ And how to use on-camera Help. Scroll through a Help topic See the Extended user guide www.kodak.com/go/c160support, www.kodak.com/go/c180support 6 www.kodak.com/go/easysharecenter Your camera offers a built-in Help system. You want the...

User Manual
Page 7
... and share your computer Keep learning! Congratulations! You have: • set up your camera • taken pictures • transferred pictures to your best pictures! Visit www.kodak.com/go/c160support or www.kodak.com/go/c180support: • the extended user guide • interactive troubleshooting and repairs • interactive tutorials • FAQs • downloads •...
... and share your computer Keep learning! Congratulations! You have: • set up your camera • taken pictures • transferred pictures to your best pictures! Visit www.kodak.com/go/c160support or www.kodak.com/go/c180support: • the extended user guide • interactive troubleshooting and repairs • interactive tutorials • FAQs • downloads •...
User Manual
Page 1
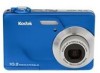
KODAK EASYSHARE C160/C180 Digital Camera Extended user guide www.kodak.com For interactive tutorials: www.kodak.com/go/howto For help with your camera: www.kodak.com/go/c160support, www.kodak.com/go/c180support
KODAK EASYSHARE C160/C180 Digital Camera Extended user guide www.kodak.com For interactive tutorials: www.kodak.com/go/howto For help with your camera: www.kodak.com/go/c160support, www.kodak.com/go/c180support
User Manual
Page 37
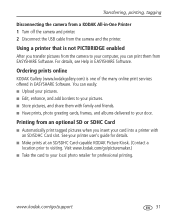
.... ■ Store pictures, and share them from the camera to your local photo retailer for details. ■ Make prints at an SD/SDHC Card-capable KODAK Picture Kiosk. (Contact a location prior to your printer user's guide for professional printing. For details, see Help in EASYSHARE Software. www.kodak.com/go /picturemaker.) ■ Take the card...
.... ■ Store pictures, and share them from the camera to your local photo retailer for details. ■ Make prints at an SD/SDHC Card-capable KODAK Picture Kiosk. (Contact a location prior to your printer user's guide for professional printing. For details, see Help in EASYSHARE Software. www.kodak.com/go /picturemaker.) ■ Take the card...
User Manual
Page 43
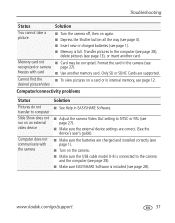
...9632; Turn on the camera. ■ Make sure the USB cable model U-8 is connected to the camera and the computer (see page 29). ■ Make sure EASYSHARE Software is full. ...camera freezes with the camera Solution ■ See Help in EASYSHARE Software. ■ Adjust the camera Video Out setting to NTSC or PAL (see page 27). ■ Make sure the external device settings are correct. (See the device's user's guide...Computer does not communicate with card Cannot find the desired picture/video ■ Turn the camera off, then on again. ■ Depress the Shutter button all the way (see ...
...9632; Turn on the camera. ■ Make sure the USB cable model U-8 is connected to the camera and the computer (see page 29). ■ Make sure EASYSHARE Software is full. ...camera freezes with the camera Solution ■ See Help in EASYSHARE Software. ■ Adjust the camera Video Out setting to NTSC or PAL (see page 27). ■ Make sure the external device settings are correct. (See the device's user's guide...Computer does not communicate with card Cannot find the desired picture/video ■ Turn the camera off, then on again. ■ Depress the Shutter button all the way (see ...
User Manual
Page 50
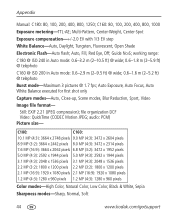
...DCF Video: QuickTime (CODEC Motion JPEG; C160: 80, 100, 200, 400, 800, 1000 Exposure metering-TTL-AE; Still: EXIF 2.21 (JPEG compression); Guide No.6; C180: C160: 10.1 MP (4:3): 3664 x 2748 pixels 9.0 MP (4:3): 3472 x 2604 pixels 8.9 MP (3:2): 3664 x 2442 pixels 8.0 MP (4:3): 3472 x ... 1.2 MP (4:3): 1280 x 960 pixels Color modes-High Color, Natural Color, Low Color, Black & White, Sepia Sharpness modes-Sharp, Normal, Soft 44 www.kodak.com/go/support working range: C180 @ ISO 240 in Auto mode: 0.6-3.2 m (2-10.5 ft) @ wide; 0.6-1.8 m (2-5.9 ft) @ telephoto C160 @ ISO 200 in Auto mode: ...
...DCF Video: QuickTime (CODEC Motion JPEG; C160: 80, 100, 200, 400, 800, 1000 Exposure metering-TTL-AE; Still: EXIF 2.21 (JPEG compression); Guide No.6; C180: C160: 10.1 MP (4:3): 3664 x 2748 pixels 9.0 MP (4:3): 3472 x 2604 pixels 8.9 MP (3:2): 3664 x 2442 pixels 8.0 MP (4:3): 3472 x ... 1.2 MP (4:3): 1280 x 960 pixels Color modes-High Color, Natural Color, Low Color, Black & White, Sepia Sharpness modes-Sharp, Normal, Soft 44 www.kodak.com/go/support working range: C180 @ ISO 240 in Auto mode: 0.6-3.2 m (2-10.5 ft) @ wide; 0.6-1.8 m (2-5.9 ft) @ telephoto C160 @ ISO 200 in Auto mode: ...


