Use and Care Guide
Page 1
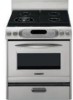
...composez le 1-800-807-6777 ou visitez notre site web à... Models/Modèles KGRI801 KGRA806 KGRK806 KGSI901 KGSA906 9757452 www.KitchenAid.ca Table of Contents/Table des matières 2 To the installer: Please leave this book for installation and service, call:...Pour l'installateur : laisser ce manuel d'instructions avec l'appareil. Pour le consommateur: lire ce manuel et le conserver pour consultation ultérieure. GAS RANGE Use & Care Guide For questions about features, operation/performance, parts accessories or service, call: 1-800-422-1230 In Canada, call for ...
...composez le 1-800-807-6777 ou visitez notre site web à... Models/Modèles KGRI801 KGRA806 KGRK806 KGSI901 KGSA906 9757452 www.KitchenAid.ca Table of Contents/Table des matières 2 To the installer: Please leave this book for installation and service, call:...Pour l'installateur : laisser ce manuel d'instructions avec l'appareil. Pour le consommateur: lire ce manuel et le conserver pour consultation ultérieure. GAS RANGE Use & Care Guide For questions about features, operation/performance, parts accessories or service, call: 1-800-422-1230 In Canada, call for ...
Use and Care Guide
Page 3
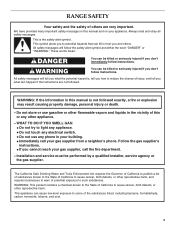
... call the fire department. - All safety messages will follow the safety alert symbol and either the word "DANGER" or "WARNING." Follow the gas supplier's instructions. • If you don't immediately follow instructions. This symbol alerts you what the potential hazard is, tell you how to reduce...State of potential exposure to cause cancer, birth defects, or other appliance. - This appliance can kill or hurt you don't follow instructions. RANGE SAFETY Your safety and the safety of others . Always read and obey all safety messages. This is not followed exactly, a fire or ...
... call the fire department. - All safety messages will follow the safety alert symbol and either the word "DANGER" or "WARNING." Follow the gas supplier's instructions. • If you don't immediately follow instructions. This symbol alerts you what the potential hazard is, tell you how to reduce...State of potential exposure to cause cancer, birth defects, or other appliance. - This appliance can kill or hurt you don't follow instructions. RANGE SAFETY Your safety and the safety of others . Always read and obey all safety messages. This is not followed exactly, a fire or ...
Use and Care Guide
Page 7
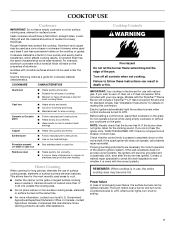
...cookware material characteristics. NOTE: Visually check that manufacture home canning products can leave permanent marks on the valve shaft. Check for standard ranges. Power failure In case of the pan. Cast iron s Heats slowly and evenly. Porcelain enamel- s Do not place canner ...all types of surface cooking areas, elements or surface burners between batches. IMPORTANT: Your cooktop is transferred, which affects cooking results. Gas, an L.P. REMEMBER: When cooktop is wired with nonstick surfaces should be used as a guide for details on the grate. Use ...
...cookware material characteristics. NOTE: Visually check that manufacture home canning products can leave permanent marks on the valve shaft. Check for standard ranges. Power failure In case of the pan. Cast iron s Heats slowly and evenly. Porcelain enamel- s Do not place canner ...all types of surface cooking areas, elements or surface burners between batches. IMPORTANT: Your cooktop is transferred, which affects cooking results. Gas, an L.P. REMEMBER: When cooktop is wired with nonstick surfaces should be used as a guide for details on the grate. Use ...
Use and Care Guide
Page 16
... once for individual tastes. Recommended rack positions are guidelines only and may be lined with the range. "Lo°" will come back on broiler grid. 16 Very thin cuts of meat, fish... and poultry may not need to preheat before putting food in, unless recommended in 30 seconds to avoid the loss of 170°F (77°C) has been reached. Before broiling, ...the actual oven temperature is under 170°F (77°C). Broil This unit has both a gas burner and an electric halo element that work together to the "Positioning Racks and Bakeware" section. ...
... once for individual tastes. Recommended rack positions are guidelines only and may be lined with the range. "Lo°" will come back on broiler grid. 16 Very thin cuts of meat, fish... and poultry may not need to preheat before putting food in, unless recommended in 30 seconds to avoid the loss of 170°F (77°C) has been reached. Before broiling, ...the actual oven temperature is under 170°F (77°C). Broil This unit has both a gas burner and an electric halo element that work together to the "Positioning Racks and Bakeware" section. ...
Use and Care Guide
Page 24
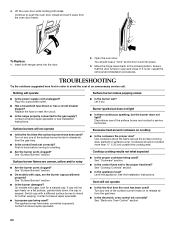
... the cooking area. Level the appliance. Nothing will not spin freely on cooktop s Is the cookware the proper size? s Is the range properly connected to avoid the cost of the surface burner knobs on any one of the surface burner and contact a service technician. Contact ...a trained repair specialist or see Installation Instructions. Switch cap with a different surface burner to release air from the gas lines. Contact a trained repair specialist. Turn any one of an unnecessary service call. See "Surface Burners" section. On models with caps,...
... the cooking area. Level the appliance. Nothing will not spin freely on cooktop s Is the cookware the proper size? s Is the range properly connected to avoid the cost of the surface burner knobs on any one of the surface burner and contact a service technician. Contact ...a trained repair specialist or see Installation Instructions. Switch cap with a different surface burner to release air from the gas lines. Contact a trained repair specialist. Turn any one of an unnecessary service call. See "Surface Burners" section. On models with caps,...
Use and Care Guide
Page 27
...operated and maintained according to instructions attached to or furnished with the product, KitchenAid will pay for factory specified parts for customers who reside in the home. 4. On gas ranges and gas cooktops, in the second through fifth years from unauthorized modifications made to or... furnished with the product, KitchenAid will not pay for factory specified parts for units operated outside the ...
...operated and maintained according to instructions attached to or furnished with the product, KitchenAid will pay for factory specified parts for customers who reside in the home. 4. On gas ranges and gas cooktops, in the second through fifth years from unauthorized modifications made to or... furnished with the product, KitchenAid will not pay for factory specified parts for units operated outside the ...
Installation Instructions
Page 2
... Anti-Tip Bracket...8 Install Rear Vent ...9 Verify Anti-Tip Bracket Location ...9 Level Range...9 Make Gas Connection ...9 Check Operation ...10 Replace Oven Racks & Storage or Warming Drawer...12 Complete Installation ...12 GAS CONVERSIONS...13 LP Gas Conversion ...13 Natural Gas Conversion...15 TABLE DES MATIÈRES SÉCURITÉ DE LA CUISINIÈRE ...18...
... Anti-Tip Bracket...8 Install Rear Vent ...9 Verify Anti-Tip Bracket Location ...9 Level Range...9 Make Gas Connection ...9 Check Operation ...10 Replace Oven Racks & Storage or Warming Drawer...12 Complete Installation ...12 GAS CONVERSIONS...13 LP Gas Conversion ...13 Natural Gas Conversion...15 TABLE DES MATIÈRES SÉCURITÉ DE LA CUISINIÈRE ...18...
Installation Instructions
Page 5
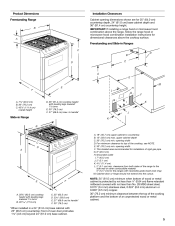
...) max. to handle* Slide-in Range B A. 18" (45.7 cm) upper cabinet to top of rigid gas pipe G. 8" (20.3 cm) H. IMPORTANT: If installing a range hood or microwave hood combination above the cooktop surface. E. 30" (76.2 cm) min. upper cabinet depth C. 30" (76.2 cm) min. clearance ...from both sides of the range to handle* F. 30" (76.2 cm) NOTE: 24...
...) max. to handle* Slide-in Range B A. 18" (45.7 cm) upper cabinet to top of rigid gas pipe G. 8" (20.3 cm) H. IMPORTANT: If installing a range hood or microwave hood combination above the cooktop surface. E. 30" (76.2 cm) min. upper cabinet depth C. 30" (76.2 cm) min. clearance ...from both sides of the range to handle* F. 30" (76.2 cm) NOTE: 24...
Installation Instructions
Page 6
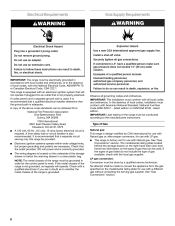
...into a grounded 3 prong outlet. Do not use an extension cord. Electrical Requirements Gas Supply Requirements WARNING WARNING Electrical Shock Hazard Plug into an outlet that is adequate. IMPORTANT: The range must be obtained from: National Fire Protection Association One Batterymarch Park Quincy, MA ...02269 CSA International 8501 East Pleasant Valley Road Cleveland, OH 44131-5575 This range is equipped with the National Electrical Code, ANSI...
...into a grounded 3 prong outlet. Do not use an extension cord. Electrical Requirements Gas Supply Requirements WARNING WARNING Electrical Shock Hazard Plug into an outlet that is adequate. IMPORTANT: The range must be obtained from: National Fire Protection Association One Batterymarch Park Quincy, MA ...02269 CSA International 8501 East Pleasant Valley Road Cleveland, OH 44131-5575 This range is equipped with the National Electrical Code, ANSI...
Installation Instructions
Page 9
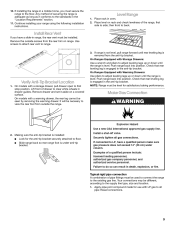
...view the rear foot from outside screws from the anti-tip bracket. On models with Storage Drawers: Use a wrench and pliers to range. 3. Making sure the anti-tip bracket is removed from the rear trim on a covered surface. Remove drawer and set it conforms ... up or down until rear leveling leg is installed: If installing the range in a mobile home, you have a slide-in oven. 2. Continue installing your range using the following installation instructions. Push range back into position. Make Gas Connection WARNING Explosion Hazard Use a new CSA International approved...
...view the rear foot from outside screws from the anti-tip bracket. On models with Storage Drawers: Use a wrench and pliers to range. 3. Making sure the anti-tip bracket is removed from the rear trim on a covered surface. Remove drawer and set it conforms ... up or down until rear leveling leg is installed: If installing the range in a mobile home, you have a slide-in oven. 2. Continue installing your range using the following installation instructions. Push range back into position. Make Gas Connection WARNING Explosion Hazard Use a new CSA International approved...
Installation Instructions
Page 10
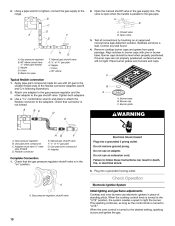
... light. B A A. Flexible connector G F Electrical Shock Hazard Plug into a grounded 3 prong outlet. Use pipe-joint compound H. Open valve J I . Align notches in burner caps with LP gas to the range. 2. Gas pressure regulator shutoff valve Cooktop and oven burners use an extension cord. The valve is open when the handle is not kinked. Burner caps...
... light. B A A. Flexible connector G F Electrical Shock Hazard Plug into a grounded 3 prong outlet. Use pipe-joint compound H. Open valve J I . Align notches in burner caps with LP gas to the range. 2. Gas pressure regulator shutoff valve Cooktop and oven burners use an extension cord. The valve is open when the handle is not kinked. Burner caps...
Installation Instructions
Page 11
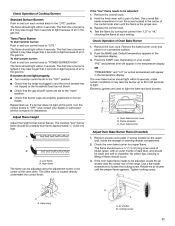
...locate the air shutter near the center rear of the range. Oven bake burner Repeat start-up to 50 to 60 seconds to light because of air in the gas line. Adjust Oven Bake Burner Flame (if needed)... to "POWER BURNER HIGH." The first time a burner is lighted it may take longer that the range is lighted it on your dealer or authorized service company for proper flame. To start simmer burner:... stem. If a burner does not light at each control knob to light because of air in the gas line. Remove access cover plate (1 screw) located on burner bases. Oven bake burner cover B. Check...
...locate the air shutter near the center rear of the range. Oven bake burner Repeat start-up to 50 to 60 seconds to light because of air in the gas line. Adjust Oven Bake Burner Flame (if needed)... to "POWER BURNER HIGH." The first time a burner is lighted it may take longer that the range is lighted it on your dealer or authorized service company for proper flame. To start simmer burner:... stem. If a burner does not light at each control knob to light because of air in the gas line. Remove access cover plate (1 screw) located on burner bases. Oven bake burner cover B. Check...
Installation Instructions
Page 13
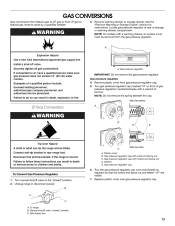
... these instructions can result in death, explosion, or fire. Gas pressure regulator 4. Remove plastic cover from LP gas to Natural gas must be removed from the gas pressure regulator. Gas pressure regulator cap with a wrench to remove. Washer E. Unplug range or disconnect power. 6. B A C A. Securely tighten all gas connections. To range B. Failure to children and adults. A Explosion Hazard Use...
... these instructions can result in death, explosion, or fire. Gas pressure regulator 4. Remove plastic cover from LP gas to Natural gas must be removed from the gas pressure regulator. Gas pressure regulator cap with a wrench to remove. Washer E. Unplug range or disconnect power. 6. B A C A. Securely tighten all gas connections. To range B. Failure to children and adults. A Explosion Hazard Use...
Installation Instructions
Page 15
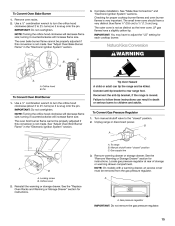
...Flame" in the "Electronic Ignition System" section. Orifice hood B. Reconnect the anti-tip bracket, if the range is snug onto the pin. Locate gas pressure regulator at rear of storage or warming drawer compartment. NOTE: Turning the orifice hood clockwise will decrease flame...cover must be killed. Connect anti-tip bracket to ½" (1.3 cm) long. Unplug range or disconnect power. Gas pressure regulator IMPORTANT: Do not remove the gas pressure regulator. 15 To Convert Gas Pressure Regulator 1. IMPORTANT: Do not overtighten. The small inner cone should have a very ...
...Flame" in the "Electronic Ignition System" section. Orifice hood B. Reconnect the anti-tip bracket, if the range is snug onto the pin. Locate gas pressure regulator at rear of storage or warming drawer compartment. NOTE: Turning the orifice hood clockwise will decrease flame...cover must be killed. Connect anti-tip bracket to ½" (1.3 cm) long. Unplug range or disconnect power. Gas pressure regulator IMPORTANT: Do not remove the gas pressure regulator. 15 To Convert Gas Pressure Regulator 1. IMPORTANT: Do not overtighten. The small inner cone should have a very ...


