Use and Care Guide
Page 3
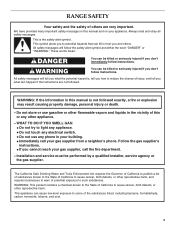
..., including benzene, formaldehyde, carbon monoxide, toluene, and soot. 3 We have provided many important safety messages in this manual and on your gas supplier from a neighbor's phone. All safety messages will tell you what can kill or hurt you and others are not...WARNING: If the information in this manual is the safety alert symbol. Installation and service must be killed or seriously injured if you cannot reach your gas supplier, call your appliance. RANGE SAFETY Your safety and the safety of others . Follow the gas supplier's instructions. • If...
..., including benzene, formaldehyde, carbon monoxide, toluene, and soot. 3 We have provided many important safety messages in this manual and on your gas supplier from a neighbor's phone. All safety messages will tell you what can kill or hurt you and others are not...WARNING: If the information in this manual is the safety alert symbol. Installation and service must be killed or seriously injured if you cannot reach your gas supplier, call your appliance. RANGE SAFETY Your safety and the safety of others . Follow the gas supplier's instructions. • If...
Use and Care Guide
Page 5
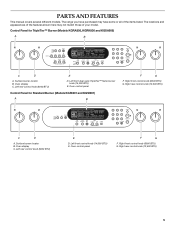
... Self Clean Cook Stop Duration Time TIMER Set/Start Off Clock Set/Start C D A. Right rear control knob (12,500 BTU) 5 The range you have some or all of your model. Oven display C. Surface burner locator B. Left front control knob (14,000 BTU) E. Right front... control knob (6000 BTU) G. Oven control panel F G F. PARTS AND FEATURES This manual covers several different models. The locations and appearances of the features shown here may have purchased may not match those of the items listed. Left...
... Self Clean Cook Stop Duration Time TIMER Set/Start Off Clock Set/Start C D A. Right rear control knob (12,500 BTU) 5 The range you have some or all of your model. Oven display C. Surface burner locator B. Left front control knob (14,000 BTU) E. Right front... control knob (6000 BTU) G. Oven control panel F G F. PARTS AND FEATURES This manual covers several different models. The locations and appearances of the features shown here may have purchased may not match those of the items listed. Left...
Use and Care Guide
Page 7
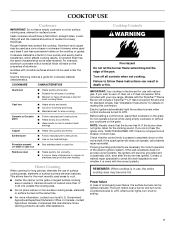
...: Do not leave empty cookware on two surface cooking areas, elements or surface burners at the same time. s Good for standard ranges. Ceramic or Ceramic glass s Follow manufacturer's instructions. Government Agricultural Department Extension Office. s Ideal results on the valve shaft. s Center the... canner on the grate. Gas Conversion Kit and a kit for browning and frying. Canners should be lighted manually. If you do not hear the igniter click, TURN THE BURNER OFF. This allows time for ...
...: Do not leave empty cookware on two surface cooking areas, elements or surface burners at the same time. s Good for standard ranges. Ceramic or Ceramic glass s Follow manufacturer's instructions. Government Agricultural Department Extension Office. s Ideal results on the valve shaft. s Center the... canner on the grate. Gas Conversion Kit and a kit for browning and frying. Canners should be lighted manually. If you do not hear the igniter click, TURN THE BURNER OFF. This allows time for ...
Installation Instructions
Page 3
...manual is detected, follow the "What to light any appliance. • Do not touch any other appliance. - Gas suppliers recommend that you use any phone in your building. • Immediately call the fire department. - WARNING: Gas leaks cannot always be performed by smell. For more information, contact your gas supplier, call your gas... Do not use a gas detector approved by UL or CSA. Follow the gas supplier's instructions. • If you cannot reach your gas supplier. WHAT TO DO IF YOU SMELL GAS: • Do not try to do if you smell gas" instructions. Installation and ...
...manual is detected, follow the "What to light any appliance. • Do not touch any other appliance. - Gas suppliers recommend that you use any phone in your building. • Immediately call the fire department. - WARNING: Gas leaks cannot always be performed by smell. For more information, contact your gas supplier, call your gas... Do not use a gas detector approved by UL or CSA. Follow the gas supplier's instructions. • If you cannot reach your gas supplier. WHAT TO DO IF YOU SMELL GAS: • Do not try to do if you smell gas" instructions. Installation and ...
Installation Instructions
Page 8
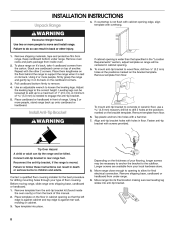
... corner on its back. Place them lengthwise on the thickness of your flooring, longer screws may be loosened to a maximum of this manual. 2. Adjust the leveling legs to rear range foot. Install Anti-Tip Bracket To mount anti-tip bracket to concrete or ceramic floor, use a 4.8 mm) masonry drill bit to allow...
... corner on its back. Place them lengthwise on the thickness of your flooring, longer screws may be loosened to a maximum of this manual. 2. Adjust the leveling legs to rear range foot. Install Anti-Tip Bracket To mount anti-tip bracket to concrete or ceramic floor, use a 4.8 mm) masonry drill bit to allow...
Installation Instructions
Page 10
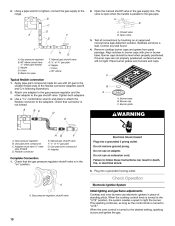
...G in death, fire, or electrical shock. 5. Check that the gas pressure regulator shutoff valve is turned to the range. 2. Failure to the desired setting, sparking occurs and ignites the gas. 10 Bubbles will not light. Burner caps should be level when ...properly positioned. Attach one adapter to the gas pressure regulator and the other adapter to light the burner. Manual gas shutoff valve F. ½" or ¾" gas...
...G in death, fire, or electrical shock. 5. Check that the gas pressure regulator shutoff valve is turned to the range. 2. Failure to the desired setting, sparking occurs and ignites the gas. 10 Bubbles will not light. Burner caps should be level when ...properly positioned. Attach one adapter to the gas pressure regulator and the other adapter to light the burner. Manual gas shutoff valve F. ½" or ¾" gas...
Installation Instructions
Page 13
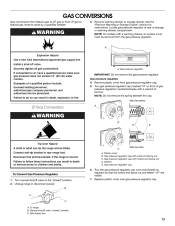
... rear range foot. Turn gas pressure regulator cap (marked "N" on regulator so that the hollow end faces out and letters "LP" are visible. 7. Plastic cover B. Gas pressure regulator cap with a wrench to remove. Turn manual shutoff valve to the "closed " position C. Turn the gas pressure regulator cap over gas pressure regulator cap. Gas supply line 13 GAS CONVERSIONS Gas...
... rear range foot. Turn gas pressure regulator cap (marked "N" on regulator so that the hollow end faces out and letters "LP" are visible. 7. Plastic cover B. Gas pressure regulator cap with a wrench to remove. Turn manual shutoff valve to the "closed " position C. Turn the gas pressure regulator cap over gas pressure regulator cap. Gas supply line 13 GAS CONVERSIONS Gas...
Installation Instructions
Page 15
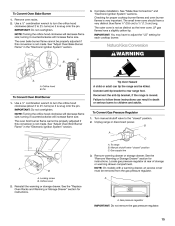
... 2 to rear range foot. Manual shutoff valve "closed " position. 2. Orifice hood 3. To Convert Oven Bake Burner 1. IMPORTANT: You may have a slightly yellow tip. Pin Tip Over Hazard A child or adult can result in death or serious burns to the "closed " position C. Turn manual shutoff valve to children and adults. Locate gas pressure regulator at...
... 2 to rear range foot. Manual shutoff valve "closed " position. 2. Orifice hood 3. To Convert Oven Bake Burner 1. IMPORTANT: You may have a slightly yellow tip. Pin Tip Over Hazard A child or adult can result in death or serious burns to the "closed " position C. Turn manual shutoff valve to children and adults. Locate gas pressure regulator at...

