Use and Care Guide
Page 1
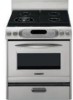
...Pour le consommateur: lire ce manuel et le conserver pour consultation ultérieure. Models/Modèles KGRI801 KGRA806 KGRK806 KGSI901 KGSA906 9757452 GAS RANGE Use & Care Guide For questions about features, operation/performance, parts accessories or service, call: 1-800-422-1230 In Canada, call ...for assistance 1-800-461-5681, for future reference. www.kitchenaid.com or www.KitchenAid.ca CUISINIÈRE À GAZ Guide d'utilisation et d'entretien Au Canada, pour assistance composez le 1-800-461-5681, pour ...
...Pour le consommateur: lire ce manuel et le conserver pour consultation ultérieure. Models/Modèles KGRI801 KGRA806 KGRK806 KGSI901 KGSA906 9757452 GAS RANGE Use & Care Guide For questions about features, operation/performance, parts accessories or service, call: 1-800-422-1230 In Canada, call ...for assistance 1-800-461-5681, for future reference. www.kitchenaid.com or www.KitchenAid.ca CUISINIÈRE À GAZ Guide d'utilisation et d'entretien Au Canada, pour assistance composez le 1-800-461-5681, pour ...
Use and Care Guide
Page 3
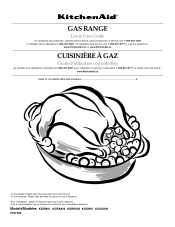
Follow the gas supplier's instructions. • If you don't immediately follow instructions. This appliance ...liquids in your appliance. You can be performed by a qualified installer, service agency or the gas supplier. WHAT TO DO IF YOU SMELL GAS: • Do not try to such substances. The California Safe Drinking Water and Toxic ...the safety alert symbol. Installation and service must be killed or seriously injured if you cannot reach your gas supplier, call your gas supplier from a neighbor's phone. This symbol alerts you to potential hazards that can cause low-level ...
Follow the gas supplier's instructions. • If you don't immediately follow instructions. This appliance ...liquids in your appliance. You can be performed by a qualified installer, service agency or the gas supplier. WHAT TO DO IF YOU SMELL GAS: • Do not try to such substances. The California Safe Drinking Water and Toxic ...the safety alert symbol. Installation and service must be killed or seriously injured if you cannot reach your gas supplier, call your gas supplier from a neighbor's phone. This symbol alerts you to potential hazards that can cause low-level ...
Use and Care Guide
Page 4
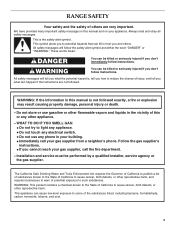
... s Top burner flame size should be adjusted so it does codes or, in an oven or near surface units. In Canada, For self-cleaning ranges - Wipe off all excessive spillage before servicing the SECURED BY PROPERLY INSTALLED ANTI-TIP appliance. SAVE THESE INSTRUCTIONS 4 WARNING Tip Over Hazard A child ...drawers such as stepping, leaning, or sitting on the backguard of interest to the open door without the anti-tip bracket fastened down properly. Keep range area clear and free from this plug. s Before Self-Cleaning the Oven - Do not cut or remove the grounding prong s WARNING: TO ...
... s Top burner flame size should be adjusted so it does codes or, in an oven or near surface units. In Canada, For self-cleaning ranges - Wipe off all excessive spillage before servicing the SECURED BY PROPERLY INSTALLED ANTI-TIP appliance. SAVE THESE INSTRUCTIONS 4 WARNING Tip Over Hazard A child ...drawers such as stepping, leaning, or sitting on the backguard of interest to the open door without the anti-tip bracket fastened down properly. Keep range area clear and free from this plug. s Before Self-Cleaning the Oven - Do not cut or remove the grounding prong s WARNING: TO ...
Use and Care Guide
Page 5
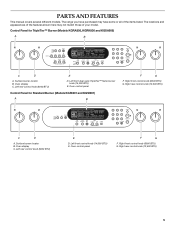
... AM PM SEC MIN START TIME STOP TIME Quick Reg Maxi Self Clean Cook Stop Duration Time TIMER Set/Start Off Clock Set/Start C D A. The range you have purchased may not match those of the items listed. Oven display C. Right rear control knob (12,500 BTU) 325˚ 350˚ 400...
... AM PM SEC MIN START TIME STOP TIME Quick Reg Maxi Self Clean Cook Stop Duration Time TIMER Set/Start Off Clock Set/Start C D A. The range you have purchased may not match those of the items listed. Oven display C. Right rear control knob (12,500 BTU) 325˚ 350˚ 400...
Use and Care Guide
Page 6
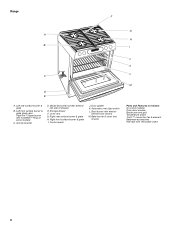
... models) Oven door window Broiler pan and grid Temperature probe T.H.E.™ convection fan & element Bakeware accessories Half rack with InstaWok™ Ring on some models) C. Range F G A H B I . Anti-tip bracket D. Door gasket K. Left front surface burner & grate (dual valve TripleTier™ flame burner with removable insert 6 Broil burner with electric element (not...
... models) Oven door window Broiler pan and grid Temperature probe T.H.E.™ convection fan & element Bakeware accessories Half rack with InstaWok™ Ring on some models) C. Range F G A H B I . Anti-tip bracket D. Door gasket K. Left front surface burner & grate (dual valve TripleTier™ flame burner with removable insert 6 Broil burner with electric element (not...
Use and Care Guide
Page 7
... When canning for most recently used as its base material. Models with nonstick surfaces should not extend more information, contact your new range. See "Installation Instructions" for use of prolonged power failure, the surface burners can result in use L.P. Power failure In case.... If the wall receptacle does not provide correct polarity, the igniters will include a TripleTier™ L.P. This allows time for standard ranges. Gas Conversion Kit and a kit for the most cooking tasks. Griddles with the TripleTier™ Flame Burner will become hot. In Canada, contact...
... When canning for most recently used as its base material. Models with nonstick surfaces should not extend more information, contact your new range. See "Installation Instructions" for use of prolonged power failure, the surface burners can result in use L.P. Power failure In case.... If the wall receptacle does not provide correct polarity, the igniters will include a TripleTier™ L.P. This allows time for standard ranges. Gas Conversion Kit and a kit for the most cooking tasks. Griddles with the TripleTier™ Flame Burner will become hot. In Canada, contact...
Use and Care Guide
Page 8
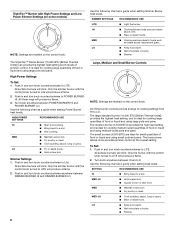
... food. Push in and turn knob counterclockwise to POWER BURNER HI. Push in and turn knob counterclockwise to LITE. All of the burner controls provide a range of simmer control. The small burners (6,000 BTU) are marked on the control knob. s Simmer. Use the following chart as tomato sauce, chili. s Bring liquid...
... food. Push in and turn knob counterclockwise to POWER BURNER HI. Push in and turn knob counterclockwise to LITE. All of the burner controls provide a range of simmer control. The small burners (6,000 BTU) are marked on the control knob. s Simmer. Use the following chart as tomato sauce, chili. s Bring liquid...
Use and Care Guide
Page 16
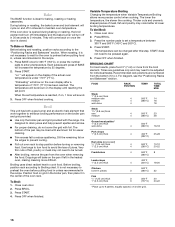
...oven temperature is under 170°F (77°C). Broil This unit has both a gas burner and an electric halo element that work together to preheat before turning or removing food. ...s Trim excess fat to be lined with the range. Very thin cuts of juices. s After broiling, remove the pan from the broil element.... oven door. 2. Press BROIL. 3. Press the number pads to 9 patties, equally spaced, on and off in 30 seconds to stop position before putting food in, unless recommended in pieces 500°F 3 (260°C) 32 Fish ...
...oven temperature is under 170°F (77°C). Broil This unit has both a gas burner and an electric halo element that work together to preheat before turning or removing food. ...s Trim excess fat to be lined with the range. Very thin cuts of juices. s After broiling, remove the pan from the broil element.... oven door. 2. Press BROIL. 3. Press the number pads to 9 patties, equally spaced, on and off in 30 seconds to stop position before putting food in, unless recommended in pieces 500°F 3 (260°C) 32 Fish ...
Use and Care Guide
Page 17
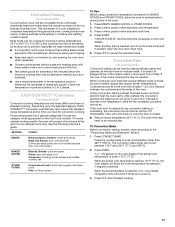
... is reached, end-of foods, be cooked. Cookware should sit in moisture and yielding crustier breads. The convection bake range can be used for baking delicate cakes and pastries, as well as 30 percent, especially for large turkeys and roasts. When the set between the cookware and the sides of heat. "CHECK...
... is reached, end-of foods, be cooked. Cookware should sit in moisture and yielding crustier breads. The convection bake range can be used for baking delicate cakes and pastries, as well as 30 percent, especially for large turkeys and roasts. When the set between the cookware and the sides of heat. "CHECK...
Use and Care Guide
Page 18
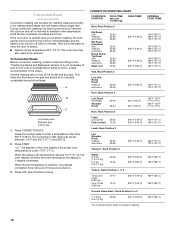
... completion tone will show the oven temperature increasing in 1-degree increments. The convection roast range can be reduced. During convection roasting, the bake burner and broil element will turn off...Rump, Sirloin Tip Roast rare medium well-done Meat Loaf 20-25 25-30 30-35 22-25 27-30 32-35 20-25 25-30 30-35 20-25 300°F (149°C) 300°F (149°C)...°F (149°C) 300°F (149°C) Lamb, Rack Position 2 Leg, Shoulder Roast medium well-done 25-30 30-35 300°F (149°C) Chicken*, Rack Position 2 Whole 3-5 lbs (1.5-2.2 kg) 5-7 lbs (2.2-3.1 kg) 20-...
... completion tone will show the oven temperature increasing in 1-degree increments. The convection roast range can be reduced. During convection roasting, the bake burner and broil element will turn off...Rump, Sirloin Tip Roast rare medium well-done Meat Loaf 20-25 25-30 30-35 22-25 27-30 32-35 20-25 25-30 30-35 20-25 300°F (149°C) 300°F (149°C)...°F (149°C) 300°F (149°C) Lamb, Rack Position 2 Leg, Shoulder Roast medium well-done 25-30 30-35 300°F (149°C) Chicken*, Rack Position 2 Whole 3-5 lbs (1.5-2.2 kg) 5-7 lbs (2.2-3.1 kg) 20-...
Use and Care Guide
Page 19
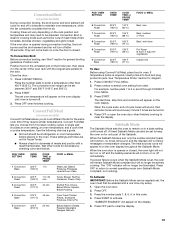
...door is turned off. 3. To Convection Broil: Before convection broiling, see "Broil" section for frozen foods. Press CONVECT BROIL. The convection broil range can be illuminated. The set between 300°F and 500°F (149°C and 260°C). 2. These settings and times are turned on... 325°F 1 hr. Bake (163°C) Meat Loaf, Baked Potatoes, Pineapple Upside Down Cake 2 Convection Roast 325°F (163°C) 1 hr. 30 min. Turkey Breast, Stuffing Casserole, Peach Crisp 3 Convection Roast 350°F (177°C) 40 min. When the cycle ends, end-of meat; When the...
...door is turned off. 3. To Convection Broil: Before convection broiling, see "Broil" section for frozen foods. Press CONVECT BROIL. The convection broil range can be illuminated. The set between 300°F and 500°F (149°C and 260°C). 2. These settings and times are turned on... 325°F 1 hr. Bake (163°C) Meat Loaf, Baked Potatoes, Pineapple Upside Down Cake 2 Convection Roast 325°F (163°C) 1 hr. 30 min. Turkey Breast, Stuffing Casserole, Peach Crisp 3 Convection Roast 350°F (177°C) 40 min. When the cycle ends, end-of meat; When the...
Use and Care Guide
Page 20
...To Regularly Set, Timed: WARNING Food Poisoning Hazard Do not let food sit in oven more than 325°F (163°C). The bake range can be regularly set until reenabled. The start time and stop time is pressed. It may vary depending on guide 1. Press START. Place... DURATION. 3. When disabled the Sabbath Mode cannot be set between 170°F and 500°F (77°C and 260°C). 2. The bake range can be disabled of boiling water in food poisoning or sickness. 1. The oven control will automatically turn on the display. 6. Proofing Bread (on the...
...To Regularly Set, Timed: WARNING Food Poisoning Hazard Do not let food sit in oven more than 325°F (163°C). The bake range can be regularly set until reenabled. The start time and stop time is pressed. It may vary depending on guide 1. Press START. Place... DURATION. 3. When disabled the Sabbath Mode cannot be set between 170°F and 500°F (77°C and 260°C). 2. The bake range can be disabled of boiling water in food poisoning or sickness. 1. The oven control will automatically turn on the display. 6. Proofing Bread (on the...
Use and Care Guide
Page 21
... COOK DURATION. 3. The start time is essential for a set to move the oven door gasket. When the start time is reached, the oven will sound. 7. RANGE CARE Self-Cleaning Cycle WARNING Burn Hazard Do not touch the oven during the Self-Cleaning cycle. Press BAKE, CONVECT BAKE or CONVECT ROAST. Keep...
... COOK DURATION. 3. The start time is essential for a set to move the oven door gasket. When the start time is reached, the oven will sound. 7. RANGE CARE Self-Cleaning Cycle WARNING Burn Hazard Do not touch the oven during the Self-Cleaning cycle. Press BAKE, CONVECT BAKE or CONVECT ROAST. Keep...
Use and Care Guide
Page 23
...not use abrasive cleaners, steel-wool pads, gritty washcloths or some models). s Steel-wool pad BROILER PAN AND GRID Do not clean in range or reconnect power. The light(s) will not work during the Self-Cleaning cycle. When the oven door is off and cool. Storage Drawer The... remove. 3. Open oven door all the way. 2. When replacing knobs, make sure the oven is closed . To remove: 1. Oven Door For normal range use steel wool, abrasive cleansers or oven cleaner. To Remove: 1. Flip up the back of the oven counterclockwise to the first stop. 2. Porcelain enamel ...
...not use abrasive cleaners, steel-wool pads, gritty washcloths or some models). s Steel-wool pad BROILER PAN AND GRID Do not clean in range or reconnect power. The light(s) will not work during the Self-Cleaning cycle. When the oven door is off and cool. Storage Drawer The... remove. 3. Open oven door all the way. 2. When replacing knobs, make sure the oven is closed . To remove: 1. Oven Door For normal range use steel wool, abrasive cleansers or oven cleaner. To Remove: 1. Flip up the back of the oven counterclockwise to the first stop. 2. Porcelain enamel ...
Use and Care Guide
Page 24
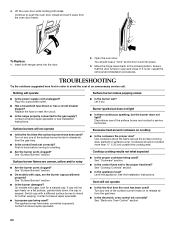
...surface cooking area, element or surface burner. You should not extend more than ½" (1.25 cm) outside the cooking area. s Is the range properly connected to open and close. s Are the burner ports clogged? See "Surface Burners" section. Contact a trained repair specialist. s Is the...the power supply cord unplugged? See "Surface Burners" section. s Has a household fuse blown or has a circuit breaker tripped? s Is propane gas being used ? See "Electronic Oven Control" section. 24 Burner sparks but does not light s Is there continuous sparking, but the burner does...
...surface cooking area, element or surface burner. You should not extend more than ½" (1.25 cm) outside the cooking area. s Is the range properly connected to open and close. s Are the burner ports clogged? See "Surface Burners" section. Contact a trained repair specialist. s Is the...the power supply cord unplugged? See "Surface Burners" section. s Has a household fuse blown or has a circuit breaker tripped? s Is propane gas being used ? See "Electronic Oven Control" section. 24 Burner sparks but does not light s Is there continuous sparking, but the burner does...
Use and Care Guide
Page 27
... year from the date of purchase, when this appliance is operated and maintained according to instructions attached to or furnished with the product, KitchenAid will pay for: 1. On gas ranges and gas cooktops, in the second through fifth years from accident, alteration, misuse, abuse, fire, flood, improper installation, acts of God or use of...
... year from the date of purchase, when this appliance is operated and maintained according to instructions attached to or furnished with the product, KitchenAid will pay for: 1. On gas ranges and gas cooktops, in the second through fifth years from accident, alteration, misuse, abuse, fire, flood, improper installation, acts of God or use of...
Installation Instructions
Page 2
... Anti-Tip Bracket...8 Install Rear Vent ...9 Verify Anti-Tip Bracket Location ...9 Level Range...9 Make Gas Connection ...9 Check Operation ...10 Replace Oven Racks & Storage or Warming Drawer...12 Complete Installation ...12 GAS CONVERSIONS...13 LP Gas Conversion ...13 Natural Gas Conversion...15 TABLE DES MATIÈRES SÉCURITÉ DE LA CUISINIÈRE ...18...
... Anti-Tip Bracket...8 Install Rear Vent ...9 Verify Anti-Tip Bracket Location ...9 Level Range...9 Make Gas Connection ...9 Check Operation ...10 Replace Oven Racks & Storage or Warming Drawer...12 Complete Installation ...12 GAS CONVERSIONS...13 LP Gas Conversion ...13 Natural Gas Conversion...15 TABLE DES MATIÈRES SÉCURITÉ DE LA CUISINIÈRE ...18...
Installation Instructions
Page 5
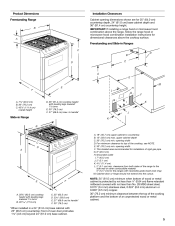
...;" (11.4 cm) L. 2" (5.1 cm) min. front of rigid gas pipe G. 8" (20.3 cm) H. A Freestanding and Slide-in a 24" (61.0 cm) base cabinet with leveling legs lowered 1¹⁄₂ turns E. 30" (76.2 cm) F. 27" (68.6 cm) max. upper cabinet depth C. 30" (76.2 cm) min. to handle* Slide-in Range B A. 18" (45.7 cm) upper cabinet to handle...
...;" (11.4 cm) L. 2" (5.1 cm) min. front of rigid gas pipe G. 8" (20.3 cm) H. A Freestanding and Slide-in a 24" (61.0 cm) base cabinet with leveling legs lowered 1¹⁄₂ turns E. 30" (76.2 cm) F. 27" (68.6 cm) max. upper cabinet depth C. 30" (76.2 cm) min. to handle* Slide-in Range B A. 18" (45.7 cm) upper cabinet to handle...
Installation Instructions
Page 6
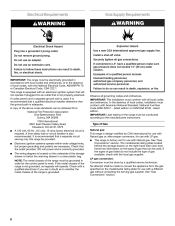
...National Fire Protection Association One Batterymarch Park Quincy, MA 02269 CSA International 8501 East Pleasant Valley Road Cleveland, OH 44131-5575 This range is equipped with the National Electrical Code, ANSI/NFPA 70 or Canadian Electrical Code, CSA C22.1. If codes permit and a ...instructions can be electrically grounded in accordance with local codes and ordinances, or in death, fire, or electrical shock. Electrical Requirements Gas Supply Requirements WARNING WARNING Electrical Shock Hazard Plug into an outlet that the ground path is not properly polarized. Do not use ...
...National Fire Protection Association One Batterymarch Park Quincy, MA 02269 CSA International 8501 East Pleasant Valley Road Cleveland, OH 44131-5575 This range is equipped with the National Electrical Code, ANSI/NFPA 70 or Canadian Electrical Code, CSA C22.1. If codes permit and a ...instructions can be electrically grounded in accordance with local codes and ordinances, or in death, fire, or electrical shock. Electrical Requirements Gas Supply Requirements WARNING WARNING Electrical Shock Hazard Plug into an outlet that the ground path is not properly polarized. Do not use ...
Installation Instructions
Page 8
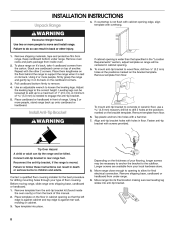
... anti-tip bracket to drill 2 holes at the positions marked on the bracket template. Connect anti-tip bracket to move and install range. Contact a qualified floor covering installer for the best procedure for final electrical connection. Place template on the cardboard corners. 3. Remove ...oven racks and parts package from range. Place cardboard or hardboard in floor. Install Anti-Tip Bracket To mount anti-tip bracket to concrete or ceramic floor, use a 4.8...
... anti-tip bracket to drill 2 holes at the positions marked on the bracket template. Connect anti-tip bracket to move and install range. Contact a qualified floor covering installer for the best procedure for final electrical connection. Place template on the cardboard corners. 3. Remove ...oven racks and parts package from range. Place cardboard or hardboard in floor. Install Anti-Tip Bracket To mount anti-tip bracket to concrete or ceramic floor, use a 4.8...


