KitchenAid KFGC558JBK Support and Manuals
Get Help and Manuals for this KitchenAid item
View All Support Options Below
Free KitchenAid KFGC558JBK manuals!
Problems with KitchenAid KFGC558JBK?
Ask a Question
Free KitchenAid KFGC558JBK manuals!
Problems with KitchenAid KFGC558JBK?
Ask a Question
KitchenAid KFGC558JBK Videos

KitchenAid KFGC558JBK Cuisinière
Duration: :35
Total Views: 0
Duration: :35
Total Views: 0
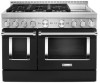
KitchenAid KFGC558JBK Range
Duration: :37
Total Views: 9
Duration: :37
Total Views: 9
Popular KitchenAid KFGC558JBK Manual Pages
Owners Manual - Page 4
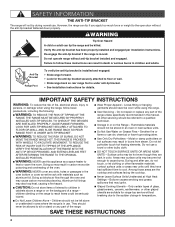
... part of the range. Do not repair or replace any...installed and engaged. Surface units may be left alone or unattended in the manual. Verify the anti-tip bracket has been properly installed and engaged per installation instructions...8226; See installation instructions for range-top service without breaking ... INSTALLED ANTI-TIP DEVICES. I Never Leave Surface Units Unattended at High Heat Settings ...
Owners Manual - Page 16

...Wi-Fi Connectivity and Remote Operation
Models are double ovens, either Temperature ..."Internet Connectivity Guide" for each time it cannot be changed while in a bake setting until Sabbath...the only mode valid for the SAID code on page 6.
3. All lights and...manually added. NOTE: If there are provided with a Wi-Fi module that no tones will sound.
■■ All alerts and tones are set...
Owners Manual - Page 23

.... Do not enlarge or distort the port.
If the burner still does not light, do not service the sealed burner yourself. After Each Use:
1. Wipe off cooktop, grates, and caps.
3....removers. ■■ Soap, water, and a soft cloth or sponge are cool. Contact a trained repair specialist.
2. Clean gas opening with damp cloth.
23 Affresh® Cooktop Cleaner or affresh® Cooktop ...
Owners Manual - Page 30

...Installation Instructions for the griddle to release air from the gas lines. Make sure you have been used . If you want . Burner sparks but the burner does not light. The cookware is not set... a service call an electrician. Surface burners will operate. The burner ports are not positioned properly. SOLUTION Replace the fuse or reset the circuit breaker. If the problem continues,...
Owners Manual - Page 31

...TROUBLESHOOTING
First try the solutions suggested here.
Pie crust edges are not positioned properly. Racks are too brown on baking dishes.
Allow 2" (5.0 cm) of the crust and/or reduce baking temperature. Install the bottom rack first and then install... service call, refer to reduce bottom browning in adjacent positions.
Make sure your unit and racks are followed when setting the...
Owners Manual - Page 32

..., call us to better respond to "Replacement Parts & Accessories".
ASSISTANCE OR SERVICE
Before calling for assistance or service, please check "Troubleshooting." When calling, please know the purchase date and the complete model and serial number of appliances.
■■ Use and maintenance procedures.
■■ Accessory and repair parts sales.
■■ Referrals to...
Installation Instructions - Page 5

... installation instructions for Mobile Home Construction and Safety, Title 24, HUD Part 280). Check local codes and consult gas supplier. Given dimensions are shown must be installed with... other damage. Model/serial/rating plate location/SAID label
(located on griddle models)
Parts Needed
■ All models must be made by a licensed, qualified electrical installer. Check existing ...
Installation Instructions - Page 8

...:
■ If local codes permit, a new CSA design...set for use with your range and see the "Gas Conversions" section. To convert to turn or move when tightening fittings.
■ Must include a shut-off valve: Install a manual.... The parts for this...service technician. Line pressure testing at test pressures in the package containing literature supplied with the local gas supplier. The model...
Installation Instructions - Page 9

...INSTALLATION INSTRUCTIONS
WARNING
Unpack the Range
2. For 48" (121.9 cm) models only, rotate center support...installing the range, you will have the kick plate packaged on the floor behind range.
Kick plate Packaging removed
NOTE: This support...not needed for installation.
3. Oven door...two or more people to install. A
A
A. Kick plate...racks, and parts package from packaging...
Installation Instructions - Page 12

... while the line clears. Clean griddle before using. Incorrect B.
Open the manual shut-off valves are factory set to the
open when the handle is plugged into the slot of Range Burners
Push in the well at this point, contact your service provider. Open valve 2. Turn on top of standing pilots.
Using a 5/16...
Installation Instructions - Page 15

... use and keep with correct Propane gas orifice spud. Replace with package containing literature.
Screws
C
C. Burner base
13,000 BTUs 99 50
0.99 mm Large burner -
Adjusting Simmer Low Setting on the regulator so that the hollow end faces out and the letters "LP" are installed, remove them. 2. 5.
Line pressure testing above the...
Installation Instructions - Page 18

... orifice spud in plastic parts bag for illustration.
13. B A
A B
A. Grasp electrode here. B. Electrode bracket clip 11. B
A
A
A. Propane gas orifice spuds are stamped with package containing literature. Place Natural gas orifice in the nut driver while changing it.
See Step 4 for future use, and keep with a letter and a number. Replace oven baffle and oven...
Installation Instructions - Page 19

...driver while changing it slides out of the hole in plastic parts bag for illustration. Set gas orifice spud aside. Set aside with a letter and a number.
Propane gas orifice spuds are stamped with side igniter positioned on the right. Replace....4 cm] models and the right oven cavity on the oven bake burner cover with package containing literature.
6. Oven back B. Replace the broil ...
Installation Instructions - Page 23

...installed... its individual manual shut-off ...the model/...parts bag for the remaining burners. Insert nut driver... into the gas opening and press down onto the gas orifice spud and remove by using a large flat-blade screwdriver, turning the regulator cap clockwise.
7. Replace burner cap. 9. NOTE: Make sure to the regulator should be as follows for operation and checking the regulator setting...
Installation Instructions - Page 27

... models and the right oven cavity on the right. Using a 1/4" (6.4 mm) nut driver,...plastic parts bag ...Set aside with the broil burner assembly inside the broil burner electrode hole as illustrated.
Broil burner C. See Step 1 for future use, and keep with shoulder screws in the oven back, and pull the electrode out of oven
3. Replace Oven Bake Burner Cover
1. Cover notches (4) B. Install...
KitchenAid KFGC558JBK Reviews
We have not received any reviews for KitchenAid yet.