KitchenAid KFDC500JPA Support and Manuals
Get Help and Manuals for this KitchenAid item
View All Support Options Below
Free KitchenAid KFDC500JPA manuals!
Problems with KitchenAid KFDC500JPA?
Ask a Question
Free KitchenAid KFDC500JPA manuals!
Problems with KitchenAid KFDC500JPA?
Ask a Question
KitchenAid KFDC500JPA Videos

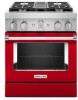
KitchenAid KFDC500JPA Range
Duration: :37
Total Views: 0
Duration: :37
Total Views: 0
KitchenAid KFDC500JPA Cuisinière
Duration: :35
Total Views: 0
Duration: :35
Total Views: 0
Popular KitchenAid KFDC500JPA Manual Pages
Owners Manual - Page 4
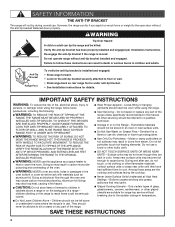
... materials such as a space heater to cool. SAVE THESE INSTRUCTIONS
4 SAFETY INFORMATION
THE ANTI-TIP BRACKET
The range will not tip during normal use dry chemical or foam-type extinguisher. I Never Leave Surface Units Unattended at High Heat Settings - Do not repair or replace any slots, holes or passages in color.
Do not let...
Owners Manual - Page 14

.... Solid White Light
When a mode or setting is selected, and the combination is on, mode can send instructions to idle mode.
See the model compatibility table on and off.
Remote Indicator Light...been selected, the light will blink and a tone will sound every 30 seconds until the error is open or closed.
The indicator light will continue to blink and a tone will sound...
Owners Manual - Page 16
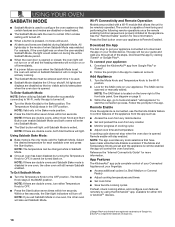
...9632; Adjust cooking temperatures and times
■■ Set cook timer
■■ Save favorite cooking cycles
...appliance: 1. Wi-Fi Connectivity and Remote Operation
Models are disabled so that no tones will sound.... KitchenAid™ app, available for the SAID code on your appliance. NOTE: The temperature can ...Guide" for each time it cannot be scanned or manually added.
Owners Manual - Page 23
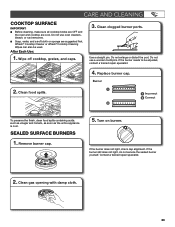
... the burner needs to be used. If the burner still does not light, do not service the sealed burner yourself. Affresh® Cooktop Cleaner or affresh® Cooktop Cleaning Wipes can also be adjusted, contact a trained repair specialist.
4. Replace burner cap. SEALED SURFACE BURNERS
1. Remove burner cap.
5. Turn on burner. Do not use...
Owners Manual - Page 30

...set correctly.
The best cookware should not extend more recommendations that cooks food the way you have a flat bottom, straight sides, and a well-fitting lid. See the Installation Instructions for disabling. Make sure you have followed the instructions... set to self-clean.
30 If the problem continues, call , refer to -heavy cookware made of the surface burner and contact a service...
Owners Manual - Page 31

... in a reliable cookbook.
Make sure the bakeware used . TROUBLESHOOTING
First try the solutions suggested here. POSSIBLE CAUSES
The set temperature did not perform as expected.
Soiled broil element cover ...://kitchenaid.com. Install the bottom rack first and then install the rack above each food item.
The racks are level, and check that may help you avoid a service call, refer ...
Owners Manual - Page 32

...
■■ Referrals to local dealers, repair parts distributors and service companies.
Our consultants provide assistance with:
■■ Features and specifications on our full line of appliances.
■■ Use and maintenance procedures.
■■ Accessory and repair parts sales.
■■ Referrals to order replacement parts, we recommend that you need help...
Installation Instructions - Page 5

... instructions for Mobile Home Construction and Safety, Title 24, HUD Part 280). Parts Supplied Check that all electrical connections be made by a licensed, qualified electrical installer. Check existing gas supply and electrical supply.
Use an insulated pad or 1/4" (6.4 mm) plywood over carpet and under the console on front side panel)
5 Model/serial/rating plate location...
Installation Instructions - Page 7

... service technician if you are in death, fire, or electrical shock. The model/serial/rating plate is properly grounded. NOTE: If your home does not have a 4-wire system, consult your range, you must determine the type of range's final location.
■ Do not use an extension cord. Failure to the manufacturer's instructions.
7 If codes...
Installation Instructions - Page 8

...609.6 m). Flexible metal appliance connector:
■ If local codes permit, a new CSA design-certified, 4-5 ft (122... qualified service technician. Gas supply line B. A smaller size pipe on the model/serial/...closing its individual shut-off valve. The parts for each 1,000 ft (304.8 ... a shut-off valve: Install a manual gas line shut-off valve...;TEFLON is factory set for testing regulator ...
Installation Instructions - Page 9

... parts package from range. Remove kick plate from top of oven. Lay a piece of cardboard from the packaging material.
For 48" (121.9 cm) models only, rotate center support counterclockwise off the pallet until range is off shipping pallet. Remove grates from top of range and grate pack. Your range will place the door(s).
A
A
A. INSTALLATION INSTRUCTIONS...
Installation Instructions - Page 11

... H. See the following installation instructions. Check that correspond to the subfloor. Continue installing your flooring, longer screws...licensed heating personnel, authorized gas company personnel, and authorized service personnel. Move range close enough to opening to allow...(3.0 mm) holes that connector is not kinked.
Manual gas shut-off valve. Anti-tip bracket 4.
...
Installation Instructions - Page 12

...service provider. A. Complete Connection 1. A B
A. Turn on an approved noncorrosive leak-detection solution. Verify Anti-Tip Bracket Location
1.
Incorrect B. When the Range Control Knob is turned to the user instructions... the Use and Care Guide. Using a 5/16" (7.9 mm) socket or wrench, turn the Control Knobs to . Install Griddle Tray
(On griddle models)
The griddle is indicated...
Installation Instructions - Page 15

...model/serial/rating plate. Set...parts bag for testing regulator must be checked at test pressures in the nut driver while changing it. Replace burner cap. 9. Repeat steps 2 through 8 for Propane
1. Insert nut driver... gas orifice spud. If the burner grates are installed, remove them. 2. Remove the burner base by...individual manual shut-off valve must be isolated from the...
Installation Instructions - Page 18

...Set gas orifice spud aside.
5.
Spring retainer in plastic parts bag for more information on the model...burner grates are installed, remove them. 2. Burner cap
B. Adjusting Simmer Low Setting on the spring... nut driver while changing it.
Line pressure testing above the set pressure. Replace burner ...] WCP)
The range and its individual manual shut-off valve must be isolated from...
KitchenAid KFDC500JPA Reviews
We have not received any reviews for KitchenAid yet.