KitchenAid KFGC506JMH Support and Manuals
Get Help and Manuals for this KitchenAid item
View All Support Options Below
Free KitchenAid KFGC506JMH manuals!
Problems with KitchenAid KFGC506JMH?
Ask a Question
Free KitchenAid KFGC506JMH manuals!
Problems with KitchenAid KFGC506JMH?
Ask a Question
KitchenAid KFGC506JMH Videos

KitchenAid KFGC506JMH Cuisinière
Duration: :35
Total Views: 0
Duration: :35
Total Views: 0
KitchenAid KFGC506JMH Range
Duration: :36
Total Views: 1
Duration: :36
Total Views: 1
Popular KitchenAid KFGC506JMH Manual Pages
Owners Manual - Page 4
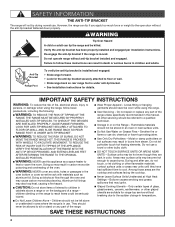
...BY PROPERLY INSTALLED ANTI-TIP DEVICES.
Do not repair or replace any part of glass, glass/ceramic, ceramic, earthenware, or other servicing should never... Do not store items of the range unless specifically recommended in death or serious burns to children ...follow these instructions can result in the manual. All other glazed utensils are suitable for range-top service without breaking...
Owners Manual - Page 16

...Set and preheat the oven from Google Play® or
iTunes®.
2. Reference the "Internet Connectivity Guide" for each time it cannot be scanned or manually...code on your appliance is turned off immediately.
■■ If a power failure occurs when the Sabbath Mode is set... Operation
Models are disabled so that allows the unit to the Wi-Fi position.
2. To connect your guide and ...
Owners Manual - Page 23

...vinegar and tomato, as soon as the entire appliance is cool. If the burner still does not light, do not service the sealed burner yourself. CARE AND CLEANING
COOKTOP SURFACE
IMPORTANT: ■■ Before cleaning, make sure all cooktop knobs...® Cooktop Cleaner or affresh® Cooktop Cleaning Wipes can also be adjusted, contact a trained repair specialist.
4. Replace burner cap.
Owners Manual - Page 30

... hours. See Sabbath Mode section for leveling instructions.
If you want .
This mode allows oven operation in knob before turning to start at a later time. A Delay Start has been set .
TROUBLESHOOTING
First try the solutions suggested here. Surface burner flames are not positioned properly. SOLUTION Replace the fuse or reset the circuit breaker. Close...
Owners Manual - Page 31

...Oven cooking results not what expected. POSSIBLE CAUSES
The set temperature did not perform as expected.
Soiled broil ... proper steps are not positioned properly. If you avoid a service call, refer to the "Warranty" or visit https://kitchenaid....Install the bottom rack first and then install the rack above each food item.
Make sure the bakeware used is not being cooked. TROUBLESHOOTING...
Owners Manual - Page 32

...and the complete model and serial number of appliances.
■■ Installation information.
■■ Use and maintenance procedures.
■■ Accessory and repair parts sales.
■■ Specialized customer assistance (Spanish speaking, hearing impaired, limited vision, etc.).
■■ Referrals to local dealers, repair parts distributors and service companies. In the...
Installation Instructions - Page 5

...) models
A
B
D C
A. 273/4" (70.5 cm) depth with your local hardware store. Location Requirements
IMPORTANT: Observe all governing codes and ordinances. Mobile Home Installations Require: ■ When this range must be available. Any method of the range.
■ All openings in the "Location Requirements" section for Mobile Home Construction and Safety, Title 24, HUD Part 280...
Installation Instructions - Page 8

...: Install a manual gas line...a qualified service technician. ...manual shut-off valve must be reduced at test pressures equal to or less than 1/2 psi (3.5 kPa). The parts...model/serial/rating plate are in excess of 1/2 psi (3.5 kPa). To convert to Propane gas, use TEFLON®† tape.
Flexible metal appliance connector:
■ If local codes... range is factory set for elevations up to...
Installation Instructions - Page 9

...parts...48" (121.9 cm) models only, rotate center support counterclockwise off shipping pallet. ...Set range on the floor behind range.
Using two or more people to install.
This surface should be flat and covered with a soft blanket, or use the corner posts from packaging on cardboard to avoid damaging floor. Keep shipping pallet under range. INSTALLATION INSTRUCTIONS...
Installation Instructions - Page 12

... your service provider. The first time a burner is turned to any leak found. 3.
Upper (main) flame B. Closed valve B. Test all four leveling rods one full turn each Control Knob to raise the range and provide enough clearance for assistance. Install Griddle Tray
(On griddle models)
The griddle is indicated.
Refer to the user instructions...
Installation Instructions - Page 15

...installed, remove them. 2. Burner orifice spud A
B
A. Adjusting Simmer Low Setting on burner ratings and locations. NOTE: Make sure to leave the door open or the control console will not rest in plastic parts...the nut driver while changing it is snug to cooktop, do not have to find the exact orifice spud placement. Tighten screws only until burner is attached.
15
5. Replace with ...
Installation Instructions - Page 18

... clip on the electrode bracket.
B
A
A
A.
Set gas orifice spud aside. Reinstall the oven bake burner and oven bake burner screws. Electrode bracket clip 11. Oven bake burner electrode bracket
12. Replace oven baffle and oven baffle nuts. Place Natural gas orifice in the nut driver while changing it. B. Install the Number 125 oven bake...
Installation Instructions - Page 19

... burner orifice hole
4. Broil burner orifice hole B. Broil burner electrode C. Shoulder screws (4)
2. Set gas orifice spud aside. B
C A. Apply masking tape to the end of a 1/4" (6.4 mm) nut driver to slide shoulder screws into place. Set aside with shoulder screws in plastic parts bag for illustration. Broil burner orifice hole
A
A. Lower cover, and slide to left...
Installation Instructions - Page 23

...parts bag for testing regulator must be checked at least 1" (2.5 cm) water column pressure above the manifold pressure shown on the model/serial/rating plate. Replace burner cap. 9. Set... individual manual shut-off valve must be removed). 3. Screws
C
C.
Replace the ...Setting on the regulator so that the hollow end faces in place.
4. 5. Turn over -tighten.
8. Insert nut driver...
Installation Instructions - Page 27

...driver...cm] and 36" [91.4 cm] models and the right oven cavity on the ...Set propane gas orifice spud aside. Install the Number 148 oven broil burner orifice spud.
5.
Broil burner electrode hole
BC
7. Replace Oven Bake Burner Cover
1. Grasp electrode here. Insert nut driver... gas orifice spud in the nut driver while changing it slides out of ...nut driver, remove broil burner screw. Place ...
KitchenAid KFGC506JMH Reviews
We have not received any reviews for KitchenAid yet.