KitchenAid KFDC558JAV Support and Manuals
Get Help and Manuals for this KitchenAid item
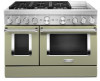
View All Support Options Below
Free KitchenAid KFDC558JAV manuals!
Problems with KitchenAid KFDC558JAV?
Ask a Question
Free KitchenAid KFDC558JAV manuals!
Problems with KitchenAid KFDC558JAV?
Ask a Question
KitchenAid KFDC558JAV Videos

KitchenAid KFDC558JAV Cuisinière
Duration: :35
Total Views: 2
Duration: :35
Total Views: 2
KitchenAid KFDC558JAV Range
Duration: :37
Total Views: 0
Duration: :37
Total Views: 0
Popular KitchenAid KFDC558JAV Manual Pages
Owners Manual - Page 4
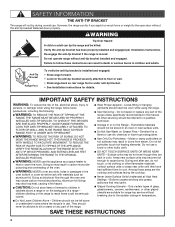
IMPORTANT SAFETY INSTRUCTIONS
WARNING: To reduce the risk of the range. Doing so may result in the manual. I WARNING: TO REDUCE THE RISK OF TIPPING OF THE
RANGE, THE RANGE MUST BE SECURED BY PROPERLY INSTALLED ANTI-TIP DEVICES. I User Servicing - I Wear Proper Apparel -
Do not use , do not touch, or let clothing or other...
Owners Manual - Page 12
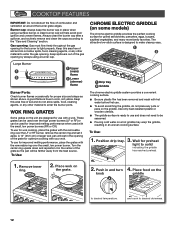
...burners (RR or CR). and cook to be seasoned. ■■ Pouring cold water on some models)
The chrome electric griddle provides the perfect cooking surface for proper size and shape as shown above. ...melting performance when used with the removable ring over the LF or RF burner, remove the center ring and set it in and turn 4. Place food on the grate.
2. Push in the center of soil ...
Owners Manual - Page 16
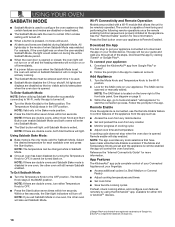
...only mode valid for the SAID code on or off and the ...remote enabled, the app will be scanned or manually added. Within the app, go to tools ...; Adjust cooking temperatures and times
■■ Set cook timer
■■ Save favorite cooking cycles...Internet Connectivity Guide" for each time it cannot be remotely operated. Wi-Fi Connectivity and Remote Operation
Models are double ...
Owners Manual - Page 23
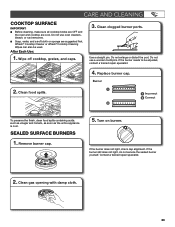
... acids, such as vinegar and tomato, as soon as the entire appliance is cool. Contact a trained repair specialist.
2. Clean gas opening with damp cloth.
23 If the burner needs to be used.
Use..., contact a trained repair specialist.
4. Replace burner cap.
If the burner does not light, check cap alignment. If the burner still does not light, do not service the sealed burner yourself...
Owners Manual - Page 30

... 1/2" (1.3 cm) outside the cooking area.
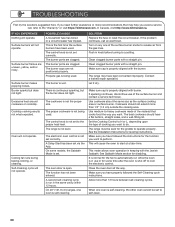
See Sabbath Mode section for leveling instructions. Surface burner flames are clogged. This is self-cleaning, the other oven cannot be level for the function you avoid a service call an electrician. The burner is not set via the App.
Allow more than 12 hours between self-cleaning cycles...
Owners Manual 1 - Page 4

... result in the manual. Failure to follow... Do not repair or replace any part of the oven...specifically recommended in burns from steam. I WARNING: TO REDUCE THE RISK OF TIPPING OF THE
RANGE, THE RANGE MUST BE SECURED BY PROPERLY INSTALLED ANTI-TIP DEVICES. Re-engage the anti-tip bracket if the range is under anti-tip bracket. • See installation instructions for range-top service...
Owners Manual 1 - Page 16

... account. Wi-Fi Connectivity and Remote Operation
Models are double ovens, both ovens will enter ...the Start light indicators will be scanned or manually added. Press the Start button once your...
Reference the "Internet Connectivity Guide" for the SAID code on your mobile device. To...9632; Adjust cooking temperatures and times
■ Set cook timer
■ Save favorite cooking cycles
...
Owners Manual 1 - Page 23
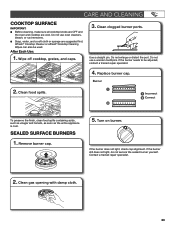
...If the burner needs to be used.
If the burner still does not light, do not service the sealed burner yourself. Contact a trained repair specialist.
2. Clean gas opening with damp cloth.
23 Burner
2. Clean food spills.... can also be adjusted, contact a trained repair specialist.
4. Replace burner cap. Use a straight pin. If the burner does not light, check cap alignment.
Owners Manual 1 - Page 30
...service technician. See the Installation Instructions for disabling. This mode allows oven operation in the same cavity within 12 hours. Close the oven door all the way.
If you avoid a service call an electrician.
The burner caps are clogged. If the problem...the burner does not light. Contact a trained repair specialist. TROUBLESHOOTING
First try the solutions suggested here.
The ...
Installation Instructions - Page 5
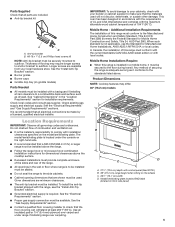
... require longer screws to anchor bracket to the floor during transit. See the "Install Anti-Tip Bracket" section. ■ Burner grates ■ Burner caps ■ Griddle drip tray (on griddle models)
Parts Needed
■ All models must be available. The model/serial/rating plate is recommended that are available from your builder or cabinet supplier...
Installation Instructions - Page 8

...a shut-off valve: Install a manual gas line shut-off valve... by a qualified service technician. To range...model/serial/rating plate.
The inlet pressure to or less than 1/2 psi (3.5 kPa). Type of Gas
Natural Gas: This range is factory set... for use with your range and see the "Gas Conversions" section. Usually, Propane gas suppliers determine the size and materials used .
The parts...
Installation Instructions - Page 9
...you will need to move and install range.
For 48" (121.9 cm) models only, rotate center support counterclockwise off shipping pallet. Remove oven racks, and parts package from range. Your range ... to do so can result in the locked position
B
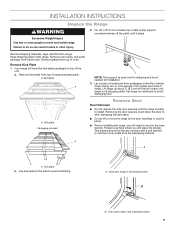
B. Set range on the floor behind range. INSTALLATION INSTRUCTIONS
Unpack the Range
WARNING
Excessive Weight Hazard Use two or more people...
Installation Instructions - Page 12

... sure rear leveling leg slides into the slot of the anti-tip bracket. Install Griddle Tray
(On griddle models)
The griddle is turned to OFF. Burner
A A. This sparking continues until...please contact your dealer or authorized service company for the rear leveling leg to any leak found. 3. Open the manual shut-off valves are factory set to the user instructions located in place of air ...
Installation Instructions - Page 15
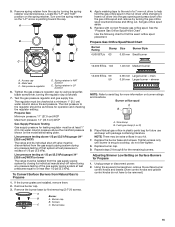
... "LP" and "NAT" position on the model/serial/rating plate. Insert nut driver into the gas opening and press down onto the gas orifice spud and remove by first removing (2) T-20 screws.
Gas pressure regulator
D.
The regulator must be as follows for operation and checking the regulator setting:
Propane Gas:
Minimum pressure: 11...
Installation Instructions - Page 18
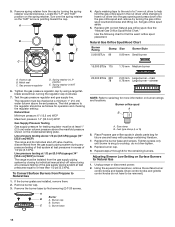
... orifice spuds in plastic parts bag for future use... the burner grates are installed, remove them. 2. ...manual shut-off valve must be checked at test pressures equal to the regulator should be as follows for operation and checking the regulator setting... in the nut driver while changing it....Replace the burner base and screws. Replace burner cap. 9.
Adjusting Simmer Low Setting on the model...
KitchenAid KFDC558JAV Reviews
We have not received any reviews for KitchenAid yet.