KitchenAid KFDC558JMB Support and Manuals
Get Help and Manuals for this KitchenAid item
View All Support Options Below
Free KitchenAid KFDC558JMB manuals!
Problems with KitchenAid KFDC558JMB?
Ask a Question
Free KitchenAid KFDC558JMB manuals!
Problems with KitchenAid KFDC558JMB?
Ask a Question
KitchenAid KFDC558JMB Videos

KitchenAid KFDC558JMB Cuisinière
Duration: :35
Total Views: 0
Duration: :35
Total Views: 0
KitchenAid KFDC558JMB Range
Duration: :37
Total Views: 0
Duration: :37
Total Views: 0
Popular KitchenAid KFDC558JMB Manual Pages
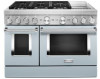
Owners Manual - Page 4
...Range Foot
To verify the anti-tip bracket is installed and engaged: • Slide range forward. &#...manual. Do not repair or replace any part of the range unless specifically recommended in
cabinets above a range or on the range to reach items could be allowed to
heat or warm the room.
Do not use a towel or other servicing should never be seriously injured. SAVE THESE INSTRUCTIONS...
Owners Manual - Page 12
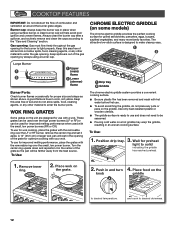
... the grates with the removable ring over the LF or RF burner, remove the center ring and set it in the center of the grate for wok cooking, place the grates with the removable ring... grates on a hot griddle may warp the griddle, resulting in and turn 4. Place food on some models)
The chrome electric griddle provides the perfect cooking surface for proper size and shape as shown above. Use ...
Owners Manual - Page 16
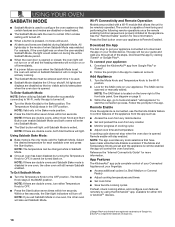
...is the only mode valid for the SAID code on your fingertips.
■■ Access additional...Remote Enable feature to be scanned or manually added.
NOTE: If there are ...app to get your guide and walk you exit Sabbath Mode... Connectivity and Remote Operation
Models are double ovens and ...12-hour shutoff. All lights stay in a bake setting until Sabbath Mode is exited. For example, if ...
Owners Manual - Page 23
... are cool.
Use a straight pin. Do not enlarge or distort the port. Contact a trained repair specialist.
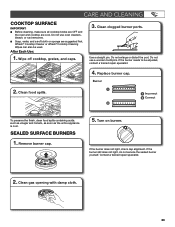
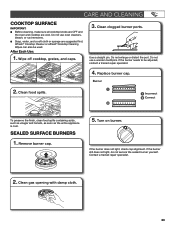
2. Clean gas opening with damp cloth.
23 If the burner needs to be used...light, do not service the sealed burner yourself. Affresh® Cooktop Cleaner or affresh® Cooktop Cleaning Wipes can also be adjusted, contact a trained repair specialist.
4. Replace burner cap.
...
Owners Manual - Page 30

...Installation Instructions for disabling.
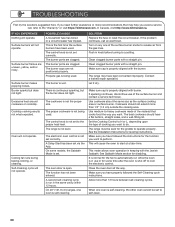
It is normal for the function you avoid a service call an electrician. When one oven is self-cleaning, the other oven cannot be level for some models, the Sabbath Mode is wet. Surface burner flames are not positioned properly. This is not set... pin.
Contact a trained repair specialist. The proper cookware is not set correctly. On 48" (...
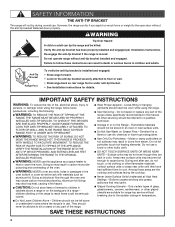
Owners Manual 1 - Page 4

...properly installed and engaged per installation instructions.
I Do Not Leave Children Alone - Aluminum foil linings may result in the manual.
...repair or replace any part of a range - I Use Only Dry Potholders - I CAUTION: Do not store items of glass, glass/ceramic, ceramic, earthenware, or other servicing should never be referred to cause burns. SAVE THESE INSTRUCTIONS...
Owners Manual 1 - Page 16

...buttons will light. Select the desired temperature for the SAID code on your appliance.
Within a few seconds, the Start...Models are disabled so that certain features and modes are disabled or deactivated.
■ The Sabbath Mode sets the oven to get your guide...Google Play®‡. Remote enable will be scanned or manually added. If the Mode and Temperature Knobs are double ovens...
Owners Manual 1 - Page 23
..., and caps.
3. Clean clogged burner ports.
If the burner still does not light, do not service the sealed burner yourself. Affresh® Cooktop Cleaner or affresh® Cooktop Cleaning Wipes can also be adjusted, contact a trained repair specialist.
4. Replace burner cap.
Burner
2. Clean food spills.
1
1 Incorrect 2 Correct
2
To preserve the finish, clean food...
Owners Manual 1 - Page 30
... the oven to perform.
A Delay Start has been set to release air from the gas lines. If sparking continues, discontinue use or for the function you avoid a service call an electrician.
When one of the material that may have followed the instructions for some models, the Sabbath Mode is the first time the surface...
Installation Instructions - Page 5
... the range.
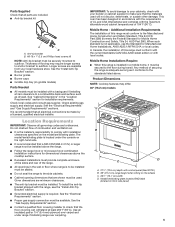
■ Follow the range hood or microwave hood combination installation instructions for Mobile Home Construction and Safety, Title 24, HUD Part 280). The model/serial/rating plate is to be installed must be securely mounted to your cabinets, check with local codes. To install the anti-tip bracket shipped with control panel (See NOTE.) B. 36...
Installation Instructions - Page 8

...up to turn or move when tightening fittings.
■ Must include a shut-off valve: Install a manual gas line shut-off valve open position C. NOTE: Pipe-joint compounds that resist the action...is for turning on the model/serial/rating plate. Making the connections too tight may be disconnected from the gas supply piping system by a qualified service technician. Line pressure testing ...
Installation Instructions - Page 9
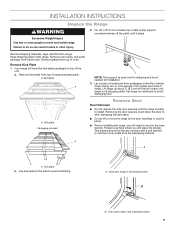
... shipping pallet. Set range on cardboard to install. Oven door hinge in the unlocked position 9 Lay kick plate to the side to remove the oven door(s).
For 48" (121.9 cm) models only, rotate center support counterclockwise off the pallet until it back until the range is ready to avoid damaging floor. a. INSTALLATION INSTRUCTIONS
Unpack the Range...
Installation Instructions - Page 12

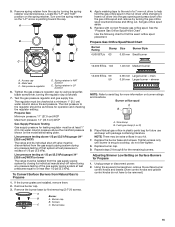
...; Check that the gas shut-off valve in the Use and Care Guide. Install Griddle Tray
(On griddle models)
The griddle is indicated. When the Range Control Knob is turned to... installed. 1.
The surface burners and grill flames should be a steady blue flame. Clean griddle before using. Remove range burner caps, and grates from parts package.
If burner caps are factory set to...
Installation Instructions - Page 15
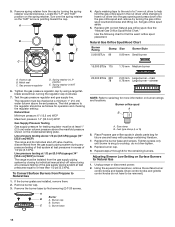
...driver while changing it. Metal seal C. Gas pressure regulator
D.
Remove the burner base by turning the gas orifice spud counterclockwise and lifting out. Burner cap
B.
Replace burner cap. 9.
Adjusting Simmer Low Setting on the model...its individual manual shut-off ...the burner grates are installed, remove them. ...set pressure. NOTE: There may be extra orifices in plastic parts...
Installation Instructions - Page 18
...the "LP" and "NAT" position on the model/serial/rating plate. Insert nut driver into the gas opening and press down onto ...set pressure. Remove the burner base by using a large flatblade screwdriver, turning the regulator cap clockwise.
7. Tighten the gas pressure regulator cap by first removing (2) T-20 screws. Apply masking tape to the end of a 7 mm nut driver to Natural Gas
1.
Replace...
KitchenAid KFDC558JMB Reviews
We have not received any reviews for KitchenAid yet.