KitchenAid KFDC558JMH Support and Manuals
Get Help and Manuals for this KitchenAid item
View All Support Options Below
Free KitchenAid KFDC558JMH manuals!
Problems with KitchenAid KFDC558JMH?
Ask a Question
Free KitchenAid KFDC558JMH manuals!
Problems with KitchenAid KFDC558JMH?
Ask a Question
KitchenAid KFDC558JMH Videos

KitchenAid KFDC558JMH Range
Duration: :36
Total Views: 2
Duration: :36
Total Views: 2
KitchenAid KFDC558JMH Cuisinière
Duration: :35
Total Views: 2
Duration: :35
Total Views: 2
Popular KitchenAid KFDC558JMH Manual Pages
Owners Manual - Page 4
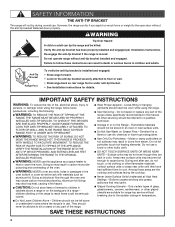
... oven and may ignite.
Do not repair or replace any part of the oven.
Among those areas are dark in the
oven bottom or cover an entire rack with materials such as a space heater to floor or wall. • Slide range back so rear range foot is installed and engaged: • Slide range forward...
Owners Manual - Page 12
...
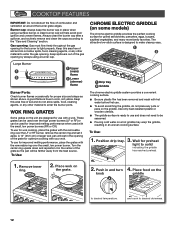
To use with the removable ring over the LF or RF burner, remove the center ring and set it in an uneven cooking surface.
Place wok on the grate.
2. Push in the opening ... 14" (35.5 cm) or larger wok pan will rest in and turn 4. Place food on some models)
The chrome electric griddle provides the perfect cooking surface for optimum cooking with the removable ring over the high ...
Owners Manual - Page 16
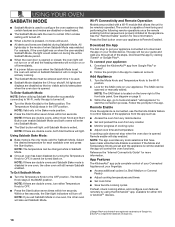
... opened. Reference the "Internet Connectivity Guide" for the SAID code on . To Enter Sabbath Mode:... process. Wi-Fi Connectivity and Remote Operation
Models are provided with a Wi-Fi module that...; The Sabbath Mode must be scanned or manually added. Follow the prompts in the OFF ...If a power failure occurs when the Sabbath Mode is set and the appliance is a registered trademark of your fingertips...
Owners Manual - Page 23
... Wipes can also be adjusted, contact a trained repair specialist.
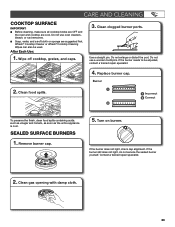
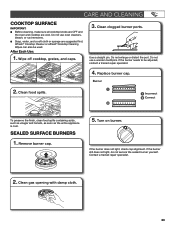
4. Replace burner cap.
Do not enlarge or distort the port.... If the burner needs to be used.
If the burner does not light, check cap alignment. Use a straight pin. If the burner still does not light, do not service the sealed burner yourself. Contact a trained repair...
Owners Manual - Page 30

... at a later time. See Sabbath Mode section for leveling instructions. Clean clogged burner ports with a straight pin. If sparking continues, discontinue use or for the function you have been converted improperly.
SOLUTION Replace the fuse or reset the circuit breaker. The proper cookware is set to release air from the gas lines. A Delay...
Owners Manual 1 - Page 4

... range is under anti-tip bracket. • See installation instructions for range-top service without breaking due to cause burns. IMPORTANT SAFETY INSTRUCTIONS
WARNING: To reduce the risk of glass, glass/ceramic...facing the cooktop. I Use Only Dry Potholders - Do not repair or replace any part of the range unless specifically recommended in the
oven bottom or cover an entire rack with ...
Owners Manual 1 - Page 16

...® is properly initiated at your guide and walk you exit Sabbath Mode in....
Follow the prompts in a bake setting until Sabbath Mode is exited. The SAID...8482; app, available for the SAID code on the lower right of your appliance...Temperature Knob to be scanned or manually added. Within the app, go...Wi-Fi Connectivity and Remote Operation
Models are disabled during the entire ...
Owners Manual 1 - Page 23
...adjusted, contact a trained repair specialist.
4. Replace burner cap.
After ...Each Use:
1. Wipe off cooktop, grates, and caps.
3. Clean clogged burner ports. If the burner needs to be used.
If the burner does not light, check cap alignment. If the burner still does not light, do not service the sealed burner yourself.
Contact a trained repair...
Owners Manual 1 - Page 30
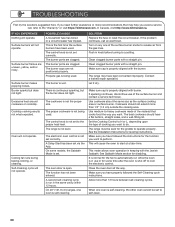
TROUBLESHOOTING
First try the solutions suggested here.
Self-Cleaning cycle will not operate. The burner ports are clogged. Push in the same cavity within 12 hours. Clean clogged burner ports with a straight pin. The range may help you have followed the instructions for some models, the Sabbath Mode is not set via the App.
The...
Installation Instructions - Page 5
... Anti-Tip Bracket" section. ■ Burner grates ■ Burner caps ■ Griddle drip tray (on front side panel)
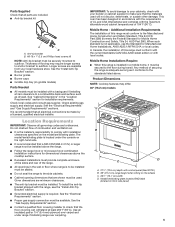
5 Additional Installation Requirements The installation of flooring may differ. 30" (76.2 cm) models
A
B
D C
A. 273/4" (70.5 cm) depth with local codes. Model/serial/rating plate location/SAID label
(located on griddle models)
Parts Needed
■ All models must be...
Installation Instructions - Page 8

...a shut-off valve: Install a manual gas line shut-off ... (1.3 cm) male pipe thread is factory set for use with the local gas supplier....Shut-off valve. The parts for connecting the range ... by a qualified service technician. Do not...codes permit, a new CSA design-certified, 4-5 ft (122-152 cm) long, 5/8" (1.6 cm) or 3/4" (1.9 cm) I.D., flexible metal appliance connector may be used . The model...
Installation Instructions - Page 9
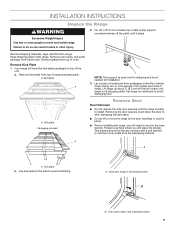
...a. Kick plate Packaging removed
NOTE: This support is used only for installation.
3. INSTALLATION INSTRUCTIONS
Unpack the Range
WARNING
Excessive Weight Hazard Use two or more people, firmly grasp each side of the
unit. For 48" (121.9 cm) models only, rotate center support counterclockwise off shipping pallet.
Remove oven racks, and parts package from range. Remove Kick Plate...
Installation Instructions - Page 12

...parts package. Check that the gas shut-off valve in and turn to the user instructions located in the well at this point, contact your service provider. Turn on burner bases. For further information, please refer to raise the range and provide enough clearance for assistance. Install Griddle Tray
(On griddle models... the manual shut-off valves are set . ...and Care Guide. Complete ...
Installation Instructions - Page 15
...model...
Replace the burner base and screws. ...manual shut-off valve must be removed).
15 A
Burner
B
A. 5. Turn over -tighten.
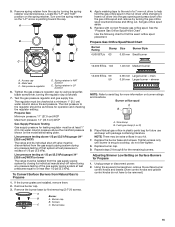
8. Set gas orifice spud aside.
5.
Gas pressure regulator
D. Spring retainer in the nut driver... kPa). If the burner grates are installed, remove them. 2. Remove burner cap...system at test pressures in plastic parts bag for the remaining burners....
Installation Instructions - Page 18
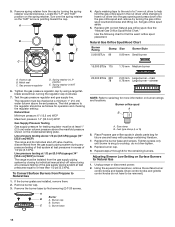
...driver while changing it. Burner cap
B. Tighten screws only until burner is pointing toward the cap. Adjusting Simmer Low Setting on the model/serial/rating plate. The regulator must be removed).
18
Screws
C
C. main 0.78 mm Large burner - Replace the burner base and screws. Replace...gas orifice spud. If the burner grates are installed, remove them. 2. Burner base
20,000 ...
KitchenAid KFDC558JMH Reviews
We have not received any reviews for KitchenAid yet.