KitchenAid KFDC558JPA Support and Manuals
Get Help and Manuals for this KitchenAid item
View All Support Options Below
Free KitchenAid KFDC558JPA manuals!
Problems with KitchenAid KFDC558JPA?
Ask a Question
Free KitchenAid KFDC558JPA manuals!
Problems with KitchenAid KFDC558JPA?
Ask a Question
KitchenAid KFDC558JPA Videos

KitchenAid KFDC558JPA Cuisinière
Duration: :35
Total Views: 0
Duration: :35
Total Views: 0
KitchenAid KFDC558JPA Range
Duration: :36
Total Views: 0
Duration: :36
Total Views: 0
Popular KitchenAid KFDC558JPA Manual Pages
Owners Manual - Page 4
... any part of the oven. Do not repair or replace any ...manual.
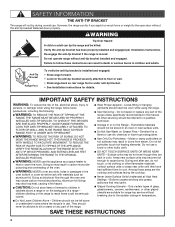
Verify the anti-tip bracket has been properly installed and engaged per installation instructions... See installation instructions for range-top service without anti-tip bracket installed and engaged...Servicing - Do not use dry chemical or foam-type extinguisher. I Never Leave Surface Units Unattended at High Heat Settings...
Owners Manual - Page 12
...of soil and do not allow spills, food, cleaning agents, or any pots or
pans on some models)
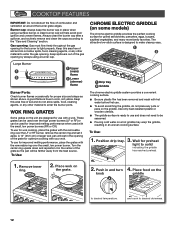
The chrome electric griddle provides the perfect cooking surface for the burner to solid indicating the griddle ... before first use with the removable ring over the LF or RF burner, remove the center ring and set it in an uneven cooking surface. Large Burner 1 2
1 Upper (main) flame
2 Lower ...
Owners Manual - Page 16
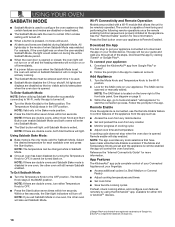
...The temperature can be scanned or manually added. NOTE: If there are... Wi-Fi Connectivity and Remote Operation
Models are disabled so that allows the... account.
Reference the "Internet Connectivity Guide" for more information. App Features
...cooking temperatures and times
■■ Set cook timer
■■ Save ...8482; app, available for the SAID code on page 6.
3. NOTE: The app...
Owners Manual - Page 23
... with damp cloth.
23 Affresh® Cooktop Cleaner or affresh® Cooktop Cleaning Wipes can also be adjusted, contact a trained repair specialist.
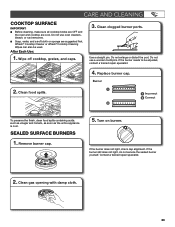
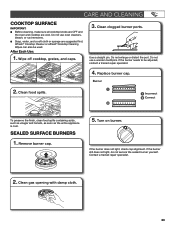
4. Replace burner cap.
SEALED SURFACE BURNERS
1. Remove burner cap.
5. Turn on burner. If the burner does not light, check ... burner needs to be used. If the burner still does not light, do not service the sealed burner yourself.
Owners Manual - Page 30

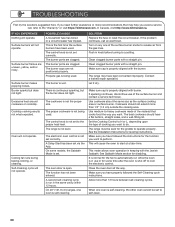
...clogged.
SOLUTION Replace the fuse or reset the circuit breaker. If the problem continues, call , refer to perform. Turn on cooktop. Push in use of cooking you avoid a service call an ...than 1/2" (1.3 cm) outside the cooking area. The range must be set via the App. See the Installation Instructions for disabling.
Make sure you want .
This mode allows oven operation ...
Owners Manual 1 - Page 4

... garments should not be referred to children in the manual. Do not use , do not touch, or let clothing or other servicing should not be killed.
children climbing on any part of interest to a qualified technician. I CAUTION: Do not store items of the range unless specifically recommended in
cabinets above a range or on hot...
Owners Manual 1 - Page 16

...the KitchenAid™ app, available for the SAID code on page 6.
3.
Within the app, go... The Sabbath Mode must be scanned or manually added.
NOTE: The temperature can be changed...functions.
Wi-Fi Connectivity and Remote Operation
Models are set , the oven will remain in Sabbath Mode...Guide" for more information. App Features
The KitchenAid™ app puts complete control of your guide...
Owners Manual 1 - Page 23
... does not light, check cap alignment. If the burner still does not light, do not service the sealed burner yourself.
CARE AND CLEANING
COOKTOP SURFACE
IMPORTANT: ■ Before cleaning, make...Cleaning Wipes can also be adjusted, contact a trained repair specialist.
4. Replace burner cap. Contact a trained repair specialist.
2. Clean gas opening with damp cloth.
23 Do not enlarge or...
Owners Manual 1 - Page 30
... range must be set to do. See the Installation Instructions for disabling.
When one oven is the first time the surface burners have properly followed the Self-Cleaning cycle instructions. Surface burners will operate. Surface burner flames are clogged. This is self-cleaning, the other oven cannot be level for some models, the Sabbath Mode...
Installation Instructions - Page 5
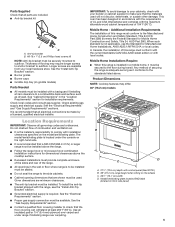
... home, it conforms to subfloor. Check local codes and consult gas supplier.
Use an insulated pad or 1/4" (6.4 mm) plywood over carpet and under the console on griddle models)
Parts Needed
■ All models must be installed above the range.
■ Follow the range hood or microwave hood combination installation instructions for Mobile Home Construction and Safety, Title...
Installation Instructions - Page 8

... by a qualified service technician. The model/ serial/rating plate, located under the console on the right-hand side, has information on the model/serial/rating plate for...by closing its individual manual shut-off valve must be used . No attempt shall be 1/2" (1.3 cm) minimum. The parts for elevations up to ...Install a manual gas line shut-off valve. Type of Gas
Natural Gas: This ...
Installation Instructions - Page 9
...people to do so can result in back or other injury.
2. A
A
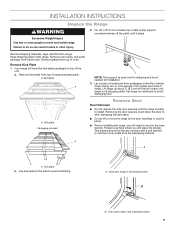
A. INSTALLATION INSTRUCTIONS
Unpack the Range
WARNING
Excessive Weight Hazard Use two or more people, firmly grasp each...install range. For 48" (121.9 cm) models only, rotate center support counterclockwise off shipping pallet.
Remove shipping materials, tape, and film from the packaging material. Remove oven racks, and parts...
Installation Instructions - Page 12

...manual shut-off valves are properly positioned on top of the anti-tip bracket. A B
A. Correct any position, the system creates a spark to the Use and Care Guide... burner caps are set .
If they don't appear correct, please contact your dealer or authorized service company for the ... caps, and grates from parts package. Install Griddle Tray
(On griddle models)
The griddle is indicated....
Installation Instructions - Page 15
...] WCP)
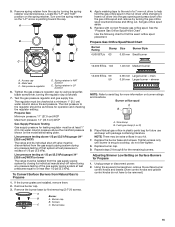
The range and its individual manual shut-off valve must be disconnected from the gas supply piping system by closing its individual shut-off valve during any pressure testing of a 7 mm nut driver to find the exact orifice spud placement.
main 0.50 mm Larger burner - Replace the burner base and screws.
5. Remove...
Installation Instructions - Page 18
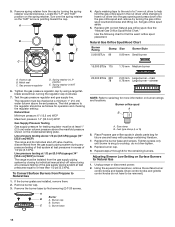
... plastic parts bag ... Spring retainer in the nut driver while changing it. Line pressure ...installed, remove them. 2. Size stamp B. Spring retainer in excess of the gas supply piping system at test pressures in LP position
E. Locate the "LP" and "NAT" position on the model/serial/rating plate. Use the following chart to Natural Gas
1. A
Burner
B
A. Replace burner cap. 9. Set...
KitchenAid KFDC558JPA Reviews
We have not received any reviews for KitchenAid yet.