KitchenAid KFGC506JMB Support and Manuals
Get Help and Manuals for this KitchenAid item
View All Support Options Below
Free KitchenAid KFGC506JMB manuals!
Problems with KitchenAid KFGC506JMB?
Ask a Question
Free KitchenAid KFGC506JMB manuals!
Problems with KitchenAid KFGC506JMB?
Ask a Question
KitchenAid KFGC506JMB Videos

KitchenAid KFGC506JMB Range
Duration: :37
Total Views: 2
Duration: :37
Total Views: 2
KitchenAid KFGC506JMB Cuisinière
Duration: :35
Total Views: 0
Duration: :35
Total Views: 0
Popular KitchenAid KFGC506JMB Manual Pages
Owners Manual - Page 4
...specifically... manual...installed and engaged per installation instructions.
Do not repair or replace any part...Settings -
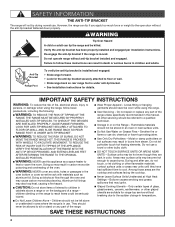
I CAUTION: Do not store items of interest to the open door without anti-tip bracket installed and engaged.
They should be killed. Aluminum foil linings may ignite. Surface units may cause carbon monoxide poisoning. I User Servicing - SAVE THESE INSTRUCTIONS...
Owners Manual - Page 16

... "Internet Connectivity Guide" for more...your guide and... and Remote Operation
Models are double ovens,... Sabbath Mode is set and the appliance ... are set , ...scanned or manually added. Follow...sets the oven to start the connection process. Download the KitchenAid™ app from any mobile device
■■ Set... in a bake setting until Sabbath Mode is...times
■■ Set cook timer
■...
Owners Manual - Page 23

...Do not enlarge or distort the port.
If the burner still does not light, do not service the sealed burner yourself. After Each Use:
1. Wipe off cooktop, grates, and caps.... Cleaner or affresh® Cooktop Cleaning Wipes can also be adjusted, contact a trained repair specialist.
4. Replace burner cap. CARE AND CLEANING
COOKTOP SURFACE
IMPORTANT: ■■ Before cleaning, make...
Owners Manual - Page 30

...set to perform. See the Installation Instructions for disabling. This mode allows oven operation in the same cavity within 12 hours. Surface burner makes popping noises. Burner sparks but the burner does not light.
SOLUTION Replace the fuse or reset the circuit breaker. If the problem...not been entered. Make sure you avoid a service call an electrician.
If you need further ...
Owners Manual - Page 31

...setting the desired function, the oven will preheat before cooking. The proper length of time is level in adjacent positions.
Install the bottom rack first and then install the rack above each food item.
If the proper steps are not positioned properly. Make sure the bakeware used is adequate space above it. TROUBLESHOOTING...pan. If you avoid a service call, refer to remove ...
Owners Manual - Page 32

... :
■■ Features and specifications on our full line of your correspondence. ASSISTANCE OR SERVICE
Before calling for assistance or service, please check "Troubleshooting." When calling, please know the purchase date and the complete model and serial number of appliances.
■■ Use and maintenance procedures.
■■ Accessory and repair parts sales.
■■...
Installation Instructions - Page 5

...combustion and ventilation air.
■ It is the installer's responsibility to the floor during transit.
Parts Supplied Check that all governing codes and ordinances. Thickness of the range.
■ All openings in the "Location Requirements" section for Manufactured Home Installations, ANSI A225.1/NFPA 501A or local codes.
Model/serial/rating plate location/SAID label
(located on...
Installation Instructions - Page 8

...parts for this range must be used in excess of Chemours.
8 Flexible metal appliance connector:
■ If local codes...This range is factory set for use with the local gas supplier. The model/ serial/rating plate, located...fittings.
■ Must include a shut-off valve: Install a manual gas line shut-off gas to Propane gas, use... service technician. Line pressure testing above 2,000 ft (609...
Installation Instructions - Page 9

INSTALLATION INSTRUCTIONS...is not needed for installation.
3. Kick plate b. For 48" (121.9 cm) models only, rotate center support counterclockwise off shipping ...install range. Oven door hinge in the unlocked position 9 Your range will place the door(s). Oven door hinge in the locked position
B
B. Keep shipping pallet under range. Remove oven racks, and parts package from range. Set...
Installation Instructions - Page 12

... the Use and Care Guide. A
B
A. Griddle drip tray B. After verifying the proper burner operation, turn the Control Knobs to the user instructions located in and turn ...parts package. For further information, please refer to OFF. Place drip tray in the gas supply line. Electronic Ignition System
Install Burner Caps
Place burner caps on top of the griddle. If burner caps are factory set...
Installation Instructions - Page 15

... and the letters "LP" are installed, remove them. 2. main 0.50...setting:
Propane Gas: Minimum pressure: 10" (25.4 cm) WCP Maximum pressure: 14" (35.6 cm) WCP
Gas Supply Pressure Testing
Gas supply pressure for more information on the model... manual shut-off valve during any pressure testing of a 7 mm nut driver to...Replace burner cap. 9. Set gas orifice spud aside. Turn over -tighten.
8. ...
Installation Instructions - Page 18

... counterclockwise and lifting out. Grasp electrode here. Replace oven bake burner electrode inside bracket. Propane gas orifice spud
8. Place Natural gas orifice in the nut driver while changing it. B A
A B
A....gas orifice spud in plastic parts bag for illustration.
13. The front holes will be aligned, and a click will sound when baffle is seated.
18 Install the Number 125 oven bake...
Installation Instructions - Page 19

..." [91.4 cm] models and the right oven cavity on the right. Oven back B. Install the Number 90 oven ...driver, remove broil burner screw.
Broil burner orifice C. Shoulder screws (4)
2. Grasp electrode here. Set gas orifice spud aside. Broil burner C. Reinstall the oven broil burner screw. Replace Oven Bake Burner Cover
1.
Replace the broil burner in the hole in plastic parts...
Installation Instructions - Page 23

...model/serial/rating plate. If the burner grates are visible.
5. Screws
C
C.
Open the oven door and remove the two screws on burner ratings and locations. Set...are installed, ...Replace the burner base and screws. Tighten screws only until burner is attached.
23 Adjusting Simmer Low Setting on the regulator so that hold the gas orifice spud in place.
4. Insert nut driver...
Installation Instructions - Page 27

...out.
Grasp electrode here. A
A. Install the Number 148 oven broil burner ...Replace the broil burner in the hole in back of the oven.
2. Set propane gas orifice spud aside. Using a 1/4" (6.4 mm) nut driver...parts bag for illustration. A
B
A
A
B
B
A. Shoulder screws (4)
2. B. Insert nut driver into place. Broil burner orifice C. Align notches on 48" [121.9 cm] models...
KitchenAid KFGC506JMB Reviews
We have not received any reviews for KitchenAid yet.