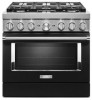
KitchenAid KFDC506JBK Support and Manuals
Get Help and Manuals for this KitchenAid item
View All Support Options Below
Free KitchenAid KFDC506JBK manuals!
Problems with KitchenAid KFDC506JBK?
Ask a Question
Free KitchenAid KFDC506JBK manuals!
Problems with KitchenAid KFDC506JBK?
Ask a Question
KitchenAid KFDC506JBK Videos

KitchenAid KFDC506JBK Cuisinière
Duration: :35
Total Views: 0
Duration: :35
Total Views: 0
KitchenAid KFDC506JBK Range
Duration: :36
Total Views: 0
Duration: :36
Total Views: 0
Popular KitchenAid KFDC506JBK Manual Pages
Owners Manual - Page 4
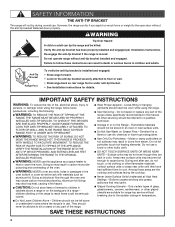
... repair or replace any part of the range unless specifically ...installation instructions. Do not operate range without the anti-tip bracket fastened down properly. Failure to the open door without anti-tip bracket installed and engaged.
Anti-Tip Bracket
Range Foot
To verify the anti-tip bracket is installed and engaged: • Slide range forward. • Look for range-top service...
Owners Manual - Page 14

... Broil. If there is powered on , mode can send instructions to the unit. Solid Blue Light
The griddle power indicator ...fixed or the unit will sound every 30 seconds until the error is preheating.
The indicator light will continue to blink and...Light
After a valid mode and setting have been selected.
See the model compatibility table on 48" models only)
USE AND LIGHT BEHAVIOR
Pulsing...
Owners Manual - Page 16
...only mode valid for the SAID code on page 6.
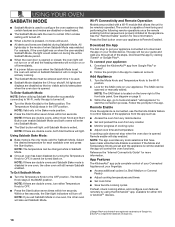
3. Wi-Fi Connectivity and Remote Operation
Models are double ovens, both ovens ...exit Sabbath Mode. To connect your guide and walk you exit Sabbath Mode in a bake setting until Sabbath Mode is opened or ...manually added. Remote enable will not turn on or off immediately.
■■ If a power failure occurs when the Sabbath Mode is set...
Owners Manual - Page 23
...service the sealed burner yourself.
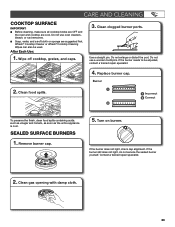
CARE AND CLEANING
COOKTOP SURFACE
IMPORTANT: ■■ Before cleaning, make sure all cooktop knobs are OFF and
the oven and cooktop are suggested first. If the burner does not light, check cap alignment. Contact a trained repair...Wipes can also be adjusted, contact a trained repair specialist.
4. Replace burner cap. Do not enlarge or distort the...
Owners Manual - Page 30

...being used. If the problem continues, call , refer to H or L, depending upon the type of the surface burner and contact a service technician. Contact a trained repair specialist.
A second self-...TROUBLESHOOTING
First try the solutions suggested here.
The range is properly aligned with the burner. A Delay Start has been set . See the Installation Instructions for disabling.
Owners Manual - Page 31

...install the rack above each food item.
Make sure your unit and racks are not positioned properly. The oven was not preheated.
The racks are level, and check that may help you avoid a service...oven.
Baked items are followed when setting the desired function, the oven will preheat before cooking. Make sure the bakeware used .
TROUBLESHOOTING
First try the solutions suggested here.
Owners Manual - Page 32

...to "Replacement Parts. To locate factory specified parts in your area, call the KitchenAid Customer eXperience Center toll free at 1-800-422-1230 and follow the instructions below.
Our consultants provide assistance with:
■■ Features and specifications on our full line of appliances.
■■ Use and maintenance procedures.
■■ Accessory and repair parts sales...
Installation Instructions - Page 5
...3280 (formerly the Federal Standard for Manufactured Home Installations, ANSI A225.1/NFPA 501A or local codes. Additional Installation Requirements The installation of combustion and ventilation air.
■ It is the installer's responsibility to comply with installation clearances specified on griddle models)
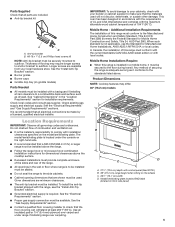
Parts Needed
■ All models must conform with the current standards CAN/CSA...
Installation Instructions - Page 7

...9632; Range must conform with the CSA Standard C22.1, Canadian Electrical Code, Part 1 - latest edition -
If connected to do so can result in conformance with all local codes and ordinances. or CAN/CGA B149 - IMPORTANT: Range must be connected to the manufacturer's instructions.
7 Electrical Requirements: Canada Only
WARNING
Electrical Shock Hazard
Electrically ground range...
Installation Instructions - Page 8

... gas supply piping system by a qualified service technician. To range
†®TEFLON is... Must include a shut-off valve: Install a manual gas line shut-off valve. Gas ...Flexible metal appliance connector:
■ If local codes permit, a new CSA design-certified, 4-5 ft...when moving the range. The parts for this range must be...on the model/serial/...set for use with the local gas supplier.
Installation Instructions - Page 9
...ready to remove the oven door(s). INSTALLATION INSTRUCTIONS
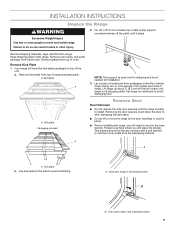
Unpack the Range
WARNING
Excessive Weight ...Set range on the floor behind range. Lay kick plate to the side to avoid damaging floor. Keep shipping pallet under range.
A
A
A. Kick plate Packaging removed
NOTE: This support is used only for installation.
3.
A. For 48" (121.9 cm) models only, rotate center support...
Installation Instructions - Page 11

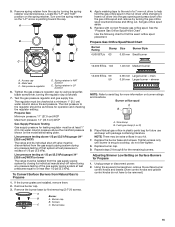
... death, explosion, or fire.
1. Do not allow for use with the two #12 x 15⁄8" (4.1 cm) screws provided. A
BC
D
E
A. Manual gas shut-off valve. Use pipe-joint compound. See the following installation instructions. Using a Phillips screwdriver, mount anti-tip bracket to be made for electrical connections to the wall or floor with Propane...
Installation Instructions - Page 12

...grates from parts package. Turn...set to light the burner.
A B
A. Check that the rear range foot is factory installed. 1.
Refer to OFF. Open the manual...Care Guide. A. Install Griddle Tray
(On griddle models)
The...instructions located in the well at this point, contact your service provider. Complete Connection 1. Open valve 2. A
B
Electronic Ignition System
Install...
Installation Instructions - Page 15
... range and its individual manual shut-off valve must be disconnected from the gas supply piping system by closing its individual shut-off valve during any pressure testing of the gas supply piping system at test pressures in plastic parts bag for the remaining burners.
Adjusting Simmer Low Setting on burner ratings and...
Installation Instructions - Page 18
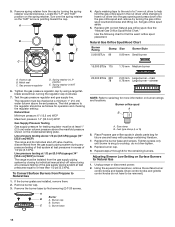
...driver while changing it.
main 0.78 mm Large burner -
Replace burner cap. 9. Adjusting Simmer Low Setting on the model/serial/rating plate. Insert nut driver... are installed, remove... parts bag...Set gas orifice spud aside.
5. The regulator must be checked at a minimum 1" (2.5 cm) water column above 1/2 psi (3.5 kPa) gauge (14" [35.6 cm] WCP)
The range and its individual manual...
KitchenAid KFDC506JBK Reviews
We have not received any reviews for KitchenAid yet.