Instruction Manual
Page 6
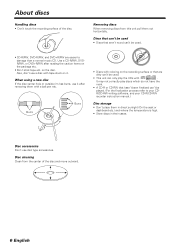
...A CD-R or CD-RW that are easier to your CD-R/CD-RW recorder instruction manual.) Disc storage • Don't place them out horizontally. Disc accessories Don't use a disc with tape stuck on it after reading the caution items on the disc. It may not correctly play the CDs with a ball... process refer to damage than a normal music CD. Removing discs When removing discs from the center of the disc. Also, don't use disc type accessories. on the package etc. • Don't stick tape etc. About discs Handling discs • Don't touch the recording surface of the disc and...
...A CD-R or CD-RW that are easier to your CD-R/CD-RW recorder instruction manual.) Disc storage • Don't place them out horizontally. Disc accessories Don't use a disc with tape stuck on it after reading the caution items on the disc. It may not correctly play the CDs with a ball... process refer to damage than a normal music CD. Removing discs When removing discs from the center of the disc. Also, don't use disc type accessories. on the package etc. • Don't stick tape etc. About discs Handling discs • Don't touch the recording surface of the disc and...
Instruction Manual
Page 11
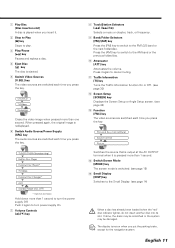
... Traffic Information function On or Off. (see page 30) w Screen Setup [SCREEN] key Displays the Screen Setup or Angle Setup screen. (see page 14) * Optional accessory Hold down more than one second. 1 Play Disc [Disc insertion slot] A disc is played when you insert it. 2 Stop to Play [7] key Stops to play...
... Traffic Information function On or Off. (see page 30) w Screen Setup [SCREEN] key Displays the Screen Setup or Angle Setup screen. (see page 14) * Optional accessory Hold down more than one second. 1 Play Disc [Disc insertion slot] A disc is played when you insert it. 2 Stop to Play [7] key Stops to play...
Instruction Manual
Page 70
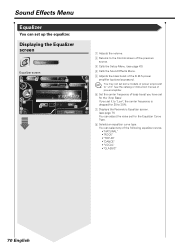
... set some models of power amp boost to "+18". You may not set up the equalizer. You can select any of the B.M.S power amplifier (optional accessory). See the catalog or instruction manual of power amplifier. 6 Set the center frequency of bass boost you set it to "Low", the center frequency is...
... set some models of power amp boost to "+18". You may not set up the equalizer. You can select any of the B.M.S power amplifier (optional accessory). See the catalog or instruction manual of power amplifier. 6 Set the center frequency of bass boost you set it to "Low", the center frequency is...

Instruction Manual
Page 76
Before Installation Accessories 1 2 3 4 5 6 7 8 9 0 - ..........1 ..........1 = ..........1 ~ ..........1 ! ..........1 @ ..........1 # ..........2 $ ..........4 % ..........4 ^ ..........2 76 English ..........2 ..........4 ..........4 ..........4 ..........2 ..........2 ..........4 ..........4 ..........1
Before Installation Accessories 1 2 3 4 5 6 7 8 9 0 - ..........1 ..........1 = ..........1 ~ ..........1 ! ..........1 @ ..........1 # ..........2 $ ..........4 % ..........4 ^ ..........2 76 English ..........2 ..........4 ..........4 ..........4 ..........2 ..........2 ..........4 ..........4 ..........1
Instruction Manual
Page 78
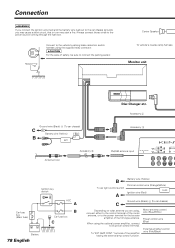
....AMP.CONT." Center Speaker To vehicle's reverse lamp harness Monitor unit Ground wire (Black) - (To car chassis) C Battery wire (Yellow) ( 5A ) B BATT Antenna Cord Accessory 5 Disc Changer etc. Accessory 2 Accessory 3 FM/AM antenna input AV INPUT 1 VIDEO L R FM /AM ANTENNA AV INPUT 2 VIDEO L R AV OUTPUT L VI R CEN Ignition key switch Car fuse box...
....AMP.CONT." Center Speaker To vehicle's reverse lamp harness Monitor unit Ground wire (Black) - (To car chassis) C Battery wire (Yellow) ( 5A ) B BATT Antenna Cord Accessory 5 Disc Changer etc. Accessory 2 Accessory 3 FM/AM antenna input AV INPUT 1 VIDEO L R FM /AM ANTENNA AV INPUT 2 VIDEO L R AV OUTPUT L VI R CEN Ignition key switch Car fuse box...
Instruction Manual
Page 79
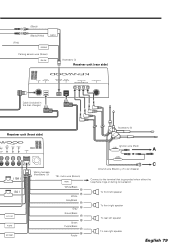
...rear left speaker To rear right speaker English 79 (Black) + (Black/White) CENTER (Pink) REVERSE Parking sensor wire (Green) PRK SW Accessory 4 Receiver unit (rear side) TO MONITOR CENTER SP (BLACK) SENSOR LINE TO MONITOR TO 5L I/F (WHITE) TO...I/F TO TV ANTENNA Cable (included in the disc changer) Receiver unit (front side) Accessory ! CONT P CONT EXT CONT. T VIDEO SUB (MONO) L PREOUT REAR L FRONT L ENTER R R R POWER ( 10A ) ( 3A ) ANT. Wiring harness (Accessory 1) TEL mute wire (Brown) MUTE White/Black + White Gray/Black + Gray Green/...
...rear left speaker To rear right speaker English 79 (Black) + (Black/White) CENTER (Pink) REVERSE Parking sensor wire (Green) PRK SW Accessory 4 Receiver unit (rear side) TO MONITOR CENTER SP (BLACK) SENSOR LINE TO MONITOR TO 5L I/F (WHITE) TO...I/F TO TV ANTENNA Cable (included in the disc changer) Receiver unit (front side) Accessory ! CONT P CONT EXT CONT. T VIDEO SUB (MONO) L PREOUT REAR L FRONT L ENTER R R R POWER ( 10A ) ( 3A ) ANT. Wiring harness (Accessory 1) TEL mute wire (Brown) MUTE White/Black + White Gray/Black + Gray Green/...

Instruction Manual
Page 81
...unit is installed securely in place. Attach the installation brackets 0 to the audio board. Tapping screw (ø4×16 mm) (Accessory 9) English 81 Installation Installation for Receiver unit 1. Installation for Monitor/Player Unit Screw (M4X8) (commercially available) Firewall or metal ...Self-tapping screw (commercially available) Bend the tabs of the hideaway unit using the sems bolts 8. Metal mounting strap (commercially available) Accessory 6 Make sure that the unit is unstable, it in place. Use the tapping screw 9 to secure the hideaway unit to the ...
...unit is installed securely in place. Attach the installation brackets 0 to the audio board. Tapping screw (ø4×16 mm) (Accessory 9) English 81 Installation Installation for Receiver unit 1. Installation for Monitor/Player Unit Screw (M4X8) (commercially available) Firewall or metal ...Self-tapping screw (commercially available) Bend the tabs of the hideaway unit using the sems bolts 8. Metal mounting strap (commercially available) Accessory 6 Make sure that the unit is unstable, it in place. Use the tapping screw 9 to secure the hideaway unit to the ...

Instruction Manual
Page 82
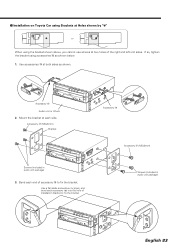
Installation Installing in Japanese-Made Cars ■ Installation on Toyota, Nissan or Mitsubishi Car using Brackets at Holes shown by "¶" or Accessory $ (M5×6mm) or Accessory % (M5×7mm) Bracket Screws (included in audio unit package) Audio unit or others Accessory $ (M5×6mm) or Accessory % (M5×7mm) Screws (included in audio unit package) 82 English
Installation Installing in Japanese-Made Cars ■ Installation on Toyota, Nissan or Mitsubishi Car using Brackets at Holes shown by "¶" or Accessory $ (M5×6mm) or Accessory % (M5×7mm) Bracket Screws (included in audio unit package) Audio unit or others Accessory $ (M5×6mm) or Accessory % (M5×7mm) Screws (included in audio unit package) 82 English
Instruction Manual
Page 83
... bracket at two holes of the right and left unit sides. Use a flat-blade screwdriver or pliers, and bend each accessory tab into the hole of accessory # to fix the bracket. Bend each end of installation bracket to fix the bracket. Screws (included in audio unit package...using Brackets at Holes shown by "¶" or When using accessories # as shown. Accessory $ (M5×6mm) Bracket Accessory # Accessory $ (M5×6mm) Screws (included in audio unit package) English 83 Use accessories # at both sides as shown below. 1. Accessory # Audio unit or others 2. If so, tighten the...
... bracket at two holes of the right and left unit sides. Use a flat-blade screwdriver or pliers, and bend each accessory tab into the hole of accessory # to fix the bracket. Bend each end of installation bracket to fix the bracket. Screws (included in audio unit package...using Brackets at Holes shown by "¶" or When using accessories # as shown. Accessory $ (M5×6mm) Bracket Accessory # Accessory $ (M5×6mm) Screws (included in audio unit package) English 83 Use accessories # at both sides as shown below. 1. Accessory # Audio unit or others 2. If so, tighten the...
Instruction Manual
Page 84
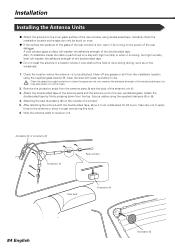
... as failure to clean the glass can only be attached. Rear window Rear seat Accessory $ 84 English Accessory % Attaching the seal (Accessory %) on the windshield. 1. Wire the antenna cable to the inner glass surface of the rear defogger. Accessory @ or Accessory # Accessory ! Attach the double-sided tape by turning on the power of the rear window...
... as failure to clean the glass can only be attached. Rear window Rear seat Accessory $ 84 English Accessory % Attaching the seal (Accessory %) on the windshield. 1. Wire the antenna cable to the inner glass surface of the rear defogger. Accessory @ or Accessory # Accessory ! Attach the double-sided tape by turning on the power of the rear window...
Instruction Manual
Page 85
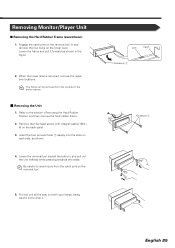
... removal tools 7 deeply into the slots on the back panel. 3. Refer to drop it forward as shown. 4. Lower the frame and pull it . Lock Catch Accessory 7 Accessory 7 English 85 Engage the catch pins on the removal tool 7 and remove the two locks on the removal tool. 5. Be careful to avoid injury from...
... removal tools 7 deeply into the slots on the back panel. 3. Refer to drop it forward as shown. 4. Lower the frame and pull it . Lock Catch Accessory 7 Accessory 7 English 85 Engage the catch pins on the removal tool 7 and remove the two locks on the removal tool. 5. Be careful to avoid injury from...


