Instruction Manual
Page 2
...Contents Before Use 4 About discs 6 Notes on playing MP3/WMA 7 Opening/Closing the Monitor and Power Switch 8 Removing/Attaching the Protection Panel..........9 XXV-05V Basic operation 10 Basic Operations of Remote Controller 12 Switch Small Display 14 Switch Screen Mode 15 Control during DVD Video, DVD Audio or Video CD Playback 16 • Displaying the DVD/VCD Playback screen • Displaying the Easy Control Panel • Displaying the DVD-V/DVD-A/VCD Control screen • DVD Disc Menu • VCD Zoom Control • Information Display • Direct Search TV Control 22...
...Contents Before Use 4 About discs 6 Notes on playing MP3/WMA 7 Opening/Closing the Monitor and Power Switch 8 Removing/Attaching the Protection Panel..........9 XXV-05V Basic operation 10 Basic Operations of Remote Controller 12 Switch Small Display 14 Switch Screen Mode 15 Control during DVD Video, DVD Audio or Video CD Playback 16 • Displaying the DVD/VCD Playback screen • Displaying the Easy Control Panel • Displaying the DVD-V/DVD-A/VCD Control screen • DVD Disc Menu • VCD Zoom Control • Information Display • Direct Search TV Control 22...
Instruction Manual
Page 3
... screen Sound Effects Menu Sound Effects Menu 66 • Displaying the Control screen • Displaying the Sound Effects Menu screen Audio Control 67 • Displaying the Audio Control screen SFC 68 • Displaying the SFC screen • SFC Adjustment Equalizer 70 • Displaying the Equalizer screen • Parametric Equalizer Position 72 • Displaying the Position screen • Position Fine Control Zone Control 74 • Displaying the Zone Control screen Before Installation 76 Connection 78 Installation 81 Glossary 86 Troubleshooting Guide 87 Specifications...
... screen Sound Effects Menu Sound Effects Menu 66 • Displaying the Control screen • Displaying the Sound Effects Menu screen Audio Control 67 • Displaying the Audio Control screen SFC 68 • Displaying the SFC screen • SFC Adjustment Equalizer 70 • Displaying the Equalizer screen • Parametric Equalizer Position 72 • Displaying the Position screen • Position Fine Control Zone Control 74 • Displaying the Zone Control screen Before Installation 76 Connection 78 Installation 81 Glossary 86 Troubleshooting Guide 87 Specifications...
Instruction Manual
Page 4
... replacing a fuse, only use in a dusty disc slot. The use automotive-grade wires or other jolts. • When extending the ignition, battery or ground wires, make sure to use of improper screws might result in a neutral detergent first, then remove the detergent using a dry cloth. Audio units you can control from the XXV-05V Receiver (As of January, 2005): KDC-CPS89, KDC-CPS87, KDC-CPS85, KDC-C719, KDC-C717, KDC-C715, KDC-C669, KDC-C667, KDC-C665, KDC...
... replacing a fuse, only use in a dusty disc slot. The use automotive-grade wires or other jolts. • When extending the ignition, battery or ground wires, make sure to use of improper screws might result in a neutral detergent first, then remove the detergent using a dry cloth. Audio units you can control from the XXV-05V Receiver (As of January, 2005): KDC-CPS89, KDC-CPS87, KDC-CPS85, KDC-C719, KDC-C717, KDC-C715, KDC-C669, KDC-C667, KDC-C665, KDC...
Instruction Manual
Page 7
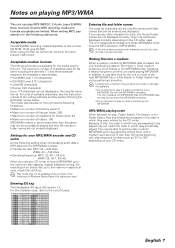
... code, refer to the maximum disc capacity, disable additional writing. If you use any other character for Folder Select, files and folders are not properly displayed. MP3/WMA playing order When selected for play, Folder Search, File Search, or for entry, the file and folder names are expected to be played may take time for folder name: 64 • Maximum number...
... code, refer to the maximum disc capacity, disable additional writing. If you use any other character for Folder Select, files and folders are not properly displayed. MP3/WMA playing order When selected for play, Folder Search, File Search, or for entry, the file and folder names are expected to be played may take time for folder name: 64 • Maximum number...
Instruction Manual
Page 13
...: Selects the Seek mode. (see page 28 for the ) [TUNER] Right or left: Selects a station. Down: Switches to the FM1, FM2, or FM3 band. The speed changes each time it is pressed. 3 Switches the voice channel. 4 Slow Backward. 5 Slow Forward. 6 Switches the caption language. ` Switches the view angle. e Switches the Video source at the AV OUTPUT plug. Up: Switches to the previous screen when the DVD Disc Menu is used. 8 [DVD] Calls the Top menu of DVD Disc Menu...
...: Selects the Seek mode. (see page 28 for the ) [TUNER] Right or left: Selects a station. Down: Switches to the FM1, FM2, or FM3 band. The speed changes each time it is pressed. 3 Switches the voice channel. 4 Slow Backward. 5 Slow Forward. 6 Switches the caption language. ` Switches the view angle. e Switches the Video source at the AV OUTPUT plug. Up: Switches to the previous screen when the DVD Disc Menu is used. 8 [DVD] Calls the Top menu of DVD Disc Menu...
Instruction Manual
Page 23
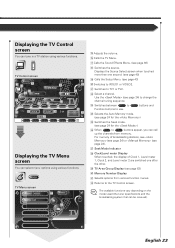
... Mode Indicator k Clock/Level meter Display When touched, the display of broadcasting stations, see (see page 24) or (see page 62) / Memory Number Display z Selects options from memory. x Returns to change the channel tuning sequence. y Calls the TV Menu. l TV Area Group Display (see page 24). Displaying the TV Control screen You can select menu options using various functions. Displays the Source Select screen when touched more than one after the other. For memory of Clock 1, Level meter 1, Clock 2, and Level meter...
... Mode Indicator k Clock/Level meter Display When touched, the display of broadcasting stations, see (see page 24) or (see page 62) / Memory Number Display z Selects options from memory. x Returns to change the channel tuning sequence. y Calls the TV Menu. l TV Area Group Display (see page 24). Displaying the TV Control screen You can select menu options using various functions. Displays the Source Select screen when touched more than one after the other. For memory of Clock 1, Level meter 1, Clock 2, and Level meter...
Instruction Manual
Page 27
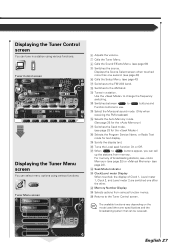
... 6 Displaying the Tuner Menu screen You can select menu options using various functions. MENU Tuner Menu screen 25 26 6 Adjusts the volume. 7 Calls the Tuner Menu. 8 Calls the Sound Effects Menu. (see page 28 for the ) i Selects the Program Service Name, or Radio Text mode for the ) u Switches the Seek mode. (see page 66) 9 Switches the source. For memory of Clock 1, Level meter 1, Clock 2, and Level meter 2 are switched one second. (see page 40) p Calls the Setup Menu. (see page 28). e Tunes in a station using various functions. f Memory Number Display g Selects options from...
... 6 Displaying the Tuner Menu screen You can select menu options using various functions. MENU Tuner Menu screen 25 26 6 Adjusts the volume. 7 Calls the Tuner Menu. 8 Calls the Sound Effects Menu. (see page 28 for the ) i Selects the Program Service Name, or Radio Text mode for the ) u Switches the Seek mode. (see page 66) 9 Switches the source. For memory of Clock 1, Level meter 1, Clock 2, and Level meter 2 are switched one second. (see page 40) p Calls the Setup Menu. (see page 28). e Tunes in a station using various functions. f Memory Number Display g Selects options from...
Instruction Manual
Page 47
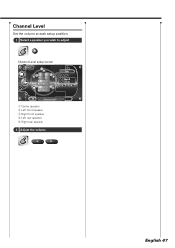
Channel Level Set the volume at each setup position. 1 Select a speaker you wish to adjust Channel Level setup screen 1 2 3 4 5 +8 dB 1 Center speaker 2 Left front speaker 3 Right front speaker 4 Left rear speaker 5 Right rear speaker 2 Adjust the volume English 47
Channel Level Set the volume at each setup position. 1 Select a speaker you wish to adjust Channel Level setup screen 1 2 3 4 5 +8 dB 1 Center speaker 2 Left front speaker 3 Right front speaker 4 Left rear speaker 5 Right rear speaker 2 Adjust the volume English 47
Instruction Manual
Page 48
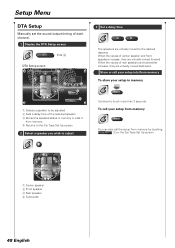
... than 2 seconds. When the values of rear speakers and subwoofer increase, they are virtually moved backward. When the values of center speaker and front speakers increase, they are virtually moved forward. Setup Menu DTA Setup Manually set the sound output timing of each channel. 1 Display the DTA Setup screen DTA (P44 6) DTA Setup screen 1 2 2 3 4 Return 1 Selects a speaker to be adjusted. 2 Sets a delay time of the selected speaker. 3 Stores the adjusted status in memory Preset Continue to the desired distance.
... than 2 seconds. When the values of rear speakers and subwoofer increase, they are virtually moved backward. When the values of center speaker and front speakers increase, they are virtually moved forward. Setup Menu DTA Setup Manually set the sound output timing of each channel. 1 Display the DTA Setup screen DTA (P44 6) DTA Setup screen 1 2 2 3 4 Return 1 Selects a speaker to be adjusted. 2 Sets a delay time of the selected speaker. 3 Stores the adjusted status in memory Preset Continue to the desired distance.
Instruction Manual
Page 53
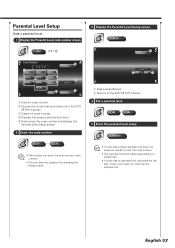
... DVD SETUP 3 screen. 3 Clears the code number. 4 Displays the present parental lock level. 5 Determines the code number and displays the Parental Level Setup screen. 2 Enter the code number 0 -9 • The number you enter first is set as your code number. • You can clear the password by pressing the Reset button. 3 Display the Parental Level Setup screen Enter 2 Return Level 5 1 1 1 Sets a parental level. 2 Returns to the DVD SETUP 3 screen. 4 Set a parental level 5 Enter the parental level setup Return • If a disc has a higher parental lock level, the audience needs...
... DVD SETUP 3 screen. 3 Clears the code number. 4 Displays the present parental lock level. 5 Determines the code number and displays the Parental Level Setup screen. 2 Enter the code number 0 -9 • The number you enter first is set as your code number. • You can clear the password by pressing the Reset button. 3 Display the Parental Level Setup screen Enter 2 Return Level 5 1 1 1 Sets a parental level. 2 Returns to the DVD SETUP 3 screen. 4 Set a parental level 5 Enter the parental level setup Return • If a disc has a higher parental lock level, the audience needs...
Instruction Manual
Page 61
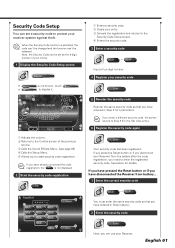
.... Security Code Setup You can set as the 4 digit number of the previous source. 3 Calls the Sound Effects Menu. (see page 66) 4 Calls the Setup Menu. 5 Allows you have already completed the code registration, the Set is activated, the code can't be changed and the function can be released. See below for the first code entry). 6 Register the security code again 1 Adjusts the volume. 2 Returns to the Control screen of your Receiver...
.... Security Code Setup You can set as the 4 digit number of the previous source. 3 Calls the Sound Effects Menu. (see page 66) 4 Calls the Setup Menu. 5 Allows you have already completed the code registration, the Set is activated, the code can't be changed and the function can be released. See below for the first code entry). 6 Register the security code again 1 Adjusts the volume. 2 Returns to the Control screen of your Receiver...
Instruction Manual
Page 69
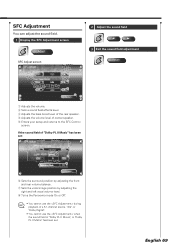
... mode On or Off. • You cannot use the during playback of a 5.1-channel source, "dts", or "Dolby Digital". • You cannot use the when the sound field of center speaker. 5 Enters your setup and returns to the SFC Control screen. English 69 SFC Adjustment You can adjust the sound field. 1 Display the SFC Adjustment screen Adjust SFC Adjust screen 1 1 2 3 Center Level 4 Mid 1 5 Return 1 1 Adjusts the volume. 2 Sets a sound field effects level. 3 Adjusts the bass boost level of the rear speaker. 4 Adjusts...
... mode On or Off. • You cannot use the during playback of a 5.1-channel source, "dts", or "Dolby Digital". • You cannot use the when the sound field of center speaker. 5 Enters your setup and returns to the SFC Control screen. English 69 SFC Adjustment You can adjust the sound field. 1 Display the SFC Adjustment screen Adjust SFC Adjust screen 1 1 2 3 Center Level 4 Mid 1 5 Return 1 1 Adjusts the volume. 2 Sets a sound field effects level. 3 Adjusts the bass boost level of the rear speaker. 4 Adjusts...
Instruction Manual
Page 73
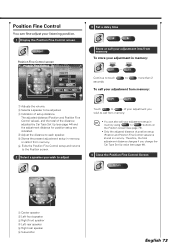
... P3 of your listening position. 1 Display the Position Fine Control screen Adjust Position Fine Control screen 2 1 1 cm 3 cm 4 5 P3 1 6 1 1 Adjusts the volume. 2 Selects a speaker to P3 buttons on the Position screen (see page 72). • Only the adjusted distance of position setup (Position and Position Fine Control values) is stored in memory using P1 to be adjusted. 3 Indication of the distance adjusted by Car Type Set Up (see page 44) and...
... P3 of your listening position. 1 Display the Position Fine Control screen Adjust Position Fine Control screen 2 1 1 cm 3 cm 4 5 P3 1 6 1 1 Adjusts the volume. 2 Selects a speaker to P3 buttons on the Position screen (see page 72). • Only the adjusted distance of position setup (Position and Position Fine Control values) is stored in memory using P1 to be adjusted. 3 Indication of the distance adjusted by Car Type Set Up (see page 44) and...

Instruction Manual
Page 74
... turned On, this button appears on the all Source Control screen. 7 Sets the front and rear audio source separately. (This button appears when the Zone function is On.) When the rear speaker sound is switched, the audio source that sets different source sounds for front and rear speakers) On or Off. However, if you have set the front and rear audio source. Displaying the Zone Control screen Zone Control Zone Control screen 1 4 6 2 3 1 8 Area Fron 7 Reverse 5 6 1 Rear DVD Rear 7 1 1 Adjusts the volume. 2 Returns to change over the front and rear audio sources...
... turned On, this button appears on the all Source Control screen. 7 Sets the front and rear audio source separately. (This button appears when the Zone function is On.) When the rear speaker sound is switched, the audio source that sets different source sounds for front and rear speakers) On or Off. However, if you have set the front and rear audio source. Displaying the Zone Control screen Zone Control Zone Control screen 1 4 6 2 3 1 8 Area Fron 7 Reverse 5 6 1 Rear DVD Rear 7 1 1 Adjusts the volume. 2 Returns to change over the front and rear audio sources...
Instruction Manual
Page 77
..., etc. Install the unit in the car. • When only two speakers are working properly. • Mount the unit so that in the following order: ground, battery, ignition. 5. battery. 2. on and off with battery wires, the battery may be turned on the car are being connected to the system, connect the connectors either to both the rear output terminals (do not connect the - English 77 Make the proper input and output wire connections for each unit. 3.
..., etc. Install the unit in the car. • When only two speakers are working properly. • Mount the unit so that in the following order: ground, battery, ignition. 5. battery. 2. on and off with battery wires, the battery may be turned on the car are being connected to the system, connect the connectors either to both the rear output terminals (do not connect the - English 77 Make the proper input and output wire connections for each unit. 3.
Instruction Manual
Page 78
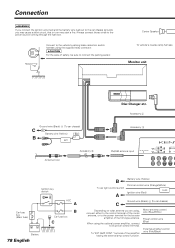
... amplifier having the external amp control function. Accessory 2 Accessory 3 FM/AM antenna input AV INPUT 1 VIDEO L R FM /AM ANTENNA AV INPUT 2 VIDEO L R AV OUTPUT L VI R CEN Ignition key switch Car fuse box (Main fuse) + Battery 78 English ACC A B Car fuse box C B To car light control switch A Battery wire (Yellow) Dimmer control wire (Orange/White) Ignition wire (Red) ILLUMI Ground wire (Black) - (To car chassis) C Depending on what antenna you may cause a short circuit, that in turn may start a fire. When using the supplied relay connector...
... amplifier having the external amp control function. Accessory 2 Accessory 3 FM/AM antenna input AV INPUT 1 VIDEO L R FM /AM ANTENNA AV INPUT 2 VIDEO L R AV OUTPUT L VI R CEN Ignition key switch Car fuse box (Main fuse) + Battery 78 English ACC A B Car fuse box C B To car light control switch A Battery wire (Yellow) Dimmer control wire (Orange/White) Ignition wire (Red) ILLUMI Ground wire (Black) - (To car chassis) C Depending on what antenna you may cause a short circuit, that in turn may start a fire. When using the supplied relay connector...
Instruction Manual
Page 87
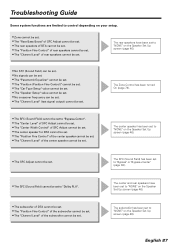
... center speaker cannot be set. The center and rear speakers have been set to "NONE" on the Speaker Set Up screen (page 46). Troubleshooting Guide Some system functions are limited to control depending on your setup. ¶ Zone cannot be set. ¶ The "Rear Bass Boost" of SFC Adjust cannot be set. ¶ The rear speakers of DTA cannot be set. ¶ The "Position Fine Control" of rear speakers cannot be set. ¶ The "Channel Level" of rear speakers...
... center speaker cannot be set. The center and rear speakers have been set to "NONE" on the Speaker Set Up screen (page 46). Troubleshooting Guide Some system functions are limited to control depending on your setup. ¶ Zone cannot be set. ¶ The "Rear Bass Boost" of SFC Adjust cannot be set. ¶ The rear speakers of DTA cannot be set. ¶ The "Position Fine Control" of rear speakers cannot be set. ¶ The "Channel Level" of rear speakers...
Instruction Manual
Page 88
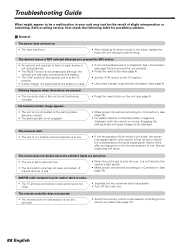
...; The unit is in a location where temperature is low. • If the temperature of a liquid crystal panel. AM/FM radio reception is poor and/or there is first turned on . • The unit is set to auto dimmer. • The illumination wire has not been connected. (If manual dimmer is set) • When the unit is set correctly. • Switch the remote control mode selector according to the source you pressed...
...; The unit is in a location where temperature is low. • If the temperature of a liquid crystal panel. AM/FM radio reception is poor and/or there is first turned on . • The unit is set to auto dimmer. • The illumination wire has not been connected. (If manual dimmer is set) • When the unit is set correctly. • Switch the remote control mode selector according to the source you pressed...
Instruction Manual
Page 90
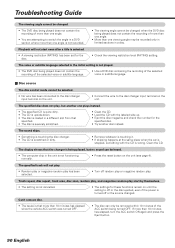
... sound can only be selected. • No wire has been connected to the disc changer input terminal on the unit. • Connect the wire to the disc changer input terminal on the unit (see page 4). If more than 10 minutes has elapsed, turn the ACC switch ON again and press the Eject button. 90 English The specified disc does not play has been selected. • Turn off or the source changed when the DVD disc being played...
... sound can only be selected. • No wire has been connected to the disc changer input terminal on the unit. • Connect the wire to the disc changer input terminal on the unit (see page 4). If more than 10 minutes has elapsed, turn the ACC switch ON again and press the Eject button. 90 English The specified disc does not play has been selected. • Turn off or the source changed when the DVD disc being played...

Instruction Manual
Page 92
... Display system Transparent TN LCD panel Drive system TFT active matrix system Number of pixels may not light or may light incorrectly. 92 English Specifications Specifications subject to Noise ratio 100dB (DVD-Audio 192k) Dynamic range 100dB (DVD-Audio 192k) DISC Format DVD-Audio/DVD-Video/VIDEO-CD/CD-DA Sampling frequency 44.1kHz/48kHz, 88.2kHz/96kHz, 176.4kHz/192kHz Quantifying bit number 16/20/24bit DSP Section 4 BAND Parametric equalizer...
... Display system Transparent TN LCD panel Drive system TFT active matrix system Number of pixels may not light or may light incorrectly. 92 English Specifications Specifications subject to Noise ratio 100dB (DVD-Audio 192k) Dynamic range 100dB (DVD-Audio 192k) DISC Format DVD-Audio/DVD-Video/VIDEO-CD/CD-DA Sampling frequency 44.1kHz/48kHz, 88.2kHz/96kHz, 176.4kHz/192kHz Quantifying bit number 16/20/24bit DSP Section 4 BAND Parametric equalizer...


