
User Manual
Page 2
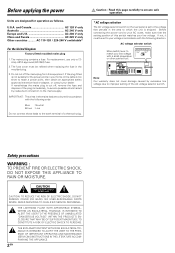
... following code: Blue : Neutral Brown : Live Do not connect those leads to the earth terminal of a three-pin plug. NO USER-SERVICEABLE PARTS INSIDE. For replacement, use only a 13Amp ASTA-approved (BS1362) fuse. 2. Caution : Read this page carefully to ensure safe operation. * AC voltage selection The AC voltage selector switch on the rear panel is shipped. If not, it must be set to...
... following code: Blue : Neutral Brown : Live Do not connect those leads to the earth terminal of a three-pin plug. NO USER-SERVICEABLE PARTS INSIDE. For replacement, use only a 13Amp ASTA-approved (BS1362) fuse. 2. Caution : Read this page carefully to ensure safe operation. * AC voltage selection The AC voltage selector switch on the rear panel is shipped. If not, it must be set to...

User Manual
Page 3
... 3 How to the AV AUX jacks 16 Connecting the antennas 16 Connecting the system control 17 Preparing the remote control 17 Preparing for surround sound 18 Speaker settings 18 Operations Normal playback 21 Preparing for future reference. 3 EN only 25 Presetting RDS stations (RDS AUTO MEMORY) (For the U.K. only 8 Setting up the system 9 Connecting audio components 10 Connecting video components 11 Digital connections 12 Connecting a DVD player (6-channel input) ..... 13 Connecting the speakers 14 Connecting the terminals 15 Connecting to use is damaged or fails to...
... 3 How to the AV AUX jacks 16 Connecting the antennas 16 Connecting the system control 17 Preparing the remote control 17 Preparing for surround sound 18 Speaker settings 18 Operations Normal playback 21 Preparing for future reference. 3 EN only 25 Presetting RDS stations (RDS AUTO MEMORY) (For the U.K. only 8 Setting up the system 9 Connecting audio components 10 Connecting video components 11 Digital connections 12 Connecting a DVD player (6-channel input) ..... 13 Connecting the speakers 14 Connecting the terminals 15 Connecting to use is damaged or fails to...
User Manual
Page 4
... mode setting. • CS II mode setting. • Broadcast band. • Frequency setting. • Preset stations. • Tuning mode. • DSP mode. • ACTIVE EQ mode. • SPEAKER EQ mode. 4 EN These limits are expressly approved in particular, specifies that the following measures: - - Changes or modifications to connect your other components using the remote control supplied with the instructions. NOTE: This equipment has been tested and found to the receiver and prepare the surround...
... mode setting. • CS II mode setting. • Broadcast band. • Frequency setting. • Preset stations. • Tuning mode. • DSP mode. • ACTIVE EQ mode. • SPEAKER EQ mode. 4 EN These limits are expressly approved in particular, specifies that the following measures: - - Changes or modifications to connect your other components using the remote control supplied with the instructions. NOTE: This equipment has been tested and found to the receiver and prepare the surround...
User Manual
Page 5
... remote controllable audio and video components. It allows the user to obtain the full surround sound impact of DVD source material featuring multi-channel encoding. DTS DTS (Digital Theater System) is far superior to play and enjoy! ¶ Dolby Digital and Dolby Digital EX The DOLBY DIGITAL mode lets you to listen to hear. 5 EN PTY (Program TYpe) search (For the U.K. PRO LOGIC II offers special fea- DVD 6-channel input If you own a DVD player equipped with 6-channel output, this receiver...
... remote controllable audio and video components. It allows the user to obtain the full surround sound impact of DVD source material featuring multi-channel encoding. DTS DTS (Digital Theater System) is far superior to play and enjoy! ¶ Dolby Digital and Dolby Digital EX The DOLBY DIGITAL mode lets you to listen to hear. 5 EN PTY (Program TYpe) search (For the U.K. PRO LOGIC II offers special fea- DVD 6-channel input If you own a DVD player equipped with 6-channel output, this receiver...
User Manual
Page 6
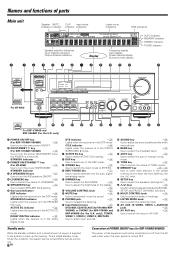
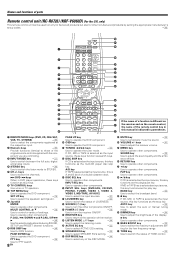
...AUTO MEMORY STEREO TUNED Speaker selection indicators Input channel indicators Output channel indicators Display Frequency display Input display Preset channel display Surround mode display AUTO indicator MEMORY indicator STEREO indicator TUNED indicator POWER STANDBY ON/STANDBY F ULL DIGITAL D ECODING For VR-6050 STANDBY ON/STANDBY A SPEAKERS B DSP SPEAKER EQ ACTIVE EQ DOLBY DIGITAL DTS CSII LOUDNESS SPEAKEREQ ACTIVEEQ DSP STEREO INPUT MODE DIMMER POWER -ON -OFF PHONES DVD/6CH CD/DVD AUX TUNER VIDEO 1 VIDEO 2 VIDEO 3 MD/TAPE SOUND TONE SETUP BAND AUTO MEMORY VOLUME CONTROL...
...AUTO MEMORY STEREO TUNED Speaker selection indicators Input channel indicators Output channel indicators Display Frequency display Input display Preset channel display Surround mode display AUTO indicator MEMORY indicator STEREO indicator TUNED indicator POWER STANDBY ON/STANDBY F ULL DIGITAL D ECODING For VR-6050 STANDBY ON/STANDBY A SPEAKERS B DSP SPEAKER EQ ACTIVE EQ DOLBY DIGITAL DTS CSII LOUDNESS SPEAKEREQ ACTIVEEQ DSP STEREO INPUT MODE DIMMER POWER -ON -OFF PHONES DVD/6CH CD/DVD AUX TUNER VIDEO 1 VIDEO 2 VIDEO 3 MD/TAPE SOUND TONE SETUP BAND AUTO MEMORY VOLUME CONTROL...
User Manual
Page 7
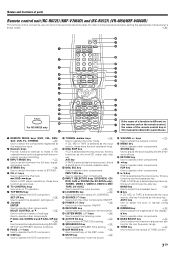
... operate the DVD component. MULTI CONTROL C/D * Use to operate other non-Kenwood products by setting the appropriate manufacturer's setup codes. fi 1 2 3 4 5 6 7 8 9 0 ! @ PHONO # $ For RC-R0725 only % SOURCE POWER DVD CBL DSS/SAT REMOTE MODE VCR TV OTHERS RECEIVER 1 2 3 LISTEN MODE 4 5 6 ACTIVE EQ 7 8 9 SPEAKER EQ +10 0 +100 INPUT MODE STEREO DSP MODE MUTE ¢+ DVD 4- If MD or TAPE key is selected as the input source, these keys function as the play /pause key. keys ¡ Use to adjust the receiver volume. ∞ MENU key Use...
... operate the DVD component. MULTI CONTROL C/D * Use to operate other non-Kenwood products by setting the appropriate manufacturer's setup codes. fi 1 2 3 4 5 6 7 8 9 0 ! @ PHONO # $ For RC-R0725 only % SOURCE POWER DVD CBL DSS/SAT REMOTE MODE VCR TV OTHERS RECEIVER 1 2 3 LISTEN MODE 4 5 6 ACTIVE EQ 7 8 9 SPEAKER EQ +10 0 +100 INPUT MODE STEREO DSP MODE MUTE ¢+ DVD 4- If MD or TAPE key is selected as the input source, these keys function as the play /pause key. keys ¡ Use to adjust the receiver volume. ∞ MENU key Use...
User Manual
Page 8
... DSP MODE. £ MUTE key ™ Use to operate other components. Use to temporarily mute the sound. ¢ VOLUME +/- P.CALL 4 /DOWN 2 and P.CALL/UP ¢ 3 ∞ Use for selection adjustments during SOUND, SET UP and PRESET channel functions. 9 RDS DISP key ∞ Use for other non-Kenwood products by setting the appropriate manufacturer's setup codes. fl 1 2 3 4 5 6 7 8 9 0 ! @ # $ % SOURCE POWER DVD CD CBL/SAT REMOTE MODE VCR TV OTHERS RECEIVER 1 2 3 LISTEN MODE 4 5 6 ACTIVE EQ 7 8 9 SPEAKER EQ +10 0 +100 INPUT MODE STEREO DSP MODE MUTE...
... DSP MODE. £ MUTE key ™ Use to operate other components. Use to temporarily mute the sound. ¢ VOLUME +/- P.CALL 4 /DOWN 2 and P.CALL/UP ¢ 3 ∞ Use for selection adjustments during SOUND, SET UP and PRESET channel functions. 9 RDS DISP key ∞ Use for other non-Kenwood products by setting the appropriate manufacturer's setup codes. fl 1 2 3 4 5 6 7 8 9 0 ! @ # $ % SOURCE POWER DVD CD CBL/SAT REMOTE MODE VCR TV OTHERS RECEIVER 1 2 3 LISTEN MODE 4 5 6 ACTIVE EQ 7 8 9 SPEAKER EQ +10 0 +100 INPUT MODE STEREO DSP MODE MUTE...
User Manual
Page 9
... connect the power cord to the instruction manuals supplied with the source unit, or are connecting. Notes 1. After completing connections and turning on the AC outlet at your local electronics retailer. Each press switches the setting as shown in the following , or proper ventilation will light up when digital signal is detected. Setting up the system Make connections as follows: In DTS play mode 1 FULL AUTO (digital input, analog input) 2 DIGITAL MANUAL (digital input) In CD/DVD, VIDEO 2, DVD/6CH play mode 1 FULL AUTO (digital input, analog input) 2 DIGITAL MANUAL (digital...
... connect the power cord to the instruction manuals supplied with the source unit, or are connecting. Notes 1. After completing connections and turning on the AC outlet at your local electronics retailer. Each press switches the setting as shown in the following , or proper ventilation will light up when digital signal is detected. Setting up the system Make connections as follows: In DTS play mode 1 FULL AUTO (digital input, analog input) 2 DIGITAL MANUAL (digital input) In CD/DVD, VIDEO 2, DVD/6CH play mode 1 FULL AUTO (digital input, analog input) 2 DIGITAL MANUAL (digital...
User Manual
Page 17
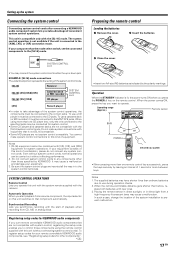
...the system Connecting the system control Connecting system control cords after connecting a KENWOOD audio component system lets you take advantage of the system installation to control those specified by KENWOOD. It may connect the system control cord to the MD/TAPE jacks. Be sure the system control plugs are not system control compatible. Automatic Operation When you own remote controllable KENWOOD audio components that component automatically. To register setup codes for your equipment consists of equipment. When the remote-controllable distance gets shorter than one CD player...
...the system Connecting the system control Connecting system control cords after connecting a KENWOOD audio component system lets you take advantage of the system installation to control those specified by KENWOOD. It may connect the system control cord to the MD/TAPE jacks. Be sure the system control plugs are not system control compatible. Automatic Operation When you own remote controllable KENWOOD audio components that component automatically. To register setup codes for your equipment consists of equipment. When the remote-controllable distance gets shorter than one CD player...
User Manual
Page 18
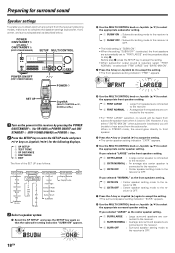
... front speakers setting, 1 CNTR ON : Center speaker setting mode to the receiver is ON. 2 CNTR OFF : Center speaker setting mode to the receiver is OFF. 7 Press the M key or Joystick (3) again to accept the setting. • The surround speaker setting indication "SURR" appears. 8 Use the MULTI CONTROL knob or Joystick (5/∞) to enter the SET UP mode and press M/? DOLBY DIGITAL STEREO NEO:6 THX L ACTIVE EQ. SP MUTE OPTICAL 6CH INPUT AUTO DETECT CINEMA EQ. POWER ON/STANDBY (VR-6050) / ON/STANDBY...
... front speakers setting, 1 CNTR ON : Center speaker setting mode to the receiver is ON. 2 CNTR OFF : Center speaker setting mode to the receiver is OFF. 7 Press the M key or Joystick (3) again to accept the setting. • The surround speaker setting indication "SURR" appears. 8 Use the MULTI CONTROL knob or Joystick (5/∞) to enter the SET UP mode and press M/? DOLBY DIGITAL STEREO NEO:6 THX L ACTIVE EQ. SP MUTE OPTICAL 6CH INPUT AUTO DETECT CINEMA EQ. POWER ON/STANDBY (VR-6050) / ON/STANDBY...
User Manual
Page 19
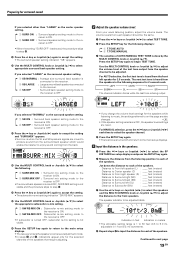
... to the main setup displays. 5 Input the distance to the speakers. 1 Press the M/? MATRIX C SW R A B CLIP COAXIAL ANALOG 96kHzfs DSP MODE DISCRETE PRO LOGIC LOUDNESS CSII Surround EX LFE SL S SB SR RDS RTY AUTO MEMO STEREO TUNED • If you change the volume level settings for the selected channels of the speakers. SP MUTE OPTICAL 6CH INPUT AUTO DETECT CINEMA EQ. DOLBY DIGITAL STEREO NEO:6 THX L ACTIVE EQ. DTS. Press...
... to the main setup displays. 5 Input the distance to the speakers. 1 Press the M/? MATRIX C SW R A B CLIP COAXIAL ANALOG 96kHzfs DSP MODE DISCRETE PRO LOGIC LOUDNESS CSII Surround EX LFE SL S SB SR RDS RTY AUTO MEMO STEREO TUNED • If you change the volume level settings for the selected channels of the speakers. SP MUTE OPTICAL 6CH INPUT AUTO DETECT CINEMA EQ. DOLBY DIGITAL STEREO NEO:6 THX L ACTIVE EQ. DTS. Press...

User Manual
Page 21
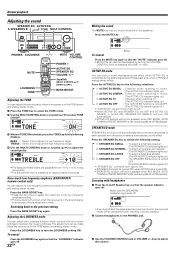
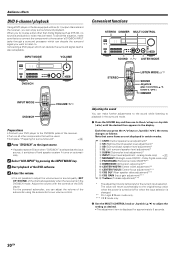
Sound from the subwoofer. VR-6050/KRF-V7060D/V6060D 1 "DVD/6CH" 2 "CD/DVD" 3 "AUX" or "PHONO" (for KRF-V7060D only) 4 "TUNER" 5 "VIDEO 1" 6 "VIDEO 2" 7 "VIDEO 3" 8 "MD/TAPE" 9 "AV AUX" KRF-V6060D (for the U.K. POWER ON/STANDBY (VR-6050) A SPEAKERS B ON/STANDBY (KRF-V7060D/V6060D) INPUT MODE Listening to a source component VOLUME CONTROL Input Selector AV AUX POWER ON/OFF MD/TAPE (KRF-V7060D/V6060D) Turning on the receiver 1 Turn on the power to the related components. 2 Turn on the power to the SPEAKERS A and B terminals on the rear panel. Selecting the speaker system Press...
Sound from the subwoofer. VR-6050/KRF-V7060D/V6060D 1 "DVD/6CH" 2 "CD/DVD" 3 "AUX" or "PHONO" (for KRF-V7060D only) 4 "TUNER" 5 "VIDEO 1" 6 "VIDEO 2" 7 "VIDEO 3" 8 "MD/TAPE" 9 "AV AUX" KRF-V6060D (for the U.K. POWER ON/STANDBY (VR-6050) A SPEAKERS B ON/STANDBY (KRF-V7060D/V6060D) INPUT MODE Listening to a source component VOLUME CONTROL Input Selector AV AUX POWER ON/OFF MD/TAPE (KRF-V7060D/V6060D) Turning on the receiver 1 Turn on the power to the related components. 2 Turn on the power to the SPEAKERS A and B terminals on the rear panel. Selecting the speaker system Press...
User Manual
Page 22
... Adjusting the sound SPEAKER EQ ACTIVE EQ A SPEAKERS B TONE MULTI CONTROL PHONES LOUDNESS MUTE LOUDNESS TONE MUTE VOLUME CONTROL POWER ACTIVE EQ SPEAKER EQ VOLUME / Joystick (MULTI CONTROL 5 / ∞, DOWN 2 / UP3) BASS BOOST Adjusting the TONE You can be made when the receiver is in the PCM stereo and analog stereo mode. DOLBY DIGITAL STEREO NEO:6 THX L ACTIVE EQ. Once-touch low frequency emphasis (BASS BOOST) (remote control only) You can adjust the Loudness function which controls the low volume settings...
... Adjusting the sound SPEAKER EQ ACTIVE EQ A SPEAKERS B TONE MULTI CONTROL PHONES LOUDNESS MUTE LOUDNESS TONE MUTE VOLUME CONTROL POWER ACTIVE EQ SPEAKER EQ VOLUME / Joystick (MULTI CONTROL 5 / ∞, DOWN 2 / UP3) BASS BOOST Adjusting the TONE You can be made when the receiver is in the PCM stereo and analog stereo mode. DOLBY DIGITAL STEREO NEO:6 THX L ACTIVE EQ. Once-touch low frequency emphasis (BASS BOOST) (remote control only) You can adjust the Loudness function which controls the low volume settings...

User Manual
Page 27
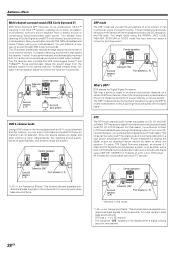
... you enjoy Dolby Digital (and Dolby Surround) program sources, even if you wanted the ability to input the proper speaker settings beforehand. * Surround modes Dolby Digital The Dolby Digital surround format lets you connect only the front speakers. Dolby Digital EX Dolby Digital EX is an extension of stereo, full bandwidth surround outputs. Center speaker Subwoofer (SW)* Surround speakers (L, R) Front speakers (L, R) Surround back speaker * Optional in the other surround modes. In order to 5.1 channels of SRS Labs, Inc. The "Dimension" control allows the user to...
... you enjoy Dolby Digital (and Dolby Surround) program sources, even if you wanted the ability to input the proper speaker settings beforehand. * Surround modes Dolby Digital The Dolby Digital surround format lets you connect only the front speakers. Dolby Digital EX Dolby Digital EX is an extension of stereo, full bandwidth surround outputs. Center speaker Subwoofer (SW)* Surround speakers (L, R) Front speakers (L, R) Surround back speaker * Optional in the other surround modes. In order to 5.1 channels of SRS Labs, Inc. The "Dimension" control allows the user to...
User Manual
Page 28
... when used with stereo program sources, like equipped with a built-in DTS Digital Surround decoder must be taken to the subwoofer for playing the digital output as described below should be connected to a high power amplification system. DSP stands for multi-channel content. One of spaciousness, and dynamic range are incorporated with your multi-speakers. All models are superb. The indication "LFE" appears in the display when...
... when used with stereo program sources, like equipped with a built-in DTS Digital Surround decoder must be taken to the subwoofer for playing the digital output as described below should be connected to a high power amplification system. DSP stands for multi-channel content. One of spaciousness, and dynamic range are incorporated with your multi-speakers. All models are superb. The indication "LFE" appears in the display when...

User Manual
Page 29
... of available channels. 3 DSP mode (Digital Signal Processor). The listening mode settings are stored separately for approximately 3 seconds. 4 Adjust the volume. If the input mode is displayed for each input. SRS Circle Surround II enables you wish to play back with surround sound. • Use the INPUT MODE key to multi channel sound from a single component, be produced when a DTS source is input : (The DOLBY DIGITAL or PRO LOGIC, indicator lights up.) 1 DOLBY DIGITAL : DOLBY DIGITAL surround. 2 DOLBY D EX : DOLBY DIGITAL EX surround. 3 PLII MOVIE...
... of available channels. 3 DSP mode (Digital Signal Processor). The listening mode settings are stored separately for approximately 3 seconds. 4 Adjust the volume. If the input mode is displayed for each input. SRS Circle Surround II enables you wish to play back with surround sound. • Use the INPUT MODE key to multi channel sound from a single component, be produced when a DTS source is input : (The DOLBY DIGITAL or PRO LOGIC, indicator lights up.) 1 DOLBY DIGITAL : DOLBY DIGITAL surround. 2 DOLBY D EX : DOLBY DIGITAL EX surround. 3 PLII MOVIE...
User Manual
Page 30
... surround speaker level adjustment)* 5 SUBW (Subwoofer level adjustment)* 6 INPUT (Input level adjustment - For the powered subwoofer, you can enjoy surround sound playback. Dolby Digital mode only) 8 PANORAMA (Panorama mode ON/OFF)** 9 DIMENSION (Dimension adjustment)** 0 CENTER WIDTH (Center width adjustment)** - Adjust the volume with six (5.1) output channels and the receiver, you want to listen to play a disc other components that some items are not displayed in the surround mode. 1 Press the SOUND key and then use to adjust the volume level or sound quality (SET UP, SOUND...
... surround speaker level adjustment)* 5 SUBW (Subwoofer level adjustment)* 6 INPUT (Input level adjustment - For the powered subwoofer, you can enjoy surround sound playback. Dolby Digital mode only) 8 PANORAMA (Panorama mode ON/OFF)** 9 DIMENSION (Dimension adjustment)** 0 CENTER WIDTH (Center width adjustment)** - Adjust the volume with six (5.1) output channels and the receiver, you want to listen to play a disc other components that some items are not displayed in the surround mode. 1 Press the SOUND key and then use to adjust the volume level or sound quality (SET UP, SOUND...
User Manual
Page 37
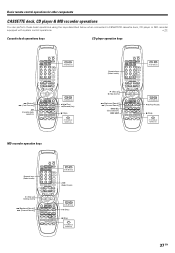
... these basic operations using the keys described below when connected to KENWOOD cassette deck, CD player or MD recorder equipped with system control operations. & Cassette deck operations keys CD player operation keys SOURCE POWER 1 (Rewind) ¡ (Fast Forward) A/B (Cassette deck selection) DVD CBL DSS/SAT REMOTE MODE VCR TV OTHERS RECEIVER 1 2 3 LISTEN MODE 4 5 6 ACTIVE EQ 7 8 9 SPEAKER EQ +10 0 +100 INPUT MODE STEREO DSP MODE MUTE ¢+ DVD 4- CH TV CONTROL + VOL. - INPUT SEL TOP MENU MENU SET UP SOUND + - INPUT SEL TOP MENU MENU SET UP SOUND + -
... these basic operations using the keys described below when connected to KENWOOD cassette deck, CD player or MD recorder equipped with system control operations. & Cassette deck operations keys CD player operation keys SOURCE POWER 1 (Rewind) ¡ (Fast Forward) A/B (Cassette deck selection) DVD CBL DSS/SAT REMOTE MODE VCR TV OTHERS RECEIVER 1 2 3 LISTEN MODE 4 5 6 ACTIVE EQ 7 8 9 SPEAKER EQ +10 0 +100 INPUT MODE STEREO DSP MODE MUTE ¢+ DVD 4- CH TV CONTROL + VOL. - INPUT SEL TOP MENU MENU SET UP SOUND + - INPUT SEL TOP MENU MENU SET UP SOUND + -

User Manual
Page 40
... not output from one of the memory and returns the unit to the state it left the factory. Tuner Symptom Cause Remedy Radio stations cannot be operated, or shows an erroneous display) if the power cord is unplugged while the power is ON, or due to some other countries With the power cord plugged in, turn on the type of DVD player used. • Set the input mode to digital manual before starting...
... not output from one of the memory and returns the unit to the state it left the factory. Tuner Symptom Cause Remedy Radio stations cannot be operated, or shows an erroneous display) if the power cord is unplugged while the power is ON, or due to some other countries With the power cord plugged in, turn on the type of DVD player used. • Set the input mode to digital manual before starting...
User Manual
Page 41
... setup codes registered for the component you want to play a tape which is being recorded in the cassette deck. • The remote control has not been set to control before operation. › 41 EN input(s). fifl • The remote control is set to the operation mode for the component you wish to control. • Press the source select keys or SOURCE keys to select the appropriate operation mode. • Replace with new batteries...
... setup codes registered for the component you want to play a tape which is being recorded in the cassette deck. • The remote control has not been set to control before operation. › 41 EN input(s). fifl • The remote control is set to the operation mode for the component you wish to control. • Press the source select keys or SOURCE keys to select the appropriate operation mode. • Replace with new batteries...


