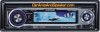
Instruction Manual
Page 2
... Power Selecting the Source Volume Attenuator Audio Control Audio Setup Subwoofer Output Sound Field Control Sound Management system Equalizer Control WOW Control Bypass Control Memory mode Memory Recall mode Theft Deterrent Faceplate Faceplate Angle Adjustment Display Type Selection Graphic part/ Spectrum Analyzer Display Switching Wallpaper selecting Text Selection for Display Text Display Switching Icon Display Switching Font Color Select G-Analyzer display Switching Station/Disc Naming (SNPS/DNPS) TEL Mute Tuner features 29 Tuning Tuning Mode Direct Access Tuning Station Preset Memory...
... Power Selecting the Source Volume Attenuator Audio Control Audio Setup Subwoofer Output Sound Field Control Sound Management system Equalizer Control WOW Control Bypass Control Memory mode Memory Recall mode Theft Deterrent Faceplate Faceplate Angle Adjustment Display Type Selection Graphic part/ Spectrum Analyzer Display Switching Wallpaper selecting Text Selection for Display Text Display Switching Icon Display Switching Font Color Select G-Analyzer display Switching Station/Disc Naming (SNPS/DNPS) TEL Mute Tuner features 29 Tuning Tuning Mode Direct Access Tuning Station Preset Memory...
Instruction Manual
Page 3
... Traffic Information CRSC (Clean Reception System Circuit) Receive mode Setting SIRIUS ID (ESN) display Auxiliary Input Display Setting & Station/Disc Naming Text Scroll Built-in Auxiliary input Setting CD Read Setting Picture downloading Voice Index ACDrive firmware version display Unique ID display Demonstration mode Setting Menu Added for DAB Basic Operations of remote control 53 Accessories/ Installation Procedure 56 Connecting Wires to Terminals 57 Installation 58 Removing the Unit 60 Troubleshooting Guide 61 Specifications 64 WOW, SRS and symbol are trademarks of Dolby...
... Traffic Information CRSC (Clean Reception System Circuit) Receive mode Setting SIRIUS ID (ESN) display Auxiliary Input Display Setting & Station/Disc Naming Text Scroll Built-in Auxiliary input Setting CD Read Setting Picture downloading Voice Index ACDrive firmware version display Unique ID display Demonstration mode Setting Menu Added for DAB Basic Operations of remote control 53 Accessories/ Installation Procedure 56 Connecting Wires to Terminals 57 Installation 58 Removing the Unit 60 Troubleshooting Guide 61 Specifications 64 WOW, SRS and symbol are trademarks of Dolby...
Instruction Manual
Page 4
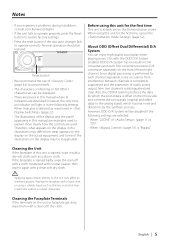
... place the faceplate or the faceplate case in a spot exposed to play. Using a fuse with the wrong rating may cause your fingers. • Do not subject the faceplate to direct sunlight, excessive heat or humidity. If you use the wrong screws, you can be displayed may not allow CDs to direct sunlight or excessive heat or humidity. About CD players/disc changers connected to this unit KENWOOD disc changers/ CD players released...
... place the faceplate or the faceplate case in a spot exposed to play. Using a fuse with the wrong rating may cause your fingers. • Do not subject the faceplate to direct sunlight, excessive heat or humidity. If you use the wrong screws, you can be displayed may not allow CDs to direct sunlight or excessive heat or humidity. About CD players/disc changers connected to this unit KENWOOD disc changers/ CD players released...
Instruction Manual
Page 5
... may differ from two channels is distinguished and clear. Notes • If you experience problems during installation, consult your Kenwood dealer. • If the unit fails to operate properly, press the Reset button to restore factory settings. • Press the reset button if the disc auto changer fails to the analog signal, which has less noise and distortion, by which the sound data is offset on...
... may differ from two channels is distinguished and clear. Notes • If you experience problems during installation, consult your Kenwood dealer. • If the unit fails to operate properly, press the Reset button to restore factory settings. • Press the reset button if the disc auto changer fails to the analog signal, which has less noise and distortion, by which the sound data is offset on...

Instruction Manual
Page 11
... when Speaker Select Subwoofer of Rear channel by [VOL] knob. - Adjust the volume of sub source by [SRC] button. - Select Main source by (page 48). - Set up the channel of Front channel by (page 11). - Internal auxiliary input • You can use the Dual Zone System only when you have set the rear speaker to be adjusted alternates between the items shown in the table below . - The Audio Control has no effect on sub source. •...
... when Speaker Select Subwoofer of Rear channel by [VOL] knob. - Adjust the volume of sub source by [SRC] button. - Select Main source by (page 48). - Set up the channel of Front channel by (page 11). - Internal auxiliary input • You can use the Dual Zone System only when you have set the rear speaker to be adjusted alternates between the items shown in the table below . - The Audio Control has no effect on sub source. •...
Instruction Manual
Page 12
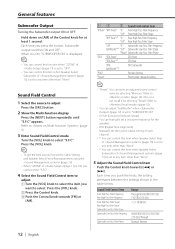
... Speaker Select Subwoofer of (page 13) is set to adjust Press the [SRC] button. 2 Show the Multi-function display Press the [NEXT] button repeatedly until "S.F.C" appears. Refer to select "S.F.C". General features Subwoofer Output Turning the Subwoofer output ON or OFF. When it by selecting "Memory". Each time you press the button, Subwoofer output switches ON and OFF. Press the [VOL] knob. • To get the best sound, first set the Cabin Setting and Speaker Select Front/Rear parameters using...
... Speaker Select Subwoofer of (page 13) is set to adjust Press the [SRC] button. 2 Show the Multi-function display Press the [NEXT] button repeatedly until "S.F.C" appears. Refer to select "S.F.C". General features Subwoofer Output Turning the Subwoofer output ON or OFF. When it by selecting "Memory". Each time you press the button, Subwoofer output switches ON and OFF. Press the [VOL] knob. • To get the best sound, first set the Cabin Setting and Speaker Select Front/Rear parameters using...

Instruction Manual
Page 13
"Preset" 6 Exit Sound Field Control mode Turn the [VOL] knob to (page 16). 5 Adjust the Sound Management item Push the Control knob towards [4] or [¢]. Also, you can store an adjusted sound control value by selecting "Recall". Multi-function item "Cabin" "Front" "Rear" "Sub-W" "Preset" Sound Management Item Cabin Setting Speaker Select Front Speaker Select Rear Speaker Select Subwoofer Preset value storage/recalling English | 13 DTA Front/DTA Rear DTA Subwoofer Position Setting 0 - 20.33 (feet) Front-Left/ Front-Right/ Front...
"Preset" 6 Exit Sound Field Control mode Turn the [VOL] knob to (page 16). 5 Adjust the Sound Management item Push the Control knob towards [4] or [¢]. Also, you can store an adjusted sound control value by selecting "Recall". Multi-function item "Cabin" "Front" "Rear" "Sub-W" "Preset" Sound Management Item Cabin Setting Speaker Select Front Speaker Select Rear Speaker Select Subwoofer Preset value storage/recalling English | 13 DTA Front/DTA Rear DTA Subwoofer Position Setting 0 - 20.33 (feet) Front-Left/ Front-Right/ Front...
Instruction Manual
Page 14
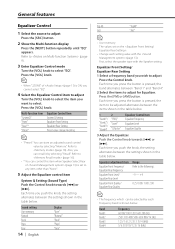
... time you want to adjust for Equalizer. Refer to (page 9). 3 Enter Equalizer Control mode Turn the [VOL] knob to adjust Press the [SRC] button. 2 Show the Multi-function display Press the [NEXT] button repeatedly until "EQ" appears. Equalizer Front Setting/ Equalizer Rear Setting 1 Select a frequency band you push the knob, the setting alternates between the items shown in the table below . 1 2 "Band1"/ "FREQ" "Band2"/ "Level" "Band3"/ "Band4" "Q Factor" Equalizer Control Item Equalizer Frequency Equalizer Level Equalizer Quality 3 Adjust the Equalizer...
... time you want to adjust for Equalizer. Refer to (page 9). 3 Enter Equalizer Control mode Turn the [VOL] knob to adjust Press the [SRC] button. 2 Show the Multi-function display Press the [NEXT] button repeatedly until "EQ" appears. Equalizer Front Setting/ Equalizer Rear Setting 1 Select a frequency band you push the knob, the setting alternates between the items shown in the table below . 1 2 "Band1"/ "FREQ" "Band2"/ "Level" "Band3"/ "Band4" "Q Factor" Equalizer Control Item Equalizer Frequency Equalizer Level Equalizer Quality 3 Adjust the Equalizer...
Instruction Manual
Page 20
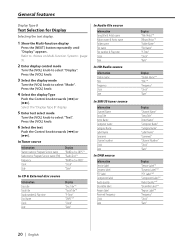
...;]. Select the "Display Type B" display. 5 Enter text select mode Turn the [VOL] knob to select "Mode". Press the [VOL] knob. 4 Select the display Type Push the Control knob towards [4] or [¢]. In Tuner source Information Station name or Program Service name Radio text or Program Service name (FM) Frequency Clock Date Display "BAND+ch+SNPS"* "Radio Text"* "BAND+ch+FREQ" "Clock" "Date" In CD & External disc source Information Disc title Track title Track number & Play time Disc Name Clock Date Display "Disc Title"* "Track Title"* "P-Time...
...;]. Select the "Display Type B" display. 5 Enter text select mode Turn the [VOL] knob to select "Mode". Press the [VOL] knob. 4 Select the display Type Push the Control knob towards [4] or [¢]. In Tuner source Information Station name or Program Service name Radio text or Program Service name (FM) Frequency Clock Date Display "BAND+ch+SNPS"* "Radio Text"* "BAND+ch+FREQ" "Clock" "Date" In CD & External disc source Information Disc title Track title Track number & Play time Disc Name Clock Date Display "Disc Title"* "Track Title"* "P-Time...

Instruction Manual
Page 22
... setting items. 7 Exit Display Control mode Turn the [VOL] knob to select "Text". Each time you push the knob, the display mode alternates between the display modes shown in 2-item displaya mode In Tuner source Information (12) Source name Frequency Information (34) Radio text (FM) Station name or Program Service name Display "Radio Text"* "SNPS"*¹ Press the [VOL] knob. 6 Select the text display part Select the display mode Press the Control knob. In the 1st text display part1 , the play time...
... setting items. 7 Exit Display Control mode Turn the [VOL] knob to select "Text". Each time you push the knob, the display mode alternates between the display modes shown in 2-item displaya mode In Tuner source Information (12) Source name Frequency Information (34) Radio text (FM) Station name or Program Service name Display "Radio Text"* "SNPS"*¹ Press the [VOL] knob. 6 Select the text display part Select the display mode Press the Control knob. In the 1st text display part1 , the play time...

Instruction Manual
Page 27
...-function display Press the [NEXT] button repeatedly until "Display" appears. however, the actual display color does not change. • This function can be reset by the numerical value. Press the [VOL] knob. • When you are required to select "Return". G-Meter display (Text part): The maximum value of Display type C/D can be set for both the upper and lower rows. Refer to (page 9). 2 Enter display control mode Turn...
...-function display Press the [NEXT] button repeatedly until "Display" appears. however, the actual display color does not change. • This function can be reset by the numerical value. Press the [VOL] knob. • When you are required to select "Return". G-Meter display (Text part): The maximum value of Display type C/D can be set for both the upper and lower rows. Refer to (page 9). 2 Enter display control mode Turn...
Instruction Manual
Page 44
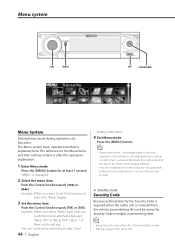
... select "Beep", each time you want to the basic operation method above--are entered step by using the Security Code is helpful in preventing theft. • Setup Security Code when the (page 52) is set the beep sound select the "Beep" display. 3 Set the menu item Push the Control knob towards [4] or [¢]. In Standby mode Security Code Because authorization by the Security Code is required when the audio unit...
... select "Beep", each time you want to the basic operation method above--are entered step by using the Security Code is helpful in preventing theft. • Setup Security Code when the (page 52) is set the beep sound select the "Beep" display. 3 Set the menu item Push the Control knob towards [4] or [¢]. In Standby mode Security Code Because authorization by the Security Code is required when the audio unit...
Instruction Manual
Page 45
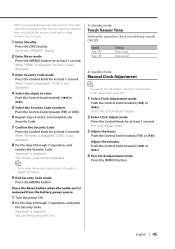
... Security Code. Note, you activate the Security Code function, the code cannot be changed and the function cannot be released. The Security Code function activates. In Standby mode Touch Sensor Tone Setting the operation check sound (beep sound) ON/OFF. Beep canceled. You can being using the unit. When "Enter" is displayed, "CODE" is set the Security Code with a 4 digit number of your choice. 1 Enter Standby Press the [SRC] button. In Standby mode Manual Clock Adjustment •...
... Security Code. Note, you activate the Security Code function, the code cannot be changed and the function cannot be released. The Security Code function activates. In Standby mode Touch Sensor Tone Setting the operation check sound (beep sound) ON/OFF. Beep canceled. You can being using the unit. When "Enter" is displayed, "CODE" is set the Security Code with a 4 digit number of your choice. 1 Enter Standby Press the [SRC] button. In Standby mode Manual Clock Adjustment •...

Instruction Manual
Page 46
... can change the illumination color of [EJECT], [NEXT], [AUTO], and [ATT] buttons. Display "DSI: ON" "DSI: OFF" Setting LED flashes. In Standby mode Synchronize Clock Synchronizing the RDS station time data and this unit's display automatically when the vehicle light switch is green. • You can adjust. 4 Adjust each item Push the Control knob towards [FM] or [AM]. 5 Repeat step 3 and 4 operation and adjust the date. 6 Exit Date adjustment mode Press the [MENU] button. In Standby mode...
... can change the illumination color of [EJECT], [NEXT], [AUTO], and [ATT] buttons. Display "DSI: ON" "DSI: OFF" Setting LED flashes. In Standby mode Synchronize Clock Synchronizing the RDS station time data and this unit's display automatically when the vehicle light switch is green. • You can adjust. 4 Adjust each item Push the Control knob towards [FM] or [AM]. 5 Repeat step 3 and 4 operation and adjust the date. 6 Exit Date adjustment mode Press the [MENU] button. In Standby mode...

Instruction Manual
Page 49
... power lines) may cause unstable sound quality when CRSC is turned ON. Display "Zone2: Rear" "Zone2: Front" Setting Sub source (Auxiliary input source) is to Analog broadcast only. The Traffic Information function is ON. In HD Radio mode Receive mode Setting Sets the receive mode. 1 Select the Receive mode Push the Control knob towards [FM] or [AM]. The CRSC is OFF. • Even if the Receive mode is set to "Auto", when the Ball game mode program (non-delayed broadcast program...
... power lines) may cause unstable sound quality when CRSC is turned ON. Display "Zone2: Rear" "Zone2: Front" Setting Sub source (Auxiliary input source) is to Analog broadcast only. The Traffic Information function is ON. In HD Radio mode Receive mode Setting Sets the receive mode. 1 Select the Receive mode Push the Control knob towards [FM] or [AM]. The CRSC is OFF. • Even if the Receive mode is set to "Auto", when the Ball game mode program (non-delayed broadcast program...

Instruction Manual
Page 54
... FM3 bands. [4]/ [¢] buttons Tune up or down band. [0] - [9] buttons Press buttons [1] - [6] to recall preset stations. [DIRECT] button Enters and cancels the (page 30) mode. [38] button Enters and cancels the (page 32) mode. The rear channel activates while the Dual Zone System is turned ON or OFF. [5]/ [∞] buttons Adjusts the volume of the rear channel. Selecting and adjusting of the Detail Audio item cannot be adjusted. [VOL] buttons Adjusts the Audio item. • Refer to...
... FM3 bands. [4]/ [¢] buttons Tune up or down band. [0] - [9] buttons Press buttons [1] - [6] to recall preset stations. [DIRECT] button Enters and cancels the (page 30) mode. [38] button Enters and cancels the (page 32) mode. The rear channel activates while the Dual Zone System is turned ON or OFF. [5]/ [∞] buttons Adjusts the volume of the rear channel. Selecting and adjusting of the Detail Audio item cannot be adjusted. [VOL] buttons Adjusts the Audio item. • Refer to...
Instruction Manual
Page 56
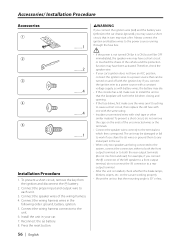
..., make sure the wires aren't touching to the unit. 6. battery. 2. Connect the wiring harness connector to cause a short circuit, then replace the old fuse with one with the same rating. • Insulate unconnected wires with vinyl tape or other similar material. battery. 8. If you share the - Reconnect the - Connect the wiring harness wires in the car. • When only two speakers are working properly. • Mount the unit so that the faceplate...
..., make sure the wires aren't touching to the unit. 6. battery. 2. Connect the wiring harness connector to cause a short circuit, then replace the old fuse with one with the same rating. • Insulate unconnected wires with vinyl tape or other similar material. battery. 8. If you share the - Reconnect the - Connect the wiring harness wires in the car. • When only two speakers are working properly. • Mount the unit so that the faceplate...
Instruction Manual
Page 61
... mute function turns ON even though the TEL mute wire is not connected. ✔ The TEL mute wire is not connected. ☞ Connect the Disc changer. No sound can select "Display N/P: POSI" as mentioned in (page 47). There are set to ON. ☞ Turn OFF "2ZONE" of the speaker wires is being used. ☞ The Touch Sensor Tone cannot be adjusted. ✔ The received RDS station is not sending time data. ☞ Receive another RDS station...
... mute function turns ON even though the TEL mute wire is not connected. ✔ The TEL mute wire is not connected. ☞ Connect the Disc changer. No sound can select "Display N/P: POSI" as mentioned in (page 47). There are set to ON. ☞ Turn OFF "2ZONE" of the speaker wires is being used. ☞ The Touch Sensor Tone cannot be adjusted. ✔ The received RDS station is not sending time data. ☞ Receive another RDS station...
Instruction Manual
Page 62
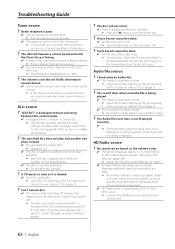
... External disc control mode. ✔ Unsupported disc changer is used. The specified disc does not play an Audio file. ✔ The media is bad or unstable. Audio file source ? The volume is not the set Traffic information sound volume. ✔ The set sound volume is less than the tuner sound volume. ☞ If the tuner sound volume is louder than 10 minutes has elapsed since the vehicle ACC switch was set with the Direct Access Tuning. ✔ A station that...
... External disc control mode. ✔ Unsupported disc changer is used. The specified disc does not play an Audio file. ✔ The media is bad or unstable. Audio file source ? The volume is not the set Traffic information sound volume. ✔ The set sound volume is less than the tuner sound volume. ☞ If the tuner sound volume is louder than 10 minutes has elapsed since the vehicle ACC switch was set with the Direct Access Tuning. ✔ A station that...
Instruction Manual
Page 63
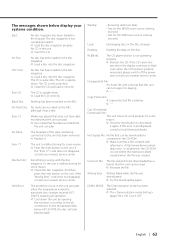
... windows or turning on the unit. If the "Mecha Error" code does not disappear, consult your systems condition. Waiting: • Receiving radio text data. • Text for the SIRIUS tuner source is upsidedown. IN (Blink): The CD player section is wrong with referring to flash even when the CD has been properly reinserted, please switch off the power and consult your nearest service center. Eject: No disc magazine...
... windows or turning on the unit. If the "Mecha Error" code does not disappear, consult your systems condition. Waiting: • Receiving radio text data. • Text for the SIRIUS tuner source is upsidedown. IN (Blink): The CD player section is wrong with referring to flash even when the CD has been properly reinserted, please switch off the power and consult your nearest service center. Eject: No disc magazine...


