
Instruction Manual
Page 1
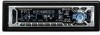
... number ©B64-2154-00 (KW) KRC-535 CASSETTE RECEIVER INSTRUCTION MANUAL AMPLI-TUNER-LECTEUR DE CASSETTE MODE D'EMPLOI RADIO CASSETTE MANUAL DE INSTRUCCIONES Take the time to the model and serial numbers whenever you obtain the best performance from your new cassette-receiver. Refer to read through this instruction manual. Familiarity with installation and operation procedures will help you call upon your records Record the serial number, found on the back of the unit...
... number ©B64-2154-00 (KW) KRC-535 CASSETTE RECEIVER INSTRUCTION MANUAL AMPLI-TUNER-LECTEUR DE CASSETTE MODE D'EMPLOI RADIO CASSETTE MANUAL DE INSTRUCCIONES Take the time to the model and serial numbers whenever you obtain the best performance from your new cassette-receiver. Refer to read through this instruction manual. Familiarity with installation and operation procedures will help you call upon your records Record the serial number, found on the back of the unit...

Instruction Manual
Page 2
...Title Scroll DNPP (Disc Name Preset Play) Menu system 18 Menu System Security Code Touch Sensor Tone Manual Clock Adjustment Selectable Illumination Switching Graphic Display Contrast Adjustment Dimmer OFF Wait Time Setting CRSC (Clean Reception System Circuit) Text Scroll Basic Operations of remote......22 Loading and Replacing the battery Basic operations In Tuner source In Cassette tape source In Disc source Accessories 24 Installation Procedure 24 Connecting Wires to Terminals 25 Installation (non-Japanese cars 26 Installation (Japanese cars) .....26 Removing the Unit 27 Locking the...
...Title Scroll DNPP (Disc Name Preset Play) Menu system 18 Menu System Security Code Touch Sensor Tone Manual Clock Adjustment Selectable Illumination Switching Graphic Display Contrast Adjustment Dimmer OFF Wait Time Setting CRSC (Clean Reception System Circuit) Text Scroll Basic Operations of remote......22 Loading and Replacing the battery Basic operations In Tuner source In Cassette tape source In Disc source Accessories 24 Installation Procedure 24 Connecting Wires to Terminals 25 Installation (non-Japanese cars 26 Installation (Japanese cars) .....26 Removing the Unit 27 Locking the...
Instruction Manual
Page 3
... ignition, battery, or ground wires, make sure to use a new one with no device (KCA-S210A, CA-C1AX, KDC-CPS87, KDC-CX87, KDC-CPS85, KDC-CX85, KDC-CPS82 or KDC-CX82) is connected, the Auxiliary input is entered when switching modes. -3- If you use the wrong screws, you connect a model with the prescribed rating. When you could damage the unit. • Do not apply excessive force to the moving faceplate. Safety...
... ignition, battery, or ground wires, make sure to use a new one with no device (KCA-S210A, CA-C1AX, KDC-CPS87, KDC-CX87, KDC-CPS85, KDC-CX85, KDC-CPS82 or KDC-CX82) is connected, the Auxiliary input is entered when switching modes. -3- If you use the wrong screws, you connect a model with the prescribed rating. When you could damage the unit. • Do not apply excessive force to the moving faceplate. Safety...
Instruction Manual
Page 4
... Security Code function (see p.18) to prevent theft. • Characters in the LCD may become difficult to read in temperatures below 41 ˚F (5 ˚C). • The illustrations of the illustrations on the display may represent something impossible in this unit is bad during installation, consult your local KENWOOD dealer for assistance. • Press the reset button if the disc auto changer...
... Security Code function (see p.18) to prevent theft. • Characters in the LCD may become difficult to read in temperatures below 41 ˚F (5 ˚C). • The illustrations of the illustrations on the display may represent something impossible in this unit is bad during installation, consult your local KENWOOD dealer for assistance. • Press the reset button if the disc auto changer...

Instruction Manual
Page 6
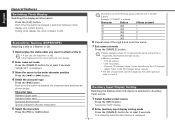
... Speaker setting. First, select the speaker type with the (page 7). System Q You can be adjusted switch as shown below. 4 Adjust the Audio item Press the [4] or [¢] button. Adjustment Item Display Range Bass level Middle level "Bass" "Middle" -8 - +8 -8 - +8 -6- Attenuator Turning the volume down quickly. Easy User memory "Flat" "Rock" "Top 40" "Pops" "Jazz" "Easy" "Scan" "User" • User memory: The values set Press the [SRC] button. 2 Select the Sound type Audio Control 1 Select the source for adjustment Press the [SRC] button. 2 Enter Audio Control mode...
... Speaker setting. First, select the speaker type with the (page 7). System Q You can be adjusted switch as shown below. 4 Adjust the Audio item Press the [4] or [¢] button. Adjustment Item Display Range Bass level Middle level "Bass" "Middle" -8 - +8 -8 - +8 -6- Attenuator Turning the volume down quickly. Easy User memory "Flat" "Rock" "Top 40" "Pops" "Jazz" "Easy" "Scan" "User" • User memory: The values set Press the [SRC] button. 2 Select the Sound type Audio Control 1 Select the source for adjustment Press the [SRC] button. 2 Enter Audio Control mode...

Instruction Manual
Page 7
... the display switches as a difference from the basic volume. 5 Exit Audio Control mode Press the [AUD] button. Press the [DISP] button. Front 15 -8 - ±0 Volume offset: Each source's volume can be set as shown below . In Tuner source Information Display Frequency Station name "SNPS" In Tape source Information Play side & Tape counter Play side & Tape running Play side In External disc source Information Display Track Time Disc name Disc title Track title "DNPS" "D-TITLE" "T-TITLE" -7- Treble level Balance Fader Volume offset "Treble" "Balance...
... the display switches as a difference from the basic volume. 5 Exit Audio Control mode Press the [AUD] button. Press the [DISP] button. Front 15 -8 - ±0 Volume offset: Each source's volume can be set as shown below . In Tuner source Information Display Frequency Station name "SNPS" In Tape source Information Play side & Tape counter Play side & Tape running Play side In External disc source Information Display Track Time Disc name Disc title Track title "DNPS" "D-TITLE" "T-TITLE" -7- Treble level Balance Fader Volume offset "Treble" "Balance...
Instruction Manual
Page 8
... Disc Naming can't be changed by using a remote with a number buttons. During clock display the clock indicator is entered. Each time the button is registered, and Name Set mode closes. • Memory numbers - AM: 16 stations - Station/Disc Naming (SNPS/DNPS) Attaching a title to a Station or CD. 1 Receive/play the station/disc you want to attach a title to • A title can't be attached to the CD changer/ player. General features English Switching Clock Display Switching the displayed information. Select the "AUX" display. 2 Enter Auxiliary input display setting mode...
... Disc Naming can't be changed by using a remote with a number buttons. During clock display the clock indicator is entered. Each time the button is registered, and Name Set mode closes. • Memory numbers - AM: 16 stations - Station/Disc Naming (SNPS/DNPS) Attaching a title to a Station or CD. 1 Receive/play the station/disc you want to attach a title to • A title can't be attached to the CD changer/ player. General features English Switching Clock Display Switching the displayed information. Select the "AUX" display. 2 Enter Auxiliary input display setting mode...
Instruction Manual
Page 10
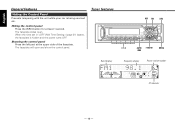
... show the control panel. # 1-6 AM FM SRC AUTO AME AUTO/ 4/¢ AME MENU Band display Frequency display Preset station number ST indicator - 10 - Showing the control panel Press the left part at least 1 second. The faceplate will open . When the time set in (page 21) lapses, the faceplate is being serviced etc. English General features Tuner features Hiding the Control Panel Prevents tampering with the unit while your car is hidden and the power turns OFF.
... show the control panel. # 1-6 AM FM SRC AUTO AME AUTO/ 4/¢ AME MENU Band display Frequency display Preset station number ST indicator - 10 - Showing the control panel Press the left part at least 1 second. The faceplate will open . When the time set in (page 21) lapses, the faceplate is being serviced etc. English General features Tuner features Hiding the Control Panel Prevents tampering with the unit while your car is hidden and the power turns OFF.

Instruction Manual
Page 11
... Direct Access Tuning Press the [DIRECT] button on the remote. Each time the [FM] button is pressed the Tuning mode switches as shown below. Tuning mode Display Operation Auto seek Preset station seek Manual "Auto1" "Auto2" "Manual" Automatic search for at least 2 seconds. Tuning Selecting the station. The preset number display blinks 1 time. Press the [AUTO] button. Each time the button is pressed it switches between the FM1, FM2, and FM3 bands. 3 Tune up or down band Press the [4] or [¢] button. Normal manual tuning control...
... Direct Access Tuning Press the [DIRECT] button on the remote. Each time the [FM] button is pressed the Tuning mode switches as shown below. Tuning mode Display Operation Auto seek Preset station seek Manual "Auto1" "Auto2" "Manual" Automatic search for at least 2 seconds. Tuning Selecting the station. The preset number display blinks 1 time. Press the [AUTO] button. Each time the button is pressed it switches between the FM1, FM2, and FM3 bands. 3 Tune up or down band Press the [4] or [¢] button. Normal manual tuning control...

Instruction Manual
Page 15
... to play the disc at that can be displayed will differ depending on the [¢] button. Press the [SRC] button. Release your finger to this unit. External disc control features 38 AM FM SRC AUTO AME SCAN RDM REP M.RDM DISP 4/¢ Track number Track time Playing External Disc Playing discs set in the optional accessory disc player connected to play the disc at that point. - 15 - Select the display for the disc player you...
... to play the disc at that can be displayed will differ depending on the [¢] button. Press the [SRC] button. Release your finger to this unit. External disc control features 38 AM FM SRC AUTO AME SCAN RDM REP M.RDM DISP 4/¢ Track number Track time Playing External Disc Playing discs set in the optional accessory disc player connected to play the disc at that point. - 15 - Select the display for the disc player you...

Instruction Manual
Page 19
... set as the 4 digit number of your choice. 1 Enter Standby Press the [SRC] button. removed from the battery power source 1 Turn the power ON. 2 Do the step 4 and 5 operation, and enter the Security Code. Note, the Security Code can 't be released. "APPROVED" is "3510". Beep canceled. "APPROVED" is activated, the code can't be changed and the function can be used. The Security Code function activates. When the Security Code function is displayed. When a Code...
... set as the 4 digit number of your choice. 1 Enter Standby Press the [SRC] button. removed from the battery power source 1 Turn the power ON. 2 Do the step 4 and 5 operation, and enter the Security Code. Note, the Security Code can 't be released. "APPROVED" is "3510". Beep canceled. "APPROVED" is activated, the code can't be changed and the function can be used. The Security Code function activates. When the Security Code function is displayed. When a Code...

Instruction Manual
Page 20
... Adjustment Adjusting the display contrast. Display and Setting "Contrast 0" "Contrast 5" (Original setting) "Contrast 10" Dimmer Dimming this unit's display automatically when the vehicle light switch is displayed. Selectable Illumination Selecting the button illumination color as green or red. Menu system Manual Clock Adjustment 1 Select Clock Adjustment mode Press the [FM] or [AM] button. Select the "Clock Adjust" display. 2 Enter Clock Adjust mode Press the [4] or [¢] button for at least 1 second. Display "Graphic ON" "Graphic OFF" Setting The graphic part is turned ON...
... Adjustment Adjusting the display contrast. Display and Setting "Contrast 0" "Contrast 5" (Original setting) "Contrast 10" Dimmer Dimming this unit's display automatically when the vehicle light switch is displayed. Selectable Illumination Selecting the button illumination color as green or red. Menu system Manual Clock Adjustment 1 Select Clock Adjustment mode Press the [FM] or [AM] button. Select the "Clock Adjust" display. 2 Enter Clock Adjust mode Press the [4] or [¢] button for at least 1 second. Display "Graphic ON" "Graphic OFF" Setting The graphic part is turned ON...

Instruction Manual
Page 22
... remote FM/AM/DISC+/DISC- [#0] - [#9] ATT SRC 4/¢ 38 DIRECT/OK DNPP VOL. Contact a doctor immediately if the battery is pressed the source switches. Basic operations [VOL.] buttons Adjusting the volume. [SRC] button Each time the button is accidentally swallowed. When it is pressed again it returns to (page 5). [ATT] button Turning the volume down quickly. English Basic Operations of children. Loading and Replacing the battery Use one lithium battery (CR2025). Do not set the remote...
... remote FM/AM/DISC+/DISC- [#0] - [#9] ATT SRC 4/¢ 38 DIRECT/OK DNPP VOL. Contact a doctor immediately if the battery is pressed the source switches. Basic operations [VOL.] buttons Adjusting the volume. [SRC] button Each time the button is accidentally swallowed. When it is pressed again it returns to (page 5). [ATT] button Turning the volume down quickly. English Basic Operations of children. Loading and Replacing the battery Use one lithium battery (CR2025). Do not set the remote...

Instruction Manual
Page 23
... tape. In Cassette tape source [4]/ [¢] buttons Do (page 14). [38] button Plays the reverse side of songs. - 23 - In Disc source [4]/ [¢] buttons Doing track forward and backward. [DISC+]/ [DISC-] buttons Doing album forward and backward. [38] button Each time the button is pressed it switches between the FM1, FM2, and FM3 bands. [4]/ [¢] buttons Tune up or down band. [#0] - [#9] buttons Press buttons [#1] - [#6] to recall preset stations. [DIRECT] button Enters and cancels...
... tape. In Cassette tape source [4]/ [¢] buttons Do (page 14). [38] button Plays the reverse side of songs. - 23 - In Disc source [4]/ [¢] buttons Doing track forward and backward. [DISC+]/ [DISC-] buttons Doing album forward and backward. [38] button Each time the button is pressed it switches between the FM1, FM2, and FM3 bands. [4]/ [¢] buttons Tune up or down band. [#0] - [#9] buttons Press buttons [#1] - [#6] to recall preset stations. [DIRECT] button Enters and cancels...
Instruction Manual
Page 24
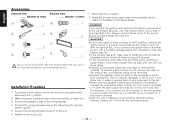
... other accessories, you share the - Install the unit in the car. • When only two speakers are working properly. - 24 - battery. 8. Make the proper input and output wire connections for each unit. 3. Accessories English External view External view ......... Number of the wiring harness. 4. Number of the unconnected wires or the terminals. • Connect the speaker wires correctly to the terminals to a rear output terminal • After the unit is installed, check whether the brake lamps, blinkers...
... other accessories, you share the - Install the unit in the car. • When only two speakers are working properly. - 24 - battery. 8. Make the proper input and output wire connections for each unit. 3. Accessories English External view External view ......... Number of the wiring harness. 4. Number of the unconnected wires or the terminals. • Connect the speaker wires correctly to the terminals to a rear output terminal • After the unit is installed, check whether the brake lamps, blinkers...

Instruction Manual
Page 25
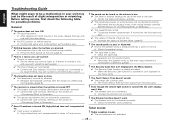
ANT CONT Motor antenna control wire (Blue) 17 7 To car light control switch ILLUMI Dimmer control wire (Orange / White) 19 Ignition key switch 41 Car fuse box (Main fuse) 42 Battery 43 + - ACC 44 Car fuse box 45 Ignition wire (Red) 46 Battery wire (Yellow) 47 Ground wire (Black) - (To car chassis) 48 To KENWOOD disc changer/ DAB control input/KPA-SD100/ KPA-HD100/KPA-SS100 25 To connect these leads, refer to the relevant instruction manuals. 26 28 White/Black To...
ANT CONT Motor antenna control wire (Blue) 17 7 To car light control switch ILLUMI Dimmer control wire (Orange / White) 19 Ignition key switch 41 Car fuse box (Main fuse) 42 Battery 43 + - ACC 44 Car fuse box 45 Ignition wire (Red) 46 Battery wire (Yellow) 47 Ground wire (Black) - (To car chassis) 48 To KENWOOD disc changer/ DAB control input/KPA-SD100/ KPA-HD100/KPA-SS100 25 To connect these leads, refer to the relevant instruction manuals. 26 28 White/Black To...

Instruction Manual
Page 26
... utensil and attach it in a Toyota car. - 26 - Make sure that the unit is unstable, it into the mounting sleeve by pressing the four corners of J-Car Brackets (Accessory 6) are not used when fitting in place. To attach this unit, make sure the front of the control panel faces you and fit it may skip). A pair of the hard rubber frame at...
... utensil and attach it in a Toyota car. - 26 - Make sure that the unit is unstable, it into the mounting sleeve by pressing the four corners of J-Car Brackets (Accessory 6) are not used when fitting in place. To attach this unit, make sure the front of the control panel faces you and fit it may skip). A pair of the hard rubber frame at...
Instruction Manual
Page 28
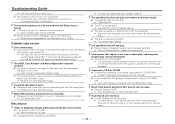
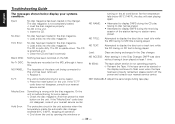
... car antenna is turned ON, the unit's display won't dim.36 ✔ The dimmer wire isn't connected. Press the reset button on (page 9). ? If the Disc changer isn't connected to it isn't displayed in the menu items. ? See the section on vehicle ignition.02 Connect the same wire to the proper terminal. The Security Code item isn't displayed in the Menu System.32 ✔ The Security Code function is incorrectly attached. Troubleshooting Guide English...
... car antenna is turned ON, the unit's display won't dim.36 ✔ The dimmer wire isn't connected. Press the reset button on (page 9). ? If the Disc changer isn't connected to it isn't displayed in the menu items. ? See the section on vehicle ignition.02 Connect the same wire to the proper terminal. The Security Code item isn't displayed in the Menu System.32 ✔ The Security Code function is incorrectly attached. Troubleshooting Guide English...
Instruction Manual
Page 29
Connect the supported disc changer. (page 3) ✔ The antenna control wire is set to "O" side. The tape can 't be done.66-1 ✔ Another function is low, it 's too short. Disc source ? "AUX" is displayed without achieving External disc control mode.50 ✔ O-N switch is not connected.40 Connect the wire correctly, referring to enter a frequency with CD recorder. ✔ A non-compatible CD changer is not canceled. Turn off random play or magazine random play has been selected. If...
Connect the supported disc changer. (page 3) ✔ The antenna control wire is set to "O" side. The tape can 't be done.66-1 ✔ Another function is low, it 's too short. Disc source ? "AUX" is displayed without achieving External disc control mode.50 ✔ O-N switch is not connected.40 Connect the wire correctly, referring to enter a frequency with CD recorder. ✔ A non-compatible CD changer is not canceled. Turn off random play or magazine random play has been selected. If...
Instruction Manual
Page 30
.... Troubleshooting Guide English The messages shown below 60°C (140°F), the disc will start playing again. E-77: The unit is wrong with the disc magazine. If the "E-77" code does not disappear, consult your nearest service center. If the tape cannot be ejected or the display continues to this unit has been removed.E30 ➪ Replace it correctly. And then press the reset button...
.... Troubleshooting Guide English The messages shown below 60°C (140°F), the disc will start playing again. E-77: The unit is wrong with the disc magazine. If the "E-77" code does not disappear, consult your nearest service center. If the tape cannot be ejected or the display continues to this unit has been removed.E30 ➪ Replace it correctly. And then press the reset button...


