
Instruction manual
Page 6
... contains a coin/button cell battery. WARNING • Do not operate any part of the body, seek immediate medical attention. Remote control (RC-406): • Do not leave the remote control in just 2 hours and can hear sounds outside the car to death. Replace it away from safe driving. • Do... not ingest the battery, Chemical Burn Hazard The remote control supplied with the same or equivalent type. • The battery pack or batteries shall not be exposed to STANDBY when parking at a low...
... contains a coin/button cell battery. WARNING • Do not operate any part of the body, seek immediate medical attention. Remote control (RC-406): • Do not leave the remote control in just 2 hours and can hear sounds outside the car to death. Replace it away from safe driving. • Do... not ingest the battery, Chemical Burn Hazard The remote control supplied with the same or equivalent type. • The battery pack or batteries shall not be exposed to STANDBY when parking at a low...

Instruction manual
Page 8
To Turn on the power Adjust the volume Select a source On the remote control Press and hold SRC to turn off the power. ( Pressing SRC does not turn on the power. ) Press or • Press and hold the volume ... select [CLOCK ADJUST], then press the knob. 4 Turn the volume knob to cancel. Remote sensor (Do not expose to select [CLOCK], then press the knob. BASICS GETTING STARTED Remote control (RC-406) This unit can be remotely controlled with an optionally purchased remote control. "DEMO OFF" appears. Press SRC repeatedly. 2 Set the clock and date 1 Press the...
To Turn on the power Adjust the volume Select a source On the remote control Press and hold SRC to turn off the power. ( Pressing SRC does not turn on the power. ) Press or • Press and hold the volume ... select [CLOCK ADJUST], then press the knob. 4 Turn the volume knob to cancel. Remote sensor (Do not expose to select [CLOCK], then press the knob. BASICS GETTING STARTED Remote control (RC-406) This unit can be remotely controlled with an optionally purchased remote control. "DEMO OFF" appears. Press SRC repeatedly. 2 Set the clock and date 1 Press the...

Instruction manual
Page 10
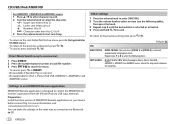
... To register, on the display window. "REGISTERING" appears on the Kenwood Marine Remote Control unit: • Press ENTER to register as [REMOTE ID1]. • Press SRC to register as [REMOTE ID2]. • Press DISP to register as [REMOTE ID3]. Search for a station 1 Press repeatedly to select HD RADIO...• To select a stored station or channel: Press one of the number buttons (1 to 6) (or press one of the Kenwood Marine Remote Control unit for more information. Preparation: Press repeatedly to enter STANDBY, then press the volume knob to enter [FUNCTION]. 1 Turn the ...
... To register, on the display window. "REGISTERING" appears on the Kenwood Marine Remote Control unit: • Press ENTER to register as [REMOTE ID1]. • Press SRC to register as [REMOTE ID2]. • Press DISP to register as [REMOTE ID3]. Search for a station 1 Press repeatedly to select HD RADIO...• To select a stored station or channel: Press one of the number buttons (1 to 6) (or press one of the Kenwood Marine Remote Control unit for more information. Preparation: Press repeatedly to enter STANDBY, then press the volume knob to enter [FUNCTION]. 1 Turn the ...

Instruction manual
Page 11
...then press the knob. 3 Repeat step 2 until the user performs the "Ignore" function. • Press (or press SRC on the remote control) to ignore the alert message. The same emergency alert message will not interrupt again for 10 seconds after step 2, Direct Access Tuning is ...This feature can store up to four messages in STANDBY, via HD Radio Broadcast. HD Radio™ tuner (for / ) Direct Access Tuning (using the remote control) 1 Press DIRECT to enter Direct Access Tuning. 2 Press the number buttons to enter a frequency. 3 Press to search for a station or channel....
...then press the knob. 3 Repeat step 2 until the user performs the "Ignore" function. • Press (or press SRC on the remote control) to ignore the alert message. The same emergency alert message will not interrupt again for 10 seconds after step 2, Direct Access Tuning is ...This feature can store up to four messages in STANDBY, via HD Radio Broadcast. HD Radio™ tuner (for / ) Direct Access Tuning (using the remote control) 1 Press DIRECT to enter Direct Access Tuning. 2 Press the number buttons to enter a frequency. 3 Press to search for a station or channel....

Instruction manual
Page 12
... Search for a station 1 Press repeatedly to select RADIO. 2 Press repeatedly (or press / on the remote control) to select FM1/FM2/FM3/AM. 3 Press S / T (or press S / on the remote control). AUTO2 : Search for a station. AUTO MEMORY YES: Automatically starts memorizing 6 stations with good reception.... and the stereo effect will remain. Direct Access Tuning (using the remote control) 1 Press DIRECT to enter Direct Access Tuning. 2 Press the number buttons to enter a frequency. 3 Press to 6) on the remote control) to search for a station. • To change the searching method...
... Search for a station 1 Press repeatedly to select RADIO. 2 Press repeatedly (or press / on the remote control) to select FM1/FM2/FM3/AM. 3 Press S / T (or press S / on the remote control). AUTO2 : Search for a station. AUTO MEMORY YES: Automatically starts memorizing 6 stations with good reception.... and the stereo effect will remain. Direct Access Tuning (using the remote control) 1 Press DIRECT to enter Direct Access Tuning. 2 Press the number buttons to enter a frequency. 3 Press to 6) on the remote control) to search for a station. • To change the searching method...

Instruction manual
Page 14
...mA) (optional accessory) iPod/iPhone KCA-iP102/KCA-iP103 (optional accessory)*1 or accessory of KENWOOD MUSIC PLAY application on your Android device before connecting. Press J / K. Follow the instructions to install KENWOOD MUSIC PLAY APP" is shown. Press . Press and hold S / T. Press repeatedly....iPod USB/ANDROID To Playback/pause Reverse/Fast-forward*4 Select a track/file Select a folder*5 Repeat play*6 Random play*6 On the faceplate On the remote control Press . Press S / T. Press S / . TRACK REPEAT/ALL REPEAT : Audio CD FILE REPEAT/FOLDER REPEAT/ALL REPEAT : MP3/WMA/AAC...
...mA) (optional accessory) iPod/iPhone KCA-iP102/KCA-iP103 (optional accessory)*1 or accessory of KENWOOD MUSIC PLAY application on your Android device before connecting. Press J / K. Follow the instructions to install KENWOOD MUSIC PLAY APP" is shown. Press . Press and hold S / T. Press repeatedly....iPod USB/ANDROID To Playback/pause Reverse/Fast-forward*4 Select a track/file Select a folder*5 Repeat play*6 Random play*6 On the faceplate On the remote control Press . Press S / T. Press S / . TRACK REPEAT/ALL REPEAT : Audio CD FILE REPEAT/FOLDER REPEAT/ALL REPEAT : MP3/WMA/AAC...
Instruction manual
Page 16
...ANDROID 2 and ANDROID source. You can make the settings in the same way as connection via USB input terminal). Settings to use KENWOOD Remote application KENWOOD Remote application is designed to the previous setting item, press . • To cancel, press and hold to [DRIVE 4]) is selected ... table), then press the knob. 3 Repeat step 2 until the desired item is selected automatically and playback starts. Direct Music Search (using the remote control) 1 Press DIRECT. 2 Press the number buttons to enter a track/file number. 3 Press to iPod 1, iPod 2, iPod USB, ANDROID ...
...ANDROID 2 and ANDROID source. You can make the settings in the same way as connection via USB input terminal). Settings to use KENWOOD Remote application KENWOOD Remote application is designed to the previous setting item, press . • To cancel, press and hold to [DRIVE 4]) is selected ... table), then press the knob. 3 Repeat step 2 until the desired item is selected automatically and playback starts. Direct Music Search (using the remote control) 1 Press DIRECT. 2 Press the number buttons to enter a track/file number. 3 Press to iPod 1, iPod 2, iPod USB, ANDROID ...
Instruction manual
Page 18
...]: According to the registered date [SORT BY A-Z]: By alphabetical order 3 Turn the volume knob (or press J / K on the remote control) to select the desired station. 4 Press the volume knob (or press on the remote control) to your Pandora account but not on the artist or current song. 4 Press and hold the volume knob. Delete... the desired station to delete, then press the knob. 5 Turn the volume knob to exit. Press / . "BOOKMARKED" appears and the information is skipped. On the remote control Press . Press T.
...]: According to the registered date [SORT BY A-Z]: By alphabetical order 3 Turn the volume knob (or press J / K on the remote control) to select the desired station. 4 Press the volume knob (or press on the remote control) to your Pandora account but not on the artist or current song. 4 Press and hold the volume knob. Delete... the desired station to delete, then press the knob. 5 Turn the volume knob to exit. Press / . "BOOKMARKED" appears and the information is skipped. On the remote control Press . Press T.
Instruction manual
Page 19
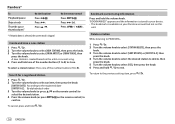
...to iHeartRadio. • Select [ON] for live station On the faceplate Press . To cancel, press and hold one of iHeartAuto application on the remote control) to the station. Search and store a station 1 Press . 2 Turn the volume knob to select a category, then press the knob. 3 ...Turn the volume knob (or press J / K on the remote control) to select the desired station. 4 Press the volume knob (or press on your device to the USB input terminal. Press 1. 1 Press 2 to start scanning....
...to iHeartRadio. • Select [ON] for live station On the faceplate Press . To cancel, press and hold one of iHeartAuto application on the remote control) to the station. Search and store a station 1 Press . 2 Turn the volume knob to select a category, then press the knob. 3 ...Turn the volume knob (or press J / K on the remote control) to select the desired station. 4 Press the volume knob (or press on your device to the USB input terminal. Press 1. 1 Press 2 to start scanning....
Instruction manual
Page 20
..." appears and the information is available for tracks in Playlists only. REPEAT ALL/REPEAT ONE*4/REPEAT OFF Press repeatedly.*4 SHUFFLE ON/SHUFFLE OFF On the remote control Press . To Playback/pause Skip a track Thumbs up or thumbs down is selected, the current track is removed from the rear of the unit. Press...
..." appears and the information is available for tracks in Playlists only. REPEAT ALL/REPEAT ONE*4/REPEAT OFF Press repeatedly.*4 SHUFFLE ON/SHUFFLE OFF On the remote control Press . To Playback/pause Skip a track Thumbs up or thumbs down is selected, the current track is removed from the rear of the unit. Press...
Instruction manual
Page 21
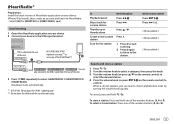
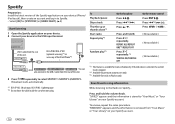
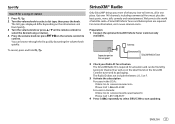
The list types displayed differ depending on the information sent from Spotify. 3 Turn the volume knob (or press J / K on the remote control) to select the desired song or station. 4 Press the volume knob (or press on the SiriusXM Connect tuner and its packaging. Get over...to the world of satellite radio. The Radio ID does not include the letters I, O, S or F. 3 Activate the subscription. You can be found on the remote control) to select a list type, then press the knob. Welcome to , all in Canada: Online: Go to Phone: Call 1-877-438-9677 4 Press repeatedly ...
The list types displayed differ depending on the information sent from Spotify. 3 Turn the volume knob (or press J / K on the remote control) to select the desired song or station. 4 Press the volume knob (or press on the SiriusXM Connect tuner and its packaging. Get over...to the world of satellite radio. The Radio ID does not include the letters I, O, S or F. 3 Activate the subscription. You can be found on the remote control) to select a list type, then press the knob. Welcome to , all in Canada: Online: Go to Phone: Call 1-877-438-9677 4 Press repeatedly ...
Instruction manual
Page 22
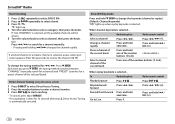
...8226; Pressing and holding S / T changes the channel rapidly. Change a channel rapidly Press and hold S / . Press and hold S / T. On the remote control Press . Enter the pass code to receive the channel. ( 19) To change the keymode (channel or replay). (Default: Channel keymode) " " lights up ....searching. • To cancel, press or DIRECT. • If no operation is done for S / T: Press . To On the faceplate On the remote control Select a channel Press S / T. Store a channel of the current band Press and hold to select a category, then press the knob. Press S...
...8226; Pressing and holding S / T changes the channel rapidly. Change a channel rapidly Press and hold S / . Press and hold S / T. On the remote control Press . Enter the pass code to receive the channel. ( 19) To change the keymode (channel or replay). (Default: Channel keymode) " " lights up ....searching. • To cancel, press or DIRECT. • If no operation is done for S / T: Press . To On the faceplate On the remote control Select a channel Press S / T. Store a channel of the current band Press and hold to select a category, then press the knob. Press S...

Instruction manual
Page 24
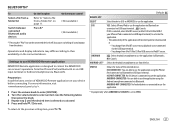
... (HFP) - SIGNAL LEVEL Shows the strength (NO SIGNAL/WEAK/GOOD/STRONG) of the channel number. 3 Press and hold to default. ; BLUETOOTH® BLUETOOTH - Audio/Video Remote Control Profile (AVRCP) - Serial Port Profile (SPP) - NO: Cancels. *1 Displayed only when [USER DEFINED] is selected. *2 Available only if the connected SiriusXM Vehicle Tuner is SXV200...
... (HFP) - SIGNAL LEVEL Shows the strength (NO SIGNAL/WEAK/GOOD/STRONG) of the channel number. 3 Press and hold to default. ; BLUETOOTH® BLUETOOTH - Audio/Video Remote Control Profile (AVRCP) - Serial Port Profile (SPP) - NO: Cancels. *1 Displayed only when [USER DEFINED] is selected. *2 Available only if the connected SiriusXM Vehicle Tuner is SXV200...

Instruction manual
Page 26
...to the N-Mark on the unit (right side of the panel). To First incoming call On the faceplate On the remote control Press or the Press . volume knob or one of the remote device for [DISPLAY] ( 32) and the KEY zone illuminates in green color and flashes. • The unit ...Refer to complete pairing and established the BLUETOOTH connection automatically. 1 Activate the NFC function on the unit (right side of the panel), the unit and remote device proceed to the instruction manual of the number buttons (1 to one NFC-compatible device at a time. For a stronger NFC signal, user must ...
...to the N-Mark on the unit (right side of the panel). To First incoming call On the faceplate On the remote control Press or the Press . volume knob or one of the remote device for [DISPLAY] ( 32) and the KEY zone illuminates in green color and flashes. • The unit ...Refer to complete pairing and established the BLUETOOTH connection automatically. 1 Activate the NFC function on the unit (right side of the panel), the unit and remote device proceed to the instruction manual of the number buttons (1 to one NFC-compatible device at a time. For a stronger NFC signal, user must ...

Instruction manual
Page 27
... LEVEL +10 (LEVEL -4): The sensitivity of the other sources. To return to the previous setting item, press . BLUETOOTH® To On the faceplate On the remote control While talking on the phone... 1 Press the volume knob to enter [FUNCTION]. 2 Turn the volume knob to select an item (see the following table), then...
... LEVEL +10 (LEVEL -4): The sensitivity of the other sources. To return to the previous setting item, press . BLUETOOTH® To On the faceplate On the remote control While talking on the phone... 1 Press the volume knob to enter [FUNCTION]. 2 Turn the volume knob to select an item (see the following table), then...

Instruction manual
Page 28
... the following table), then press the knob. 3 Repeat step 2 until you finish entering the phone number. 3 Press the volume knob to call. (or using the remote control) 1 Press the number buttons (0 to 9) to enter the phone number. 2 Press to 30: The unit answers incoming call automatically in the selected time (in seconds...
... the following table), then press the knob. 3 Repeat step 2 until you finish entering the phone number. 3 Press the volume knob to call. (or using the remote control) 1 Press the number buttons (0 to 9) to enter the phone number. 2 Press to 30: The unit answers incoming call automatically in the selected time (in seconds...

Instruction manual
Page 30
... Audio Distribution Profile (A2DP) compatibility PHONEBOOK DL: Phonebook Access profile (PBAP) compatibility To cancel test mode, press and hold S / T. On the remote control Press . Press and hold to turn off the unit. 26 ENGLISH Audio player via Bluetooth 1 Press repeatedly (or press SRC on the display. The... While in BT AUDIO source, you can check the connectivity of the connected device, this unit model name (KDC-X7**/KDC-BT7**HD/ KMR-D7**BT/KDC-X5**/KDC-BT5**U) on the Bluetooth device. 3 Operate the Bluetooth device to start playback. OFF: Cancels. ALL REPEAT, FILE...
... Audio Distribution Profile (A2DP) compatibility PHONEBOOK DL: Phonebook Access profile (PBAP) compatibility To cancel test mode, press and hold S / T. On the remote control Press . Press and hold to turn off the unit. 26 ENGLISH Audio player via Bluetooth 1 Press repeatedly (or press SRC on the display. The... While in BT AUDIO source, you can check the connectivity of the connected device, this unit model name (KDC-X7**/KDC-BT7**HD/ KMR-D7**BT/KDC-X5**/KDC-BT5**U) on the Bluetooth device. 3 Operate the Bluetooth device to start playback. OFF: Cancels. ALL REPEAT, FILE...
Instruction manual
Page 31
...ANDROID NOT CONNECTED: No Android device is connected to use the application. * Displayed only when [ANDROID] of KENWOOD Remote application on the connected device itself also causes switching of sound output from the iPhone/iPod (via Bluetooth or via...application. Default: XX REMOTE APP SELECT Select the device (IOS or ANDROID) to use KENWOOD Remote application KENWOOD Remote application is selected or activated. 4 Press and hold to control the KENWOOD car receiver's operations from the device. NO: Cancels. NO: Cancels. Press 5.* On the remote control ( Not available )...
...ANDROID NOT CONNECTED: No Android device is connected to use the application. * Displayed only when [ANDROID] of KENWOOD Remote application on the connected device itself also causes switching of sound output from the iPhone/iPod (via Bluetooth or via...application. Default: XX REMOTE APP SELECT Select the device (IOS or ANDROID) to use KENWOOD Remote application KENWOOD Remote application is selected or activated. 4 Press and hold to control the KENWOOD car receiver's operations from the device. NO: Cancels. NO: Cancels. Press 5.* On the remote control ( Not available )...

Instruction manual
Page 33
... table), then press the knob. 3 Repeat step 2 until the desired item is selected or activated. 4 Press and hold to exit. (or using the remote control) 1 Press AUD to enter [AUDIO CONTROL]. 2 Press J / K to the previous setting item, press . To return to select an item, then press . LEVEL -9 to LEVEL +9 (LEVEL... equalizer suitable to the music genre. (Select [USER] to adjust.) 1.35/1.50/2.00: Adjust the quality factor. OFF: Cancels. OFF: Cancels. AUDIO CONTROL SUB-W LEVEL MANUAL EQ 62.5HZ LEVEL 100 HZ/160 HZ/250 HZ/ 400 HZ/630 HZ/1 KHZ/ 1.6KHZ/2.5KHZ/4 KHZ/ 6.3KHZ/10 KHZ/16...
... table), then press the knob. 3 Repeat step 2 until the desired item is selected or activated. 4 Press and hold to exit. (or using the remote control) 1 Press AUD to enter [AUDIO CONTROL]. 2 Press J / K to the previous setting item, press . To return to select an item, then press . LEVEL -9 to LEVEL +9 (LEVEL... equalizer suitable to the music genre. (Select [USER] to adjust.) 1.35/1.50/2.00: Adjust the quality factor. OFF: Cancels. OFF: Cancels. AUDIO CONTROL SUB-W LEVEL MANUAL EQ 62.5HZ LEVEL 100 HZ/160 HZ/250 HZ/ 400 HZ/630 HZ/1 KHZ/ 1.6KHZ/2.5KHZ/4 KHZ/ 6.3KHZ/10 KHZ/16...
Instruction manual
Page 37
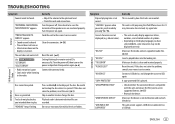
... display is compatible with this does not solve the problem, consult your nearest service centre. Clean the connectors. ( 36) Reset the unit. ( 3) Setting/deleting the remote control ID is still preparing the iPod/iPhone music list. Turn the power off , then check to USB again. If this does not solve the problem...
... display is compatible with this does not solve the problem, consult your nearest service centre. Clean the connectors. ( 36) Reset the unit. ( 3) Setting/deleting the remote control ID is still preparing the iPod/iPhone music list. Turn the power off , then check to USB again. If this does not solve the problem...


