Instruction Manuals
Page 1
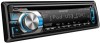
... number US Residents Only Register Online Register your records Record the serial number, found on the back of the unit, in the space provided below. KDC-X396 KDC-352U KDC-252U KDC-202U KDC-MP252U KDC-MP152U KMR-350U CD-RECEIVER INSTRUCTION MANUAL AMPLI-TUNER LECTEUR DE CD MODE D'EMPLOI REPRODUCTOR DE DISCOS COMPACTOS RECEPTOR DE FM/AM MANUAL DE INSTRUCCIONES Take the time to the model and serial numbers...
... number US Residents Only Register Online Register your records Record the serial number, found on the back of the unit, in the space provided below. KDC-X396 KDC-352U KDC-252U KDC-202U KDC-MP252U KDC-MP152U KMR-350U CD-RECEIVER INSTRUCTION MANUAL AMPLI-TUNER LECTEUR DE CD MODE D'EMPLOI REPRODUCTOR DE DISCOS COMPACTOS RECEPTOR DE FM/AM MANUAL DE INSTRUCCIONES Take the time to the model and serial numbers...
Instruction Manuals
Page 2
... audio system resumes. To continue listen to the other external components 14 Function settings 14 Troubleshooting 16 Installation/connection 18 Basic procedure Warning Caution Wiring connection Installing the unit Removing the unit Specifications 21 Muting upon the reception of with iPod Selecting a song by alphabet Selecting App & iPod Control Mode Adjust [SETTINGS] mode settings When a call ends, "CALL" disappear. CONTENTS Safety 3 Preparation 4 How to attach/detach the faceplate How to reset your unit How to prepare the remote controller...
... audio system resumes. To continue listen to the other external components 14 Function settings 14 Troubleshooting 16 Installation/connection 18 Basic procedure Warning Caution Wiring connection Installing the unit Removing the unit Specifications 21 Muting upon the reception of with iPod Selecting a song by alphabet Selecting App & iPod Control Mode Adjust [SETTINGS] mode settings When a call ends, "CALL" disappear. CONTENTS Safety 3 Preparation 4 How to attach/detach the faceplate How to reset your unit How to prepare the remote controller...
Instruction Manuals
Page 3
... manual indicates the iPod or iPhone connected to know... Caution: Adjust the volume so that they work with : The illustrations in this precaution may result in your model and in hazardous radiation exposure. This unit can only play the CDs with your area. Failure to observe this manual are used to make sure that you experience problems during installation, consult your Kenwood dealer. Connector (on the panel with a connection cable...
... manual indicates the iPod or iPhone connected to know... Caution: Adjust the volume so that they work with : The illustrations in this precaution may result in your model and in hazardous radiation exposure. This unit can only play the CDs with your area. Failure to observe this manual are used to make sure that you experience problems during installation, consult your Kenwood dealer. Connector (on the panel with a connection cable...
Instruction Manuals
Page 6
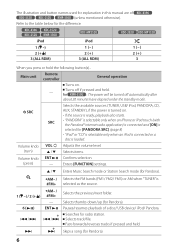
... unit Remote controller General operation Turns on . • If the source is turned on . - Selects items. Volume knob ENT (press) - Skips a song (for the difference: iPod 1 ( -) 2 (+ ) 3 (ALL RDM) iPod 1 (-) 2 (+) 3 (ALL RDM) 1 (-) 2 (+) 3 When you press or hold the following button(s)... Selects thumbs down/up (for Pandora). 6( ) ENT Pauses/resumes playback of (unless mentioned otherwise). Confirms selection. Enters [FUNCTION] settings. 5 / ∞ Enters Music Search mode or Station Search mode (for Pandora). *AM- / Selects...
... unit Remote controller General operation Turns on . • If the source is turned on . - Selects items. Volume knob ENT (press) - Skips a song (for the difference: iPod 1 ( -) 2 (+ ) 3 (ALL RDM) iPod 1 (-) 2 (+) 3 (ALL RDM) 1 (-) 2 (+) 3 When you press or hold the following button(s)... Selects thumbs down/up (for Pandora). 6( ) ENT Pauses/resumes playback of (unless mentioned otherwise). Confirms selection. Enters [FUNCTION] settings. 5 / ∞ Enters Music Search mode or Station Search mode (for Pandora). *AM- / Selects...
Instruction Manuals
Page 7
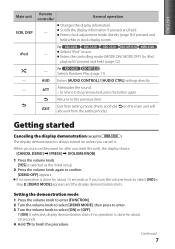
... volume knob to enter [FUNCTION]. 2 Turn the volume knob to select [DEMO MODE], then press to enter. 3 Turn the volume knob to the previous level, press the button again. For : Selects Random Play. (page 11) - AUD Enters [AUDIO CONTROL] / [AUDIO CTRL] settings directly. - Scrolls the display information if pressed and held . (page 12) - Enters clock adjustment mode directly (page 8) if pressed and held while in step 2, [DEMO MODE] appears and the display demonstration starts. ATT Attenuates the sound...
... volume knob to enter [FUNCTION]. 2 Turn the volume knob to select [DEMO MODE], then press to enter. 3 Turn the volume knob to the previous level, press the button again. For : Selects Random Play. (page 11) - AUD Enters [AUDIO CONTROL] / [AUDIO CTRL] settings directly. - Scrolls the display information if pressed and held . (page 12) - Enters clock adjustment mode directly (page 8) if pressed and held while in step 2, [DEMO MODE] appears and the display demonstration starts. ATT Attenuates the sound...
Instruction Manuals
Page 8
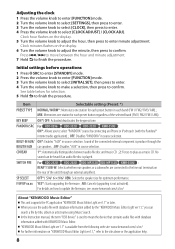
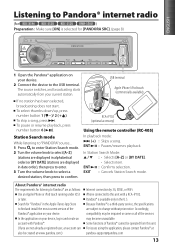
... adjustment. 7 Hold to select "PANDORA" source by title, album or artist name using Music Search. SWITCH PRE For : REAR*/ SUB-W: Selects whether rear speakers or a subwoofer are connected to mean the device that contains audio files with database information added with the Pandora® internet radio application). ; NO: Cancels (upgrading is played. Initial settings before operations 1 Press SRC to enter [STANDBY] mode. 2 Press the volume knob to enter [FUNCTION] mode. 3 Turn the volume knob to select [INITIAL SET...
... adjustment. 7 Hold to select "PANDORA" source by title, album or artist name using Music Search. SWITCH PRE For : REAR*/ SUB-W: Selects whether rear speakers or a subwoofer are connected to mean the device that contains audio files with database information added with the Pandora® internet radio application). ; NO: Cancels (upgrading is played. Initial settings before operations 1 Press SRC to enter [STANDBY] mode. 2 Press the volume knob to enter [FUNCTION] mode. 3 Turn the volume knob to select [INITIAL SET...
Instruction Manuals
Page 9
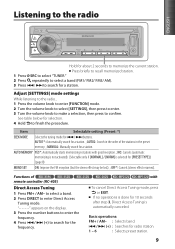
... may be lost). ; Adjust [SETTINGS] mode settings While listening to the radio... 1 Press the volume knob to enter [FUNCTION] mode. 2 Turn the volume knob to select [SETTINGS], then press to enter. 3 Turn the volume knob to make a selection, then press to enter Direct Access Tuning mode. NO: Cancels (automatic memorizing is not activated). (Selectable only if [NORMAL] / [NORM] is done for radio station. 1 - 6 : Selects preset station. 9 "- - - -" appears on the display. 3 Press the number buttons to enter the frequency. 4 Press 4 / ¢...
... may be lost). ; Adjust [SETTINGS] mode settings While listening to the radio... 1 Press the volume knob to enter [FUNCTION] mode. 2 Turn the volume knob to select [SETTINGS], then press to enter. 3 Turn the volume knob to make a selection, then press to enter Direct Access Tuning mode. NO: Cancels (automatic memorizing is not activated). (Selectable only if [NORMAL] / [NORM] is done for radio station. 1 - 6 : Selects preset station. 9 "- - - -" appears on the display. 3 Press the number buttons to enter the frequency. 4 Press 4 / ¢...
Instruction Manuals
Page 10
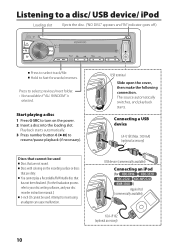
... switches, and playback starts. Playback starts automatically. 3 Press number button 6 ( ) to select previous/next folder. • Not available if "ALL RANDOM" is selected. Attempt to select track/file. Discs with coloring on the power. 2 Insert a disc into the loading slot. Listening to a disc/ USB device/ iPod Loading slot Ejects the disc. ("NO DISC" appears and "IN" indicator goes off.) Press to insert using an adapter can cause malfunction. Start playing a disc...
... switches, and playback starts. Playback starts automatically. 3 Press number button 6 ( ) to select previous/next folder. • Not available if "ALL RANDOM" is selected. Attempt to select track/file. Discs with coloring on the power. 2 Insert a disc into the loading slot. Listening to a disc/ USB device/ iPod Loading slot Ejects the disc. ("NO DISC" appears and "IN" indicator goes off.) Press to insert using an adapter can cause malfunction. Start playing a disc...
Instruction Manuals
Page 11
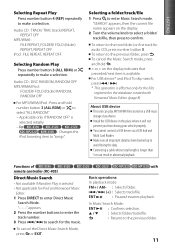
ENGLISH Selecting Repeat Play Press number button 4 (REP) repeatedly to make a selection. For USB device* and iPod: To skip search, press 4 / ¢. * This operation is effective only for iPod and Kenwood Music Editor. 1 Press DIRECT to enter Direct Music Search Mode. Connecting a cable whose total length is available. with Kenwood Music Editor. (page 8) About USB device This unit can result in the place where it will not prevent you from driving your vehicle properly. Applicable only...
ENGLISH Selecting Repeat Play Press number button 4 (REP) repeatedly to make a selection. For USB device* and iPod: To skip search, press 4 / ¢. * This operation is effective only for iPod and Kenwood Music Editor. 1 Press DIRECT to enter Direct Music Search Mode. Connecting a cable whose total length is available. with Kenwood Music Editor. (page 8) About USB device This unit can result in the place where it will not prevent you from driving your vehicle properly. Applicable only...
Instruction Manuals
Page 12
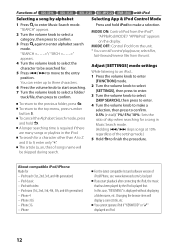
Functions of songs name will display a correct title, etc. To search for a character other than A to Z and 0 to the top menu, press number button 5. The article (a, an, the) of Selecting a song by the iPod is played first. MODE OFF: Control iPod from the unit. * You can enter up to three characters. 6 Press the volume knob to start playback after connecting the iPod, the music that has been...
Functions of songs name will display a correct title, etc. To search for a character other than A to Z and 0 to the top menu, press number button 5. The article (a, an, the) of Selecting a song by the iPod is played first. MODE OFF: Control iPod from the unit. * You can enter up to three characters. 6 Press the volume knob to start playback after connecting the iPod, the music that has been...
Instruction Manuals
Page 13
... install the most current version of the services may become unavailable. iPhone connected to this unit. For issues using the application, please contact Pandora® at www.pandora.com.) Internet connection by 3G, EDGE, or WiFi. To select thumbs down/up, press number button 1 ( - )/ 2 ( + ). To skip a song, press ¢. EXIT : Cancels Station Search mode. Accordingly, compatibility may be operated from your device. 2 Connect the device to the USB...
... install the most current version of the services may become unavailable. iPhone connected to this unit. For issues using the application, please contact Pandora® at www.pandora.com.) Internet connection by 3G, EDGE, or WiFi. To select thumbs down/up, press number button 1 ( - )/ 2 ( + ). To skip a song, press ¢. EXIT : Cancels Station Search mode. Accordingly, compatibility may be operated from your device. 2 Connect the device to the USB...
Instruction Manuals
Page 14
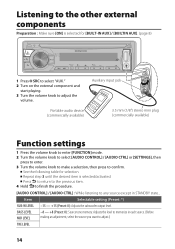
... any source except in STANDBY state... Repeat step 3 until the desired item is selected for selection. Portable audio device (commercially available) Auxiliary input jack 3.5 mm (1/8") stereo mini plug (commercially available) Function settings 1 Press the volume knob to enter [FUNCTION] mode. 2 Turn the volume knob to select [AUDIO CONTROL] / [AUDIO CTRL] or [SETTINGS], then press to enter. 3 Turn the volume knob to make a selection, then press to confirm. Item Selectable setting (Preset: *) SUB-W LEVEL -15 - +15 (Preset: 0): Adjusts the subwoofer output level. Listening...
... any source except in STANDBY state... Repeat step 3 until the desired item is selected for selection. Portable audio device (commercially available) Auxiliary input jack 3.5 mm (1/8") stereo mini plug (commercially available) Function settings 1 Press the volume knob to enter [FUNCTION] mode. 2 Turn the volume knob to select [AUDIO CONTROL] / [AUDIO CTRL] or [SETTINGS], then press to enter. 3 Turn the volume knob to make a selection, then press to confirm. Item Selectable setting (Preset: *) SUB-W LEVEL -15 - +15 (Preset: 0): Adjusts the subwoofer output level. Listening...
Instruction Manuals
Page 15
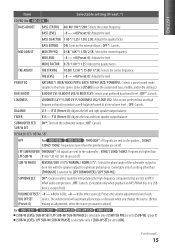
.... BASS EXTEND ON: Turns on the subwoofer output. ; FADER R15 - SUBWOOFER SET/ ON*: Turns on the extended bass. ; The volume level will automatically increase or decrease when you change the source. (Before (Preset: 0) making an adjustment, select the source you want to adjust.) For : [SUB-W LEVEL/ SUB-W SET/ LPF SUB-W/ SUB-W PHASE] is selectable only if [SWITCH PRE] is set to [ON]. MID LEVEL -8 - +8 (Preset: 0): Adjusts the level. PRESET EQ NATURAL*/ USER/ ROCK/ POPS/ EASY/ TOP40/ JAZZ/ POWERFUL: Selects a preset sound mode suitable to the music genre. (Selects [USER] to use...
.... BASS EXTEND ON: Turns on the subwoofer output. ; FADER R15 - SUBWOOFER SET/ ON*: Turns on the extended bass. ; The volume level will automatically increase or decrease when you change the source. (Before (Preset: 0) making an adjustment, select the source you want to adjust.) For : [SUB-W LEVEL/ SUB-W SET/ LPF SUB-W/ SUB-W PHASE] is selectable only if [SWITCH PRE] is set to [ON]. MID LEVEL -8 - +8 (Preset: 0): Adjusts the level. PRESET EQ NATURAL*/ USER/ ROCK/ POPS/ EASY/ TOP40/ JAZZ/ POWERFUL: Selects a preset sound mode suitable to the music genre. (Selects [USER] to use...
Instruction Manuals
Page 16
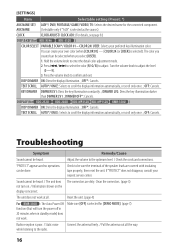
... color. Reset the unit. (page 4) For : The Auto Power Off function (that will turn on. / Information shown on the display is selected as the source.) CLOCK CLOCK ADJUST/ CLOCK ADJ: (For details, see page 8.) DISP & KEY (for [DEMO MODE]. (page 7) Radio reception is selected). COLOR 24/ USER: Selects your nearest service center. OFF: Cancels. TEXT SCROLL AUTO*/ ONCE: Selects to enter the detail color adjustment mode. 2. Adjust the volume to the optimum level. / Check the cords and connections. Clean the connectors. (page 3) not turn...
... color. Reset the unit. (page 4) For : The Auto Power Off function (that will turn on. / Information shown on the display is selected as the source.) CLOCK CLOCK ADJUST/ CLOCK ADJ: (For details, see page 8.) DISP & KEY (for [DEMO MODE]. (page 7) Radio reception is selected). COLOR 24/ USER: Selects your nearest service center. OFF: Cancels. TEXT SCROLL AUTO*/ ONCE: Selects to enter the detail color adjustment mode. 2. Adjust the volume to the optimum level. / Check the cords and connections. Clean the connectors. (page 3) not turn...
Instruction Manuals
Page 17
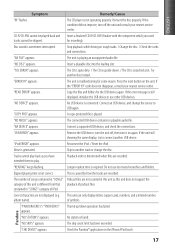
... been exceeded. "CHK DEVICE" appears. Press the reset button on rough roads. / Change the disc. / Check the cords and connections. If the error message is found. The connected USB device contains no playable audio file. If the unit still showing the same display, try to another track or change the source to play back as this unit does not support the category of this unit as you used tracks cannot be...
... been exceeded. "CHK DEVICE" appears. Press the reset button on rough roads. / Change the disc. / Check the cords and connections. If the error message is found. The connected USB device contains no playable audio file. If the unit still showing the same display, try to another track or change the source to play back as this unit does not support the category of this unit as you used tracks cannot be...
Instruction Manuals
Page 18
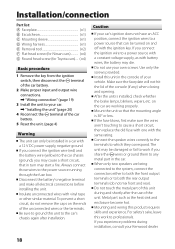
... turn may be damaged or fail to work to professionals. Do not use of the unit. on the ends of the unconnected wires or the terminals. Installation/connection Part list: A Faceplate 1) B Escutcheon 1) C Mounting sleeve 1) D Wiring harness 1) E Removal tool 2) F Flat head screw (for Nissan cars 4) G Round head screw (for Toyota cars).... (×4) Basic procedure 1 Remove the key from the ignition switch, then disconnect the · terminal of the car battery. 2 Make proper input and output wire connections. \ "Wiring connection...
... turn may be damaged or fail to work to professionals. Do not use of the unit. on the ends of the unconnected wires or the terminals. Installation/connection Part list: A Faceplate 1) B Escutcheon 1) C Mounting sleeve 1) D Wiring harness 1) E Removal tool 2) F Flat head screw (for Nissan cars 4) G Round head screw (for Toyota cars).... (×4) Basic procedure 1 Remove the key from the ignition switch, then disconnect the · terminal of the car battery. 2 Make proper input and output wire connections. \ "Wiring connection...
Instruction Manuals
Page 19
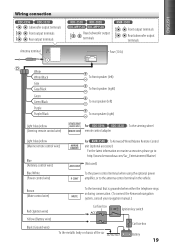
... the car Car fuse box Battery 19 ENGLISH FRONT REAR/SW REAR/SW SW FRONT REAR Wiring connection Subwoofer output terminals Front output terminals R L Rear output terminals Antenna terminal R L Rear/subwoofer output terminals R L Front output terminals Rear/subwoofer output terminals Fuse (10 A) White White/Black Gray Gray/Black Green Green/Black Purple Purple/Black To front speaker (left) To front speaker (right) To rear speaker (left) To rear speaker (right) Light blue/yellow (Steering remote control wire) STEERING WHEEL REMOTE INPUT For REMOTE CONT remote control adapter...
... the car Car fuse box Battery 19 ENGLISH FRONT REAR/SW REAR/SW SW FRONT REAR Wiring connection Subwoofer output terminals Front output terminals R L Rear output terminals Antenna terminal R L Rear/subwoofer output terminals R L Front output terminals Rear/subwoofer output terminals Fuse (10 A) White White/Black Gray Gray/Black Green Green/Black Purple Purple/Black To front speaker (left) To front speaker (right) To rear speaker (left) To rear speaker (right) Light blue/yellow (Steering remote control wire) STEERING WHEEL REMOTE INPUT For REMOTE CONT remote control adapter...
Instruction Manuals
Page 20
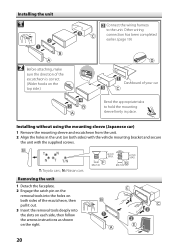
... unit with the supplied screws. Installing without using the mounting sleeve (Japanese car) 1 Remove the mounting sleeve and escutcheon from the unit. 2 Align the holes in place. N: Nissan cars Removing the unit 1 Detach the faceplate. 2 Engage the catch pin on the removal tools into the slots on each side, then follow the arrows instructions as shown on the right. 20 Installing the unit 1 Connect the wiring harness to hold the mounting...
... unit with the supplied screws. Installing without using the mounting sleeve (Japanese car) 1 Remove the mounting sleeve and escutcheon from the unit. 2 Align the holes in place. N: Nissan cars Removing the unit 1 Detach the faceplate. 2 Engage the catch pin on the removal tools into the slots on each side, then follow the arrows instructions as shown on the right. 20 Installing the unit 1 Connect the wiring harness to hold the mounting...
Instruction Manuals
Page 21
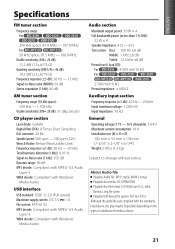
... distortion (1 kHz): 0.01 % Signal-to change without notice. Playable USB device file system: FAT16, FAT32 Although the audio files are complied with Windows Media Audio Audio section Maximum output power: 50 W × 4 Full bandwidth power (at less than 1 % THD): 22 W × 4 Speaker impedance: 4 Ω - 8 Ω Tone action: Bass: 100 Hz ±8 dB Middle: 1 kHz ±8 dB Treble: 12.5 kHz ±8 dB Preout...
... distortion (1 kHz): 0.01 % Signal-to change without notice. Playable USB device file system: FAT16, FAT32 Although the audio files are complied with Windows Media Audio Audio section Maximum output power: 50 W × 4 Full bandwidth power (at less than 1 % THD): 22 W × 4 Speaker impedance: 4 Ω - 8 Ω Tone action: Bass: 100 Hz ±8 dB Middle: 1 kHz ±8 dB Treble: 12.5 kHz ±8 dB Preout...
Instruction Manuals
Page 62
...: Reorient or relocate the receiving antenna. Increase the separation between the equipment and receiver. Apple is no guarantee that an electronic accessory has been designed to connect specifically to provide reasonable protection against harmful interference in a particular installation. and other countries. This equipment may cause harmful interference to operate this accessory with iPod or iPhone may cause harmful interference unless...
...: Reorient or relocate the receiving antenna. Increase the separation between the equipment and receiver. Apple is no guarantee that an electronic accessory has been designed to connect specifically to provide reasonable protection against harmful interference in a particular installation. and other countries. This equipment may cause harmful interference to operate this accessory with iPod or iPhone may cause harmful interference unless...


