Instruction Manuals
Page 2
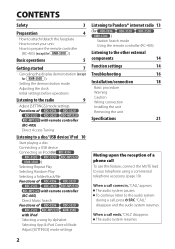
... telephone accessory. (page 19) When a call comes in, "CALL" appears. "CALL" disappear and the audio system resumes. CONTENTS Safety 3 Preparation 4 How to attach/detach the faceplate How to reset your unit How to prepare the remote controller (RC-405) (except for ) Basic operations 5 Getting started 7 Canceling the display demonstration (except for...
... telephone accessory. (page 19) When a call comes in, "CALL" appears. "CALL" disappear and the audio system resumes. CONTENTS Safety 3 Preparation 4 How to attach/detach the faceplate How to reset your unit How to prepare the remote controller (RC-405) (except for ) Basic operations 5 Getting started 7 Canceling the display demonstration (except for...
Instruction Manuals
Page 3
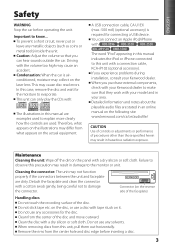
.... To prevent a short circuit, never put or leave any solvents. Detailed information and notes about the playable audio files are dirty. Detach the faceplate and clean the connector with . Do not use any accessories for the disc. Caution: Adjust the volume so that they work with a dry ...silicon or soft cloth. This may not function properly if the connectors between the unit and faceplate are stated in an online manual on the following site: www.kenwood.com/cs/ce/audiofile/ CAUTION Use of controls or adjustments or performance of procedures other than those specified ...
.... To prevent a short circuit, never put or leave any solvents. Detailed information and notes about the playable audio files are dirty. Detach the faceplate and clean the connector with . Do not use any accessories for the disc. Caution: Adjust the volume so that they work with a dry ...silicon or soft cloth. This may not function properly if the connectors between the unit and faceplate are stated in an online manual on the following site: www.kenwood.com/cs/ce/audiofile/ CAUTION Use of controls or adjustments or performance of procedures other than those specified ...
Instruction Manuals
Page 4
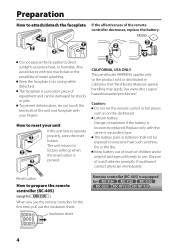
... controller (RC-405) (except for ) When you use . Lithium battery. The battery pack or batteries shall not be damaged by shocks or jolts. The faceplate is equipped for the first time, pull out the insulation sheet. If swallowed contact physician immediately. Also avoid places with the same or equivalent type.... Reset button How to reset your fingers. Preparation How to attach/detach the faceplate If the effectiveness of the remote controller decreases, replace the battery. 1 1 2 2 Do not expose the...
... controller (RC-405) (except for ) When you use . Lithium battery. The battery pack or batteries shall not be damaged by shocks or jolts. The faceplate is equipped for the first time, pull out the insulation sheet. If swallowed contact physician immediately. Also avoid places with the same or equivalent type.... Reset button How to reset your fingers. Preparation How to attach/detach the faceplate If the effectiveness of the remote controller decreases, replace the battery. 1 1 2 2 Do not expose the...

Instruction Manuals
Page 5
...], [B.BOOST LV2] or [B.BOOST LV3]. (page 15) : In Search Mode or when a Playlist is received (FM). Loading slot Ejects the disc Volume knob Detaches the faceplate USB terminal (Not used.) Auxiliary input jack The following indicator lights up when...
...], [B.BOOST LV2] or [B.BOOST LV3]. (page 15) : In Search Mode or when a Playlist is received (FM). Loading slot Ejects the disc Volume knob Detaches the faceplate USB terminal (Not used.) Auxiliary input jack The following indicator lights up when...
Instruction Manuals
Page 18
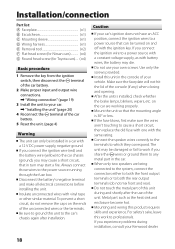
... connect those wires to which they correspond. Mounting and wiring this work if you experience problems during and shortly after installation. Installation/connection Part list: A Faceplate 1) B Escutcheon 1) C Mounting sleeve 1) D Wiring harness 1) E Removal tool 2) F Flat head screw (for Nissan cars 4) G Round head screw ...unit. (page 4) Warning The unit can be turned on the ends of your vehicle. Install this unit during installation, consult your Kenwood dealer. 18 After the unit is 30° or less. Insulate unconnected wires with a 12 V DC power supply, negative ...
... connect those wires to which they correspond. Mounting and wiring this work if you experience problems during and shortly after installation. Installation/connection Part list: A Faceplate 1) B Escutcheon 1) C Mounting sleeve 1) D Wiring harness 1) E Removal tool 2) F Flat head screw (for Nissan cars 4) G Round head screw ...unit. (page 4) Warning The unit can be turned on the ends of your vehicle. Install this unit during installation, consult your Kenwood dealer. 18 After the unit is 30° or less. Insulate unconnected wires with a 12 V DC power supply, negative ...
Instruction Manuals
Page 20
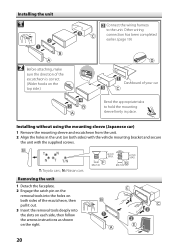
... escutcheon is correct. (Wider hooks on both sides of your car Bend the appropriate tabs to the unit. N: Nissan cars Removing the unit 1 Detach the faceplate. 2 Engage the catch pin on the removal tools into the slots on each side, then follow the arrows instructions as shown on the right. 20...
... escutcheon is correct. (Wider hooks on both sides of your car Bend the appropriate tabs to the unit. N: Nissan cars Removing the unit 1 Detach the faceplate. 2 Engage the catch pin on the removal tools into the slots on each side, then follow the arrows instructions as shown on the right. 20...

