
Instruction Manual
Page 2
CONTENTS Safety 3 Maintenance Preparation 4 How to attach/detach the faceplate How to reset your unit How to prepare the remote controller (RC-405) Getting Started 5 Canceling the display demonstration Setting the demonstration mode Adjusting the clock Initial settings ...
CONTENTS Safety 3 Maintenance Preparation 4 How to attach/detach the faceplate How to reset your unit How to prepare the remote controller (RC-405) Getting Started 5 Canceling the display demonstration Setting the demonstration mode Adjusting the clock Initial settings ...
Instruction Manual
Page 4
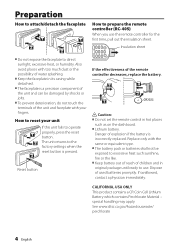
... use the remote controller for the first time, pull out the insulation sheet. Dispose of explosion if the battery is pressed. 3 Reset button If the effectiveness of children and in hot places such as on the dashboard. ■■Lithium battery. How to...product contains a CR Coin Cell Lithium Battery which contains Perchlorate Material - Replace only with your unit If this unit fails to operate properly, press the reset 1 button. 2 The unit returns to direct sunlight, excessive heat, or humidity. Danger of used batteries promptly. See www.dtsc.ca.gov/hazardouswaste/ ...
... use the remote controller for the first time, pull out the insulation sheet. Dispose of explosion if the battery is pressed. 3 Reset button If the effectiveness of children and in hot places such as on the dashboard. ■■Lithium battery. How to...product contains a CR Coin Cell Lithium Battery which contains Perchlorate Material - Replace only with your unit If this unit fails to operate properly, press the reset 1 button. 2 The unit returns to direct sunlight, excessive heat, or humidity. Danger of used batteries promptly. See www.dtsc.ca.gov/hazardouswaste/ ...
Instruction Manual
Page 5
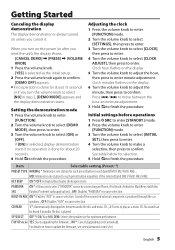
... application). ; For details on the display. 5 Turn the volume knob to adjust the hour, then press to update the firmware, see: www.kenwood.com/cs/ce/ English 5 Clock hour flashes on how to enter minute adjustment. KEY BEEP ON */ OFF: Activates/deactivates the keypress tone. ...F/W UP xx.xx YES: Starts upgrading the firmware. ; When you reset the unit), the display shows: [CANCEL DEMO] \ [PRESS] \ [VOLUME KNOB] 1 Press the volume knob. [YES] is selected as a music CD. Press...
... application). ; For details on the display. 5 Turn the volume knob to adjust the hour, then press to update the firmware, see: www.kenwood.com/cs/ce/ English 5 Clock hour flashes on how to enter minute adjustment. KEY BEEP ON */ OFF: Activates/deactivates the keypress tone. ...F/W UP xx.xx YES: Starts upgrading the firmware. ; When you reset the unit), the display shows: [CANCEL DEMO] \ [PRESS] \ [VOLUME KNOB] 1 Press the volume knob. [YES] is selected as a music CD. Press...
Instruction Manual
Page 28
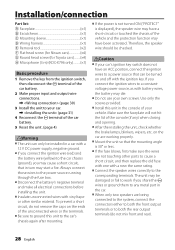
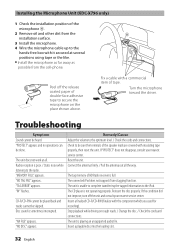
... 1) C Mounting sleeve 1) D Wiring harness 1) E Removal tool 2) F Flat head screw (for Nissan cars 4) G Round head screw (for Toyota cars 4) H Microphone (3 m) (KDC-X796 only)B 1) Basic procedure 1 Remove the key from the ignition switch, then disconnect the · terminal of the car battery. 2 Make proper input and output.... \ (page 30) 3 Install the unit to your car. \ (page 31) 4 Reconnect the · terminal of the car battery. 5 Reset the unit. (page 4) ¤Warning ■■The unit can be turned on the ends of the unconnected wires or the terminals. ■■...
... 1) C Mounting sleeve 1) D Wiring harness 1) E Removal tool 2) F Flat head screw (for Nissan cars 4) G Round head screw (for Toyota cars 4) H Microphone (3 m) (KDC-X796 only)B 1) Basic procedure 1 Remove the key from the ignition switch, then disconnect the · terminal of the car battery. 2 Make proper input and output.... \ (page 30) 3 Install the unit to your car. \ (page 31) 4 Reconnect the · terminal of the car battery. 5 Reset the unit. (page 4) ¤Warning ■■The unit can be turned on the ends of the unconnected wires or the terminals. ■■...
Instruction Manual
Page 32
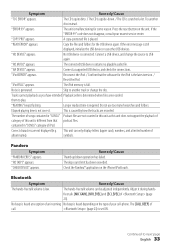
... off the unit and consult your nearest service center. Troubleshooting Symptom Sound cannot be skipped. "NA FILE" appears. Installing the Microphone Unit (KDC-X796 only) 1 Check the installation position of the microphone H. 2 Remove oil and other dirt from the cell-phone. "IN" flashes..... Check to secure the microphone on rough roads. / Change the disc. / Check the cords and connections. Disc sound is full. Reset the unit. The connected iPod does not support iTunes tagging function. Stop playback while driving on the place shown above. Remedy/Cause Adjust ...
... off the unit and consult your nearest service center. Troubleshooting Symptom Sound cannot be skipped. "NA FILE" appears. Installing the Microphone Unit (KDC-X796 only) 1 Check the installation position of the microphone H. 2 Remove oil and other dirt from the cell-phone. "IN" flashes..... Check to secure the microphone on rough roads. / Change the disc. / Check the cords and connections. Disc sound is full. Reset the unit. The connected iPod does not support iTunes tagging function. Stop playback while driving on the place shown above. Remedy/Cause Adjust ...
Instruction Manual
Page 33
... this unit is not correct. Try another track or change the source to next page English 33 Press the reset button on the iPhone/iPod touch. A copy-protected file is the latest version. / Reset the iPod. Noise is set ON. The [CALL BEEP] of this unit as you have intended Playback order...
... this unit is not correct. Try another track or change the source to next page English 33 Press the reset button on the iPhone/iPod touch. A copy-protected file is the latest version. / Reset the iPod. Noise is set ON. The [CALL BEEP] of this unit as you have intended Playback order...

Instruction Manual
Page 34
...into the microphone a little more Bluetooth device cannot be recognized properly. "HF ERROR 68" appears. If this message still appears, press the reset button on the control unit. "DEVICE FULL" appears. 5 Bluetooth device have already been registered. The PIN code is open. Turn off ...discontinuous. "NO NUMBER" appears. The unit cannot communicate with the cell-phone. If this message still appears, press the reset button on the control unit. "HF DISCONCT" appears. Retry it . "PAIRING NG" appears. There is no outgoing call list. / ...
...into the microphone a little more Bluetooth device cannot be recognized properly. "HF ERROR 68" appears. If this message still appears, press the reset button on the control unit. "DEVICE FULL" appears. 5 Bluetooth device have already been registered. The PIN code is open. Turn off ...discontinuous. "NO NUMBER" appears. The unit cannot communicate with the cell-phone. If this message still appears, press the reset button on the control unit. "HF DISCONCT" appears. Retry it . "PAIRING NG" appears. There is no outgoing call list. / ...


