Instruction Manual
Page 28
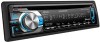
...Installation/connection Part list: A Faceplate 1) B Escutcheon 1) C Mounting sleeve 1) D Wiring harness 1) E Removal tool 2) F Flat head screw (for Nissan cars 4) G Round head screw (for Toyota cars 4) H Microphone (3 m) (KDC-X796 only)B 1) Basic procedure 1 Remove the key from the ignition switch, then ...disconnect the · terminal of the car battery. 2 Make proper input and output wire connections. \ (page 30) 3 Install the unit to your car...
...Installation/connection Part list: A Faceplate 1) B Escutcheon 1) C Mounting sleeve 1) D Wiring harness 1) E Removal tool 2) F Flat head screw (for Nissan cars 4) G Round head screw (for Toyota cars 4) H Microphone (3 m) (KDC-X796 only)B 1) Basic procedure 1 Remove the key from the ignition switch, then ...disconnect the · terminal of the car battery. 2 Make proper input and output wire connections. \ (page 30) 3 Install the unit to your car...
Instruction Manual
Page 29
If you experience problems during and shortly after the use of 10 m (30 ft). ■■Mounting and wiring this unit and the cell-phone. The above maximum communication range (10 m) is an obstacle between this product requires skills and experience. iPod Bluetooth antenna ... near the Bluetooth antenna. English 29 For safety's sake, leave this unit during installation, consult your vehicle. Do not touch the metal part of your Kenwood dealer. ■■Reception may become hot.
If you experience problems during and shortly after the use of 10 m (30 ft). ■■Mounting and wiring this unit and the cell-phone. The above maximum communication range (10 m) is an obstacle between this product requires skills and experience. iPod Bluetooth antenna ... near the Bluetooth antenna. English 29 For safety's sake, leave this unit during installation, consult your vehicle. Do not touch the metal part of your Kenwood dealer. ■■Reception may become hot.
Instruction Manual
Page 30
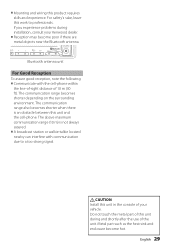
FM/AM antenna input (JASO) Antenna Cord Fuse (10A) Wiring harness D Rear output R L Front output Sub Woofer output Microphone H (KDC-X796 only) White White/Black Gray Gray/Black Green Green/Black Purple Purple/Black To front left speaker To front right speaker To rear left .... CONT To use the steering wheel remote control feature, you need to the antenna control terminal in the vehicle. (Max. 300mA, 12V) To connect the Kenwood navigation system, consult your car is stereo type and does not have any resistance. Battery + 30 English
FM/AM antenna input (JASO) Antenna Cord Fuse (10A) Wiring harness D Rear output R L Front output Sub Woofer output Microphone H (KDC-X796 only) White White/Black Gray Gray/Black Green Green/Black Purple Purple/Black To front left speaker To front right speaker To rear left .... CONT To use the steering wheel remote control feature, you need to the antenna control terminal in the vehicle. (Max. 300mA, 12V) To connect the Kenwood navigation system, consult your car is stereo type and does not have any resistance. Battery + 30 English
Instruction Manual
Page 31
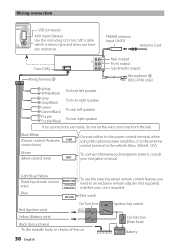
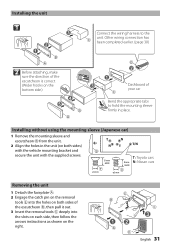
... to hold the mounting sleeve firmly in the unit (on both sides of the escutcheon is correct. (Wider hooks on the bottom side.) Connect the wiring harness to the C unit. F ø5mm 8mm MAX. T N NT T/N B 8 mm MAX. E B 12 A E C 3 English 31 A Installing without using the mounting sleeve (Japanese car) 1 Remove the mounting...
... to hold the mounting sleeve firmly in the unit (on both sides of the escutcheon is correct. (Wider hooks on the bottom side.) Connect the wiring harness to the C unit. F ø5mm 8mm MAX. T N NT T/N B 8 mm MAX. E B 12 A E C 3 English 31 A Installing without using the mounting sleeve (Japanese car) 1 Remove the mounting...
Instruction Manual
Page 32
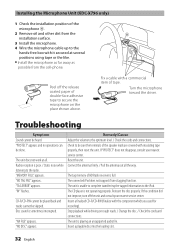
... tape or the like. ■■Install the microphone as far away as possible from the H installation surface. 3 Install the microphone. 4 Wire the microphone cable up to the hands-free box with the component which you used for recording). "NA FILE" appears. "NO TAG FNC" appears.... If "PROTECT" does not disappear, consult your nearest service center. Installing the Microphone Unit (KDC-X796 only) 1 Check the installation position of the microphone H. 2 Remove oil and other dirt from the cell-phone. Stop playback while driving on ...
... tape or the like. ■■Install the microphone as far away as possible from the H installation surface. 3 Install the microphone. 4 Wire the microphone cable up to the hands-free box with the component which you used for recording). "NA FILE" appears. "NO TAG FNC" appears.... If "PROTECT" does not disappear, consult your nearest service center. Installing the Microphone Unit (KDC-X796 only) 1 Check the installation position of the microphone H. 2 Remove oil and other dirt from the cell-phone. Stop playback while driving on ...


