Instruction Manual
Page 1
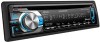
Familiarity with installation and operation procedures will help you call upon your new CD-receiver. Refer to read through this instruction manual. For your Kenwood product at www.Kenwoodusa.com © 2011 JVC KENWOOD Corporation B64-4935-00/01 (KW) KDC-BT752HD KDC-X796 CD-RECEIVER INSTRUCTION MANUAL... model and serial numbers whenever you obtain the best performance from your Kenwood dealer for information or service on the warranty card, and in the space provided below. Model KDC-BT752HD/ KDC-X796 Serial number US Residents Only Register Online Register your records Record ...
Familiarity with installation and operation procedures will help you call upon your new CD-receiver. Refer to read through this instruction manual. For your Kenwood product at www.Kenwoodusa.com © 2011 JVC KENWOOD Corporation B64-4935-00/01 (KW) KDC-BT752HD KDC-X796 CD-RECEIVER INSTRUCTION MANUAL... model and serial numbers whenever you obtain the best performance from your Kenwood dealer for information or service on the warranty card, and in the space provided below. Model KDC-BT752HD/ KDC-X796 Serial number US Residents Only Register Online Register your records Record ...

Instruction Manual
Page 2
... Bluetooth Setup SMS (Short Message Service) 24 Downloading the SMS Display the SMS Return message setting Creating an original message SMS Setup Function settings 26 Installation/connection 28 Troubleshooting 32 Specifications 35 2 English
... Bluetooth Setup SMS (Short Message Service) 24 Downloading the SMS Display the SMS Return message setting Creating an original message SMS Setup Function settings 26 Installation/connection 28 Troubleshooting 32 Specifications 35 2 English

Instruction Manual
Page 3
...the connector between the unit and faceplate are dirty. Therefore, what appears on the actual equipment. ■■If you experience problems during installation, consult your area. and Foreign Patents. Used under license from iBiquity Digital Corporation. HD Radio™ and the HD, HD Radio, and...connector. Failure to observe this case, remove the disc and wait for the moisture to evaporate. ■■The illustrations in your Kenwood dealer. ■■When you can hear the sound outside the car. and countries around the world. In this precaution may ...
...the connector between the unit and faceplate are dirty. Therefore, what appears on the actual equipment. ■■If you experience problems during installation, consult your area. and Foreign Patents. Used under license from iBiquity Digital Corporation. HD Radio™ and the HD, HD Radio, and...connector. Failure to observe this case, remove the disc and wait for the moisture to evaporate. ■■The illustrations in your Kenwood dealer. ■■When you can hear the sound outside the car. and countries around the world. In this precaution may ...
Instruction Manual
Page 13
... list of the CA-U1EX is displayed without displaying a folder name, etc. that contains audio files with database information added with KENWOOD Music Editor. ■■"KENWOOD Music Editor Light ver1.1" is available from driving your vehicle properly. ■■You cannot connect a USB device via a USB...can play audio files stored on a USB mass storage class device. ■■Install the USB device in the place where it will display a correct title, etc. ■■You cannot operate the iPod if "KENWOOD" or "✓" displayed on the type of the CA-U1EX (option) is ...
... list of the CA-U1EX is displayed without displaying a folder name, etc. that contains audio files with database information added with KENWOOD Music Editor. ■■"KENWOOD Music Editor Light ver1.1" is available from driving your vehicle properly. ■■You cannot connect a USB device via a USB...can play audio files stored on a USB mass storage class device. ■■Install the USB device in the place where it will display a correct title, etc. ■■You cannot operate the iPod if "KENWOOD" or "✓" displayed on the type of the CA-U1EX (option) is ...

Instruction Manual
Page 15
..., press number button 6 (38). Station Search mode While listening to "PANDORA" source... 1 Press to enter Station Search mode. 2 Turn the volume knob to find and install the most current version of Pandora® cannot be supported. SPP (Serial Port Profile) A2DP (Advanced Audio Distribution Profile) ■■In the application on...
..., press number button 6 (38). Station Search mode While listening to "PANDORA" source... 1 Press to enter Station Search mode. 2 Turn the volume knob to find and install the most current version of Pandora® cannot be supported. SPP (Serial Port Profile) A2DP (Advanced Audio Distribution Profile) ■■In the application on...
Instruction Manual
Page 28
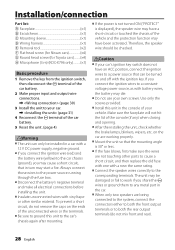
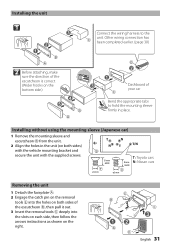
... C Mounting sleeve 1) D Wiring harness 1) E Removal tool 2) F Flat head screw (for Nissan cars 4) G Round head screw (for Toyota cars 4) H Microphone (3 m) (KDC-X796 only)B 1) Basic procedure 1 Remove the key from the ignition switch, then disconnect the · terminal of the car battery. 2 Make proper input and output ...wire connections. \ (page 30) 3 Install the unit to your car's ignition key switch does not have an ACC position, connect the ignition wires to a power source that can only...
... C Mounting sleeve 1) D Wiring harness 1) E Removal tool 2) F Flat head screw (for Nissan cars 4) G Round head screw (for Toyota cars 4) H Microphone (3 m) (KDC-X796 only)B 1) Basic procedure 1 Remove the key from the ignition switch, then disconnect the · terminal of the car battery. 2 Make proper input and output ...wire connections. \ (page 30) 3 Install the unit to your car's ignition key switch does not have an ACC position, connect the ignition wires to a power source that can only...
Instruction Manual
Page 29
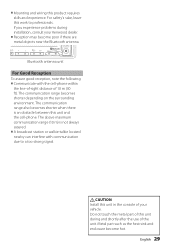
...Good Reception To assure good reception, note the following: ■■Communicate with communication due to a too strong signal. ¤ CAUTION Install this work to professionals. If you experience problems during and shortly after the use of the unit. The above maximum communication range (10 m) ...9632;■A broadcast station or walkie-talkie located nearby can interfere with the cell-phone within the line-of-sight distance of your Kenwood dealer. ■■Reception may become hot. Do not touch the metal part of this product requires skills and experience. English 29...
...Good Reception To assure good reception, note the following: ■■Communicate with communication due to a too strong signal. ¤ CAUTION Install this work to professionals. If you experience problems during and shortly after the use of the unit. The above maximum communication range (10 m) ...9632;■A broadcast station or walkie-talkie located nearby can interfere with the cell-phone within the line-of-sight distance of your Kenwood dealer. ■■Reception may become hot. Do not touch the metal part of this product requires skills and experience. English 29...
Instruction Manual
Page 31
...page 30) D 2 1 3 Dashboard of the escutcheon B, then pull it out. 3 Insert the removal tools E deeply into the holes on the right. A Installing without using the mounting sleeve (Japanese car) 1 Remove the mounting sleeve and escutcheon B from the unit. 2 Align the holes in place. G ø5mm T:...each side, then follow the arrows instructions as shown on both sides) with the vehicle mounting bracket and secure the unit with the supplied screws. Installing the unit 1 3 2 1 B A 2 Before attaching, make sure the direction of the escutcheon is correct. (Wider hooks on the bottom...
...page 30) D 2 1 3 Dashboard of the escutcheon B, then pull it out. 3 Insert the removal tools E deeply into the holes on the right. A Installing without using the mounting sleeve (Japanese car) 1 Remove the mounting sleeve and escutcheon B from the unit. 2 Align the holes in place. G ø5mm T:...each side, then follow the arrows instructions as shown on both sides) with the vehicle mounting bracket and secure the unit with the supplied screws. Installing the unit 1 3 2 1 B A 2 Before attaching, make sure the direction of the escutcheon is correct. (Wider hooks on the bottom...
Instruction Manual
Page 32
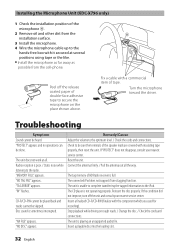
...playable disc into the loading slot. 32 English The unit does not work at several positions using tape or the like. ■■Install the microphone as far away as possible from the cell-phone. "TAG ERROR" appears. If "PROTECT" does not disappear, consult ... the disc. / Check the cords and connections. Check to be heard. Installing the Microphone Unit (KDC-X796 only) 1 Check the installation position of the microphone H. 2 Remove oil and other dirt from the H installation surface. 3 Install the microphone. 4 Wire the microphone cable up to the hands-free box with...
...playable disc into the loading slot. 32 English The unit does not work at several positions using tape or the like. ■■Install the microphone as far away as possible from the cell-phone. "TAG ERROR" appears. If "PROTECT" does not disappear, consult ... the disc. / Check the cords and connections. Check to be heard. Installing the Microphone Unit (KDC-X796 only) 1 Check the installation position of the microphone H. 2 Remove oil and other dirt from the H installation surface. 3 Install the microphone. 4 Wire the microphone cable up to the hands-free box with...

Instruction Manual
Page 35
...Limit Frequency response (±1 dB): 10 Hz - 20 kHz Total harmonic distortion (1 kHz): KDC-X796: 0.008 % KDC-BT752HD: 0.01 % Signal-to-Noise ratio (1 kHz): KDC-X796: 110 dB KDC-BT752HD: 105 dB Dynamic range: 93 dB AAC decode: AAC-LC ".m4a" files MP3 decode: ...KDC-X796: 4,000 mV/ 10 kΩ KDC-BT752HD: 2,500 mV/ 10 kΩ Preout impedance: ≤ 600 Ω Auxiliary input section Frequency response (±3 dB): 20 Hz - 20 kHz Input maximum voltage: 1,200 mV Input impedance: 10 kΩ General Operating voltage: 14.4 V (10.5 V - 16 V allowable) Maximum current consumption: 10 A Installation...
...Limit Frequency response (±1 dB): 10 Hz - 20 kHz Total harmonic distortion (1 kHz): KDC-X796: 0.008 % KDC-BT752HD: 0.01 % Signal-to-Noise ratio (1 kHz): KDC-X796: 110 dB KDC-BT752HD: 105 dB Dynamic range: 93 dB AAC decode: AAC-LC ".m4a" files MP3 decode: ...KDC-X796: 4,000 mV/ 10 kΩ KDC-BT752HD: 2,500 mV/ 10 kΩ Preout impedance: ≤ 600 Ω Auxiliary input section Frequency response (±3 dB): 20 Hz - 20 kHz Input maximum voltage: 1,200 mV Input impedance: 10 kΩ General Operating voltage: 14.4 V (10.5 V - 16 V allowable) Maximum current consumption: 10 A Installation...

Instruction Manual
Page 104
...instructions. If this equipment if an unauthorized change or modification is desirable that interference will not occur in a particular installation. This equipment has very low levels of RF energy that the Industry Canada technical specification were met. ¤CAUTION... wrists, feet and ankles). The user could lose the authority to provide reasonable protection against harmful interference in a residential installation. FCC WARNING This equipment may cause harmful interference unless the modifications are designed to operate this equipment does cause harmful interference...
...instructions. If this equipment if an unauthorized change or modification is desirable that interference will not occur in a particular installation. This equipment has very low levels of RF energy that the Industry Canada technical specification were met. ¤CAUTION... wrists, feet and ankles). The user could lose the authority to provide reasonable protection against harmful interference in a residential installation. FCC WARNING This equipment may cause harmful interference unless the modifications are designed to operate this equipment does cause harmful interference...


