Instruction Manual
Page 28
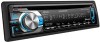
... one with a new the same rating. ■■Connect the speaker wires correctly to the corresponding terminals. Installation/connection Part list: A Faceplate 1) B Escutcheon 1) C Mounting sleeve 1) D Wiring harness 1) E Removal tool 2) F Flat head screw (for Nissan cars 4) G Round head screw (for Toyota cars 4) H Microphone (3 m) (KDC-X796 only)B 1) Basic procedure 1 Remove the key from the ignition switch...
... one with a new the same rating. ■■Connect the speaker wires correctly to the corresponding terminals. Installation/connection Part list: A Faceplate 1) B Escutcheon 1) C Mounting sleeve 1) D Wiring harness 1) E Removal tool 2) F Flat head screw (for Nissan cars 4) G Round head screw (for Toyota cars 4) H Microphone (3 m) (KDC-X796 only)B 1) Basic procedure 1 Remove the key from the ignition switch...
Instruction Manual
Page 30
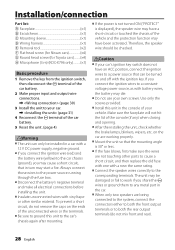
... in the vehicle. (Max. 300mA, 12V) To connect the Kenwood navigation system, consult your car is stereo type and does not have any resistance. FM/AM antenna input (JASO) Antenna Cord Fuse (10A) Wiring harness D Rear output R L Front output Sub Woofer output Microphone H (KDC-X796 only) White White/Black Gray Gray/Black Green Green...
... in the vehicle. (Max. 300mA, 12V) To connect the Kenwood navigation system, consult your car is stereo type and does not have any resistance. FM/AM antenna input (JASO) Antenna Cord Fuse (10A) Wiring harness D Rear output R L Front output Sub Woofer output Microphone H (KDC-X796 only) White White/Black Gray Gray/Black Green Green...
Instruction Manual
Page 31
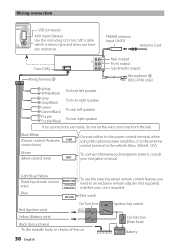
... sides of C your car 4 5 B Bend the appropriate tabs to hold the mounting sleeve firmly in the unit (on the bottom side.) Connect the wiring harness to the C unit. Other wiring connection has been completed earlier. (page 30) D 2 1 3 Dashboard of the escutcheon B, then pull it out. 3 Insert the removal tools E deeply into the slots...
... sides of C your car 4 5 B Bend the appropriate tabs to hold the mounting sleeve firmly in the unit (on the bottom side.) Connect the wiring harness to the C unit. Other wiring connection has been completed earlier. (page 30) D 2 1 3 Dashboard of the escutcheon B, then pull it out. 3 Insert the removal tools E deeply into the slots...


