Instruction Manual
Page 1
... to read through this instruction manual. Familiarity with installation and operation procedures will help you call upon your Kenwood product at www.kenwoodusa.com © B64-3394-00/00 (KV) KAC-X522 STEREO/BRIDGEABLE POWER AMPLIFIER 7 page 2-9 INSTRUCTION MANUAL AMPLIFICATEUR DE PUISSANCE STEREO/COMPATIBLE 7 page 10-17 MODE D'EMPLOI ESTÉRO/AMPLIFICADOR DE...
... to read through this instruction manual. Familiarity with installation and operation procedures will help you call upon your Kenwood product at www.kenwoodusa.com © B64-3394-00/00 (KV) KAC-X522 STEREO/BRIDGEABLE POWER AMPLIFIER 7 page 2-9 INSTRUCTION MANUAL AMPLIFICATEUR DE PUISSANCE STEREO/COMPATIBLE 7 page 10-17 MODE D'EMPLOI ESTÉRO/AMPLIFICADOR DE...
Instruction Manual
Page 2
...water splashing. • When replacing a fuse, only use a new one power amplifier are going to be connected should be the same capacity as paint thinner and alcohol. Available Control Units: A Kenwood's LX-Bus supporting Center Unit released in contact with the vehicle ground. NOTE This.... If the "E-02" code does not disappear, contact your Kenwood dealer. When the speaker cord is blinked. The protective fuse should be connected simultaneously. terminal. NOTE • If you of the amplifier. The operations of the speakers and then connect suitable speakers to...
...water splashing. • When replacing a fuse, only use a new one power amplifier are going to be connected should be the same capacity as paint thinner and alcohol. Available Control Units: A Kenwood's LX-Bus supporting Center Unit released in contact with the vehicle ground. NOTE This.... If the "E-02" code does not disappear, contact your Kenwood dealer. When the speaker cord is blinked. The protective fuse should be connected simultaneously. terminal. NOTE • If you of the amplifier. The operations of the speakers and then connect suitable speakers to...
Instruction Manual
Page 3
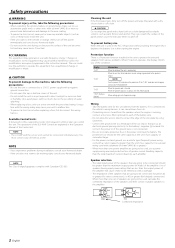
Connect the speaker wires. 5. Install the amplifier in the vehicle, check that there is nothing hazardous on top of the unit. • The surface temperature of the units. 4. Install the terminal cover. 9. .... • The installation to the vehicle should securely fasten the unit to decrease the internal temperature. English 3 Connect the input and output wires of the amplifier will not obstruct driving. Connect the negative - terminal of the battery. 2 CAUTION • Do not install in the below locations; (Unstable location, In a location that...
Connect the speaker wires. 5. Install the amplifier in the vehicle, check that there is nothing hazardous on top of the unit. • The surface temperature of the units. 4. Install the terminal cover. 9. .... • The installation to the vehicle should securely fasten the unit to decrease the internal temperature. English 3 Connect the input and output wires of the amplifier will not obstruct driving. Connect the negative - terminal of the battery. 2 CAUTION • Do not install in the below locations; (Unstable location, In a location that...
Instruction Manual
Page 4
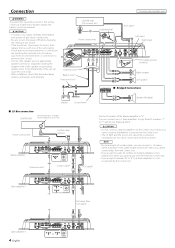
...; Connect the speaker wires to the Center Unit. You must connect any of them . 2 CAUTION • Do not connect 2 Master amplifiers to appropriate speaker connectors separately. 90 1 901 901 901 90 1 901 901 Connection * Commercially available parts 2 WARNING To prevent fire caused...Bridged Connections Battery Ground wire* Speaker (Bridged) ■ LX-Bus connection CENTER UNIT To Kenwood disc changer/ External optional accessory Power control wire Control cable (option) 30 30 Master amplifier Extension wire* 456 23 23 78 "0" 456 ID NUMBER 78 S-video cable* RCA cable*...
...; Connect the speaker wires to the Center Unit. You must connect any of them . 2 CAUTION • Do not connect 2 Master amplifiers to appropriate speaker connectors separately. 90 1 901 901 901 90 1 901 901 Connection * Commercially available parts 2 WARNING To prevent fire caused...Bridged Connections Battery Ground wire* Speaker (Bridged) ■ LX-Bus connection CENTER UNIT To Kenwood disc changer/ External optional accessory Power control wire Control cable (option) 30 30 Master amplifier Extension wire* 456 23 23 78 "0" 456 ID NUMBER 78 S-video cable* RCA cable*...
Instruction Manual
Page 5
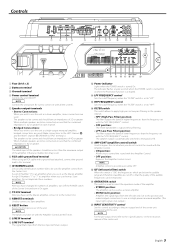
... that the combined impedance is turned On. Set to this position and make bridged connections to use the unit as a high-power monaural amplifier. (The input right signal is not output.) ) INPUT SENSITIVITY control Set this unit. The indicator flashes several seconds when the POWER switch... unit power. Do not duplicate these numbers. Assign ID Number "0" to the in the instruction manual of the Center Unit and turn it as Slave amplifiers. Controls 78 30 30 1 2 34 456 23 901 5 67 89 0 !@ # 1 Fuse (30 A × 2) 2 Battery terminal 3 Ground terminal 4 Power control ...
... that the combined impedance is turned On. Set to this position and make bridged connections to use the unit as a high-power monaural amplifier. (The input right signal is not output.) ) INPUT SENSITIVITY control Set this unit. The indicator flashes several seconds when the POWER switch... unit power. Do not duplicate these numbers. Assign ID Number "0" to the in the instruction manual of the Center Unit and turn it as Slave amplifiers. Controls 78 30 30 1 2 34 456 23 901 5 67 89 0 !@ # 1 Fuse (30 A × 2) 2 Battery terminal 3 Ground terminal 4 Power control ...
Instruction Manual
Page 6
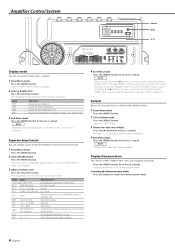
...is displayed. NOTE Volume offset value can not be selected for at least 2 seconds. Separate Amp Control You can control sounds using the Amplifier Control function of the cooling fan in the Demonstration mode. Then, you hold down the [3] button 3 or more seconds during ID ... -22°F/-30°C or less, "-22F"/"-30C" is displayed. 2 Select a display item Press the [2] or [3] button. To call the Amplifier Control's values, hold down the [2] button 3 or more seconds during ID number display ("AMP"). Indicates the internal temperature (°F/°C). For the operation...
...is displayed. NOTE Volume offset value can not be selected for at least 2 seconds. Separate Amp Control You can control sounds using the Amplifier Control function of the cooling fan in the Demonstration mode. Then, you hold down the [3] button 3 or more seconds during ID ... -22°F/-30°C or less, "-22F"/"-30C" is displayed. 2 Select a display item Press the [2] or [3] button. To call the Amplifier Control's values, hold down the [2] button 3 or more seconds during ID number display ("AMP"). Indicates the internal temperature (°F/°C). For the operation...
Instruction Manual
Page 7
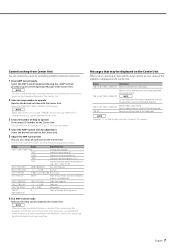
...the Center Unit When you use . 6 Exit AMP Control mode Releases the Amp Control mode by the Amplifier Control, the sound may be distorted due to operate Operate the desired set to the Kenwood's dealership. You can select an ID number of "0" to "7" of connected amps. 4 Select the AMP...on the Operation Manual of the unit is displayed on the Center Unit. "TEMP" Indicates the internal temperature (°F/°C). NOTE When you amplify the same frequency as follows. When the speaker output is displayed and you cannot operate the set a value of the Center Unit, and when...
...the Center Unit When you use . 6 Exit AMP Control mode Releases the Amp Control mode by the Amplifier Control, the sound may be distorted due to operate Operate the desired set to the Kenwood's dealership. You can select an ID number of "0" to "7" of connected amps. 4 Select the AMP...on the Operation Manual of the unit is displayed on the Center Unit. "TEMP" Indicates the internal temperature (°F/°C). NOTE When you amplify the same frequency as follows. When the speaker output is displayed and you cannot operate the set a value of the Center Unit, and when...
Instruction Manual
Page 9
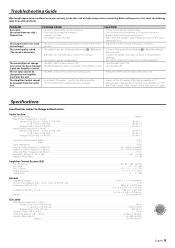
... Noise Ratio (Bypass)...82 dBA (W/4 Ω) English 9 The sound quality is bad. (The sound is not pinched by anything. • Set switches properly by the Amplifier Control of the unit. Audio Section Max Power Output...1000 W Rated Power Output (+B = 12.0 V) Normal (4 Ω) (20 Hz - 20 kHz, 0.05 %.... • The input sensitivity adjusting control is not set to the correct position. • The speakers wire are connected with the Amplifier Control. Troubleshooting Guide What might appear to be a malfunction in the car body. • The switches may just be the result ...
... Noise Ratio (Bypass)...82 dBA (W/4 Ω) English 9 The sound quality is bad. (The sound is not pinched by anything. • Set switches properly by the Amplifier Control of the unit. Audio Section Max Power Output...1000 W Rated Power Output (+B = 12.0 V) Normal (4 Ω) (20 Hz - 20 kHz, 0.05 %.... • The input sensitivity adjusting control is not set to the correct position. • The speakers wire are connected with the Amplifier Control. Troubleshooting Guide What might appear to be a malfunction in the car body. • The switches may just be the result ...


