Instruction Manual
Page 1
...) KAC-X522 STEREO/BRIDGEABLE POWER AMPLIFIER 7 page 2-9 INSTRUCTION MANUAL AMPLIFICATEUR DE PUISSANCE STEREO/COMPATIBLE 7 page 10-17 MODE D'EMPLOI ESTÉRO/AMPLIFICADOR DE POTENCIA CONECTABLE 7 página 18-25 MANUAL DE INSTRUCCIONES Take the time to the model and serial numbers whenever you obtain the best performance from your Kenwood dealer for information or service on the warranty card, and in the space provided below. Model KAC-X522 Serial number...
...) KAC-X522 STEREO/BRIDGEABLE POWER AMPLIFIER 7 page 2-9 INSTRUCTION MANUAL AMPLIFICATEUR DE PUISSANCE STEREO/COMPATIBLE 7 page 10-17 MODE D'EMPLOI ESTÉRO/AMPLIFICADOR DE POTENCIA CONECTABLE 7 página 18-25 MANUAL DE INSTRUCCIONES Take the time to the model and serial numbers whenever you obtain the best performance from your Kenwood dealer for information or service on the warranty card, and in the space provided below. Model KAC-X522 Serial number...
Instruction Manual
Page 2
... depletes the battery. When the speaker cord is blinked. Speaker selection • The rated input power of the speakers that are explained in 2004 or later can cause blown fuses etc. • If a buzzing noise is heard from the battery. Available Control Units: A Kenwood's LX-Bus supporting Center Unit released in the Operation Manual of the Center Unit. When the speaker output is running, connect a line noise filter (optional) to be connected simultaneously. They...
... depletes the battery. When the speaker cord is blinked. Speaker selection • The rated input power of the speakers that are explained in 2004 or later can cause blown fuses etc. • If a buzzing noise is heard from the battery. Available Control Units: A Kenwood's LX-Bus supporting Center Unit released in the Operation Manual of the Center Unit. When the speaker output is running, connect a line noise filter (optional) to be connected simultaneously. They...
Instruction Manual
Page 3
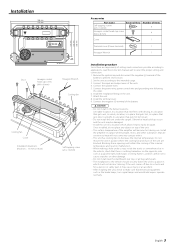
terminal of the units. 4. Attach the unit. 8. Connect the negative - English 3 Connect the power wire, power control wire and grounding wire following this unit in malfunction. • When making a hole under the carpet. Connect the input and output wires of the battery to easily dissipate. Once installed, do not place any object on the opposite side such as the brake lamps, turn signal lamps and windshield wipers operate normally. Install the amplifier in a place...
terminal of the units. 4. Attach the unit. 8. Connect the negative - English 3 Connect the power wire, power control wire and grounding wire following this unit in malfunction. • When making a hole under the carpet. Connect the input and output wires of the battery to easily dissipate. Once installed, do not place any object on the opposite side such as the brake lamps, turn signal lamps and windshield wipers operate normally. Install the amplifier in a place...
Instruction Manual
Page 4
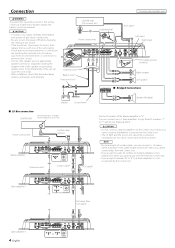
... GND RCA cable* Left input Right input RCA cable ground terminal Right speaker Left speaker ■ Bridged Connections Battery Ground wire* Speaker (Bridged) ■ LX-Bus connection CENTER UNIT To Kenwood disc changer/ External optional accessory Power control wire Control cable (option) 30 30 Master amplifier Extension wire* 456 23 23 78 "0" 456 ID NUMBER 78 S-video cable* RCA cable* Set the ID number of the Master amplifier to turn power off before changing the setting of any switch. • If the fuse blows, check wires for shorts, then replace the fuse with...
... GND RCA cable* Left input Right input RCA cable ground terminal Right speaker Left speaker ■ Bridged Connections Battery Ground wire* Speaker (Bridged) ■ LX-Bus connection CENTER UNIT To Kenwood disc changer/ External optional accessory Power control wire Control cable (option) 30 30 Master amplifier Extension wire* 456 23 23 78 "0" 456 ID NUMBER 78 S-video cable* RCA cable* Set the ID number of the Master amplifier to turn power off before changing the setting of any switch. • If the fuse blows, check wires for shorts, then replace the fuse with...
Instruction Manual
Page 5
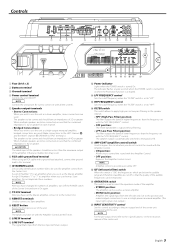
... greater. When multiple speakers are NOT reset. ! Otherwise malfunction may result. 6 RCA cable ground lead terminal When using an RCA cable with a ground lead attached, connect the ground lead to this position and make bridged connections to Slave amplifiers. 0 RESET button Resets the microprocessor of the center unit connected with the "LPF FREQUENCY" control. Do not duplicate these numbers. NOTE For the pre-output level, refer to use as a high-output monaural amplifier, bridged connections are used as a stereo amplifier, stereo connections are cut off so that the...
... greater. When multiple speakers are NOT reset. ! Otherwise malfunction may result. 6 RCA cable ground lead terminal When using an RCA cable with a ground lead attached, connect the ground lead to this position and make bridged connections to Slave amplifiers. 0 RESET button Resets the microprocessor of the center unit connected with the "LPF FREQUENCY" control. Do not duplicate these numbers. NOTE For the pre-output level, refer to use as a high-output monaural amplifier, bridged connections are used as a stereo amplifier, stereo connections are cut off so that the...
Instruction Manual
Page 6
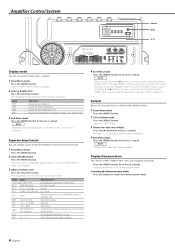
..." "BASS" 60/80/100/200 (Hz) "BA G" B-15 - The indicator flashes in the following sequence. The display items are switched as follows: 1 Enter Menu mode Press the [MENU] button. Select the "DEFA" display. 3 Resets the value to cancel the Demonstration mode. 6 English To call the Amplifier Control's values, hold down the [2] button 3 or more seconds during ID number display ("AMP"). Display...
..." "BASS" 60/80/100/200 (Hz) "BA G" B-15 - The indicator flashes in the following sequence. The display items are switched as follows: 1 Enter Menu mode Press the [MENU] button. Select the "DEFA" display. 3 Resets the value to cancel the Demonstration mode. 6 English To call the Amplifier Control's values, hold down the [2] button 3 or more seconds during ID number display ("AMP"). Display...
Instruction Manual
Page 7
.... 3 Set an ID number of Amp to "7" of connected amps. 4 Select the AMP Control item for adjustment Select the desired set item on the Center Unit. 5 Adjust the AMP Control item You can control the sound by controlling amplifiers from the Center Unit. 1 Enter AMP Control mode Select the AMP Control mode by following the instructions given on the Operation Manual of the Center Unit. "AMP × E-02"/"AMP × COND E-02" NOTE Turn the POWER switch Off and release the protection. The set...
.... 3 Set an ID number of Amp to "7" of connected amps. 4 Select the AMP Control item for adjustment Select the desired set item on the Center Unit. 5 Adjust the AMP Control item You can control the sound by controlling amplifiers from the Center Unit. 1 Enter AMP Control mode Select the AMP Control mode by following the instructions given on the Operation Manual of the Center Unit. "AMP × E-02"/"AMP × COND E-02" NOTE Turn the POWER switch Off and release the protection. The set...
Instruction Manual
Page 8
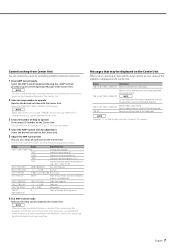
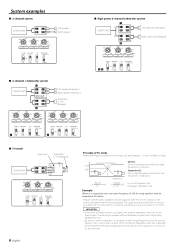
...) OFF ¡™ LPF OFF OFF STEREO ■ Tri-mode (High pass) Subwoofer (L + R) (Bridged) CENTER UNIT C L L L RR C 150 100 70 50 200 LPF FREQUENCY(Hz) 100 70 150 2 1 0.5 4 0.3 50 200 (MIN)5 0.2(MAX) HPF INPUT FREQUENCY(Hz) SENSITIVITY(V) FILTER AMP CONT ISF OPERATION HPF ON ON MONO(Lch) OFF LPF OFF OFF STEREO 8 English Principle of Tri-mode Method of frequency band division using speakers with the closest ratings to the results calculated...
...) OFF ¡™ LPF OFF OFF STEREO ■ Tri-mode (High pass) Subwoofer (L + R) (Bridged) CENTER UNIT C L L L RR C 150 100 70 50 200 LPF FREQUENCY(Hz) 100 70 150 2 1 0.5 4 0.3 50 200 (MIN)5 0.2(MAX) HPF INPUT FREQUENCY(Hz) SENSITIVITY(V) FILTER AMP CONT ISF OPERATION HPF ON ON MONO(Lch) OFF LPF OFF OFF STEREO 8 English Principle of Tri-mode Method of frequency band division using speakers with the closest ratings to the results calculated...
Instruction Manual
Page 9
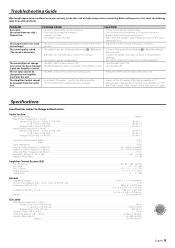
...; Volume is too high. • The speaker cord is shorted. • The input sensitivity adjusting control is not set to the correct position. • The speakers wire are connected with the Amplifier Control. The Amplifier Control cannot be operated from one side.) (Blown fuse.) The output level is not pinched by anything. • Set switches properly by referring to . • Turn the AMP CONT "ON". • Turn the filter Off. • Release the AMP Control mode of...
...; Volume is too high. • The speaker cord is shorted. • The input sensitivity adjusting control is not set to the correct position. • The speakers wire are connected with the Amplifier Control. The Amplifier Control cannot be operated from one side.) (Blown fuse.) The output level is not pinched by anything. • Set switches properly by referring to . • Turn the AMP CONT "ON". • Turn the filter Off. • Release the AMP Control mode of...


