
Instruction Manual
Page 3
Contents Before Use ...01 Dashboard Camera Function Guide 01 Precautions for Use 02 Accessories ...09 Key Features ...09 Parts Name and Functions 10 Installation and Connection 13 Initial Settings ...17 Basic Operation ...19 Settings ...29 Connection with Computer 31 Using the Desktop Software 32 Troubleshooting ...42 Appendix ...44 Specifications ...47
Contents Before Use ...01 Dashboard Camera Function Guide 01 Precautions for Use 02 Accessories ...09 Key Features ...09 Parts Name and Functions 10 Installation and Connection 13 Initial Settings ...17 Basic Operation ...19 Settings ...29 Connection with Computer 31 Using the Desktop Software 32 Troubleshooting ...42 Appendix ...44 Specifications ...47

Instruction Manual
Page 4
... card until it is active. 2. Playback Mode: Users can view all distractions from the designers: 1. For a great photo every time, here are easily played on while connected to your mobile device. Clear vision will let the device turn on your vehicles 12 V outlet or cigarette lighter socket. Copyrights • Recorded video, image, and audio content cannot be used for other trouble, or due to...
... card until it is active. 2. Playback Mode: Users can view all distractions from the designers: 1. For a great photo every time, here are easily played on while connected to your mobile device. Clear vision will let the device turn on your vehicles 12 V outlet or cigarette lighter socket. Copyrights • Recorded video, image, and audio content cannot be used for other trouble, or due to...
Instruction Manual
Page 5
... operate the controls of your device. • Do not use on portable devices with the power on. This responsibility includes observing all traffic rules and regulations in an unattended vehicle. • Overheating may impact the recording quality. • Connect the charger to excess moisture. Use a soft, lint-free cloth to wipe the screen and the exterior of the product while driving...
... operate the controls of your device. • Do not use on portable devices with the power on. This responsibility includes observing all traffic rules and regulations in an unattended vehicle. • Overheating may impact the recording quality. • Connect the charger to excess moisture. Use a soft, lint-free cloth to wipe the screen and the exterior of the product while driving...
Instruction Manual
Page 6
... driving or airbag operation. • When installing the device in a vehicle equipped with a driving support system, check the instruction manual of the vehicle and then select an installation position that will not interfere with the driving support system. • If the device is installed incorrectly, event recording or parked recording may not work correctly. • Refer to "Installation and Connection" for the loosening of fixing knob, installation orientation, installation...
... driving or airbag operation. • When installing the device in a vehicle equipped with a driving support system, check the instruction manual of the vehicle and then select an installation position that will not interfere with the driving support system. • If the device is installed incorrectly, event recording or parked recording may not work correctly. • Refer to "Installation and Connection" for the loosening of fixing knob, installation orientation, installation...
Instruction Manual
Page 12
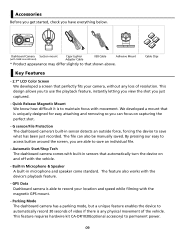
... individual file. - Quick Release Magnetic Mount We know how difficult it is able to access button around the screen, you can also be manually saved. G sensor/File Protection The dashboard camera's built-in microphone and speaker come standard. Dashboard Camera Suction mount (with 16GB microSD card) Cigar Lighter Adapter Cable USB Cable Adhesive Mount * Product appearance may differ slightly to permanent power. 09
... individual file. - Quick Release Magnetic Mount We know how difficult it is able to access button around the screen, you can also be manually saved. G sensor/File Protection The dashboard camera's built-in microphone and speaker come standard. Dashboard Camera Suction mount (with 16GB microSD card) Cigar Lighter Adapter Cable USB Cable Adhesive Mount * Product appearance may differ slightly to permanent power. 09
Instruction Manual
Page 13
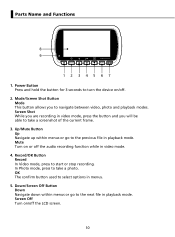
... Button Record In Video mode, press to select options in playback mode. Screen Off Turn on/off . 2. Screen Shot While you are recording in video mode. 4. OK The confirm button used to start or stop recording. Parts Name and Functions 8 9 1234567 1. Power Button Press and hold the button for 3 seconds to take a screenshot of the current frame. 3. Mute Turn on /off the LCD screen. 10 In Photo mode, press to turn the device...
... Button Record In Video mode, press to select options in playback mode. Screen Off Turn on/off . 2. Screen Shot While you are recording in video mode. 4. OK The confirm button used to start or stop recording. Parts Name and Functions 8 9 1234567 1. Power Button Press and hold the button for 3 seconds to take a screenshot of the current frame. 3. Mute Turn on /off the LCD screen. 10 In Photo mode, press to turn the device...
Instruction Manual
Page 15
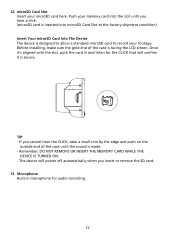
...listen for audio recording. 12 Before installing, make sure the gold end of the card until the sound is designed to allow a standard microSD card to record your footage. Once it is facing the LCD screen. Remember: DO NOT REMOVE OR INSERT THE MEMORY CARD WHILE THE DEVICE IS TURNED ON. - The device will ...confirm it 's aligned with the slot, push the card in microphone for the CLICK that will power off automatically when you insert or remove the SD card...
...listen for audio recording. 12 Before installing, make sure the gold end of the card until the sound is designed to allow a standard microSD card to record your footage. Once it is facing the LCD screen. Remember: DO NOT REMOVE OR INSERT THE MEMORY CARD WHILE THE DEVICE IS TURNED ON. - The device will ...confirm it 's aligned with the slot, push the card in microphone for the CLICK that will power off automatically when you insert or remove the SD card...

Instruction Manual
Page 16
... Port By connecting the device with driving. 13 Reset Button On the rare occasions the device has a problem, use the reset button to charge the device. You can be replaced after you are able to shut down the device. AV Output The device can either connect the cigar lighter adapter cable with the airbag. • In the case of replacement parts and other screen by the rear-view mirror). • Install the device so that...
... Port By connecting the device with driving. 13 Reset Button On the rare occasions the device has a problem, use the reset button to charge the device. You can be replaced after you are able to shut down the device. AV Output The device can either connect the cigar lighter adapter cable with the airbag. • In the case of replacement parts and other screen by the rear-view mirror). • Install the device so that...
Instruction Manual
Page 17
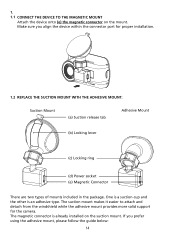
... mount. Make sure you prefer using the adhesive mount, please follow the guide below: 14 One is a suction-cup and the other is already installed on the mount. If you align the device within the connector port for the camera. The suction mount makes it easier to attach and detach from the windshield while the adhesive mount provides more solid support for proper installation. 1.2 REPLACE...
... mount. Make sure you prefer using the adhesive mount, please follow the guide below: 14 One is a suction-cup and the other is already installed on the mount. If you align the device within the connector port for the camera. The suction mount makes it easier to attach and detach from the windshield while the adhesive mount provides more solid support for proper installation. 1.2 REPLACE...
Instruction Manual
Page 21
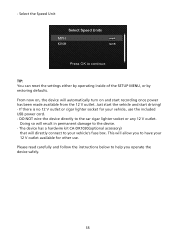
... of the SETUP MENU, or by restoring defaults. DO NOT wire the device directly to continue. Doing so will automatically turn on , the device will result in permanent damage to the device. - This will directly connect to have your 12 V outlet available for your vehicle's fuse box. Please read carefully and follow the instructions below to help you to your vehicle, use . From now...
... of the SETUP MENU, or by restoring defaults. DO NOT wire the device directly to continue. Doing so will automatically turn on , the device will result in permanent damage to the device. - This will directly connect to have your 12 V outlet available for your vehicle's fuse box. Please read carefully and follow the instructions below to help you to your vehicle, use . From now...
Instruction Manual
Page 22
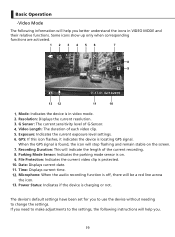
... is charging or not. Time: Displays current time. 12. Mode: Indicates the device is in VIDEO MODE and their relative functions. If you need to make adjustments to change the settings. G Sensor: The current sensitivity level of the current recording. 8. The device's default settings have been set for you . 19 Exposure: Indicates the current exposure level settings. 6. Power Status: Indicates if the device is on the screen. 7. Resolution: Displays the current resolution. 3. Some...
... is charging or not. Time: Displays current time. 12. Mode: Indicates the device is in VIDEO MODE and their relative functions. If you need to make adjustments to change the settings. G Sensor: The current sensitivity level of the current recording. 8. The device's default settings have been set for you . 19 Exposure: Indicates the current exposure level settings. 6. Power Status: Indicates if the device is on the screen. 7. Resolution: Displays the current resolution. 3. Some...
Instruction Manual
Page 24
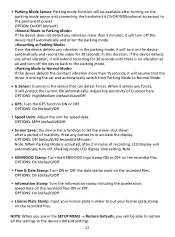
... any forces, it will turn off . (Parking mode LCD display time setting: N/A) • KENWOOD Stamp: Turn the KENWOOD logo stamp ON or OFF on the recorded files. NOTE: When you are in the parking mode, it will assume that the driver is driving the car and automatically switch from Parking Mode to the permanent power. In this duration, if the device detects any button to the parking...
... any forces, it will turn off . (Parking mode LCD display time setting: N/A) • KENWOOD Stamp: Turn the KENWOOD logo stamp ON or OFF on the recorded files. NOTE: When you are in the parking mode, it will assume that the driver is driving the car and automatically switch from Parking Mode to the permanent power. In this duration, if the device detects any button to the parking...

Instruction Manual
Page 32
... setting and press the MENU button to return to the current mode. Settings Access the SETUP MENU by using use the UP and DOWN buttons to set the value. Formatting will remove ALL the files in the card. OPTIONS: Beep: On (default)/Off Audio Rec: On (default)/Off • Time & Date: Adjust the TIME and DATE as required by pressing the MENU button twice. Format SD Card Device Sounds Time & Date Time...
... setting and press the MENU button to return to the current mode. Settings Access the SETUP MENU by using use the UP and DOWN buttons to set the value. Formatting will remove ALL the files in the card. OPTIONS: Beep: On (default)/Off Audio Rec: On (default)/Off • Time & Date: Adjust the TIME and DATE as required by pressing the MENU button twice. Format SD Card Device Sounds Time & Date Time...
Instruction Manual
Page 33
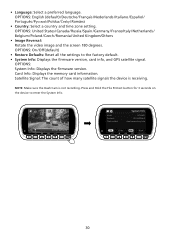
...;nă • Country: Select a country and time zone setting. Press and Hold the File Protect button for 3 seconds on the device to the factory default. • System Info: Displays the firmware version, card info, and GPS satellite signal. FHD 1080P 03:22:43 11:17:01 02/13/2019 Model: Firmware: Check updates: System Info DRV-A201 V3.3_AIZGAA_D www.kenwood.com/cs/ce OK...
...;nă • Country: Select a country and time zone setting. Press and Hold the File Protect button for 3 seconds on the device to the factory default. • System Info: Displays the firmware version, card info, and GPS satellite signal. FHD 1080P 03:22:43 11:17:01 02/13/2019 Model: Firmware: Check updates: System Info DRV-A201 V3.3_AIZGAA_D www.kenwood.com/cs/ce OK...

Instruction Manual
Page 35
... Inc., registered in the U.S. System Requirements for "KENWOOD VIDEO PLAYER" OS: Microsoft Windows 10, Windows 8.1, Windows 7* (except for displaying video recorded with the device. Using the Desktop Software "KENWOOD VIDEO PLAYER" is a desktop software for the Windows 10 Mobile, Windows RT) *Windows 7 Service Pack 1 must be installed. *Microsoft Visual C++ must be installed. *DirectX XAudio2 must be installed(Windows 7 and older version). OS: Apple Mac...
... Inc., registered in the U.S. System Requirements for "KENWOOD VIDEO PLAYER" OS: Microsoft Windows 10, Windows 8.1, Windows 7* (except for displaying video recorded with the device. Using the Desktop Software "KENWOOD VIDEO PLAYER" is a desktop software for the Windows 10 Mobile, Windows RT) *Windows 7 Service Pack 1 must be installed. *Microsoft Visual C++ must be installed. *DirectX XAudio2 must be installed(Windows 7 and older version). OS: Apple Mac...
Instruction Manual
Page 36
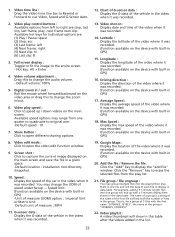
.... (Function available on the device with the number of the video when it was recorded. 12. Add the file / Remove the file : Click the "Add" key to open different sharing options. 8. Video edit mode : Click to display the "add file" window. Chart of G-sensor data : Display the G-data of measure : MPH 11. Driving direction : Display the direction of speed under Setup → Speed Unit. (Function available...
.... (Function available on the device with the number of the video when it was recorded. 12. Add the file / Remove the file : Click the "Add" key to open different sharing options. 8. Video edit mode : Click to display the "add file" window. Chart of G-sensor data : Display the G-data of measure : MPH 11. Driving direction : Display the direction of speed under Setup → Speed Unit. (Function available...
Instruction Manual
Page 37
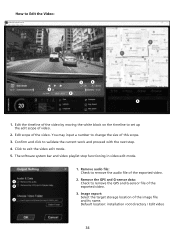
... 1. You may input a number to remove the GPS and G-sensor file of this scope. 3. Image export: Select the target storage location of the video. Click to validate the current work and proceed with the next step. 4. Confirm and click to exit the video edit mode. 5. How to Edit the Video: JKVECNWV I DOEOODPVLIADYEEOR PLAYER File Edit Setup Share Help INFORMATION Edit Mode 00:27 20...
... 1. You may input a number to remove the GPS and G-sensor file of this scope. 3. Image export: Select the target storage location of the video. Click to validate the current work and proceed with the next step. 4. Confirm and click to exit the video edit mode. 5. How to Edit the Video: JKVECNWV I DOEOODPVLIADYEEOR PLAYER File Edit Setup Share Help INFORMATION Edit Mode 00:27 20...

Instruction Manual
Page 45
... functions have a small amount of moisture to the suction cup to allow for best quality is removed and the lenses are unable to remove the SD card, use the edge of the memory card faces the screen side. Wipe down the surface and add a small amount of available space left for your computer if you have a suitable video player installed...
... functions have a small amount of moisture to the suction cup to allow for best quality is removed and the lenses are unable to remove the SD card, use the edge of the memory card faces the screen side. Wipe down the surface and add a small amount of available space left for your computer if you have a suitable video player installed...
Instruction Manual
Page 46
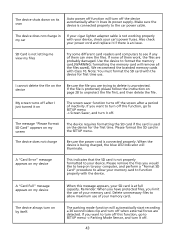
... my car If your car's power fuses. When the device is not working properly with Class 10. The device shuts down on its power supply. If the file is protected, please follow the instruction on page 28 to SETUP menu -> Parking Mode Sensor, and turn it loses its own Auto power off function will turn on by itself. A "Card Full" message appears on the device for first time use of them work...
... my car If your car's power fuses. When the device is not working properly with Class 10. The device shuts down on its power supply. If the file is protected, please follow the instruction on page 28 to SETUP menu -> Parking Mode Sensor, and turn it loses its own Auto power off function will turn on by itself. A "Card Full" message appears on the device for first time use of them work...

Instruction Manual
Page 47
... problems remain, Please contact your browser settings and allow for long periods of purchase or a service center. If you access the menu while it is viewed, but this message appears, simply adjust your store of time will increase the temperature and could damage the screen. • Extremely high or low temperatures could damage the screen. • Do not let direct...
... problems remain, Please contact your browser settings and allow for long periods of purchase or a service center. If you access the menu while it is viewed, but this message appears, simply adjust your store of time will increase the temperature and could damage the screen. • Extremely high or low temperatures could damage the screen. • Do not let direct...


