

User Manual
Page 2
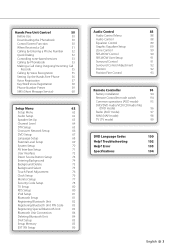
...35 iPod List 36 USB Device Control 38 Functions while displaying the Control Screen 38 USB List 39 Folder Select 39 TV Watching 40 Function During TV Screen 40 Functions When Displaying the Easy Control Panel 40 Functions While Displaying the Control Screen 41 TV Menu (with KTC-D500E (optional accessory) connected only) 42 Seek Mode 42 Auto Memory 43 Manual Memory 43 Preset Select 44 Set Station Name 44 Bluetooth Audio Control 45 Before Use 45 Functions While Displaying the Control Screen 45 External Device Power Supply Control 46 Muting Audio Volume...
...35 iPod List 36 USB Device Control 38 Functions while displaying the Control Screen 38 USB List 39 Folder Select 39 TV Watching 40 Function During TV Screen 40 Functions When Displaying the Easy Control Panel 40 Functions While Displaying the Control Screen 41 TV Menu (with KTC-D500E (optional accessory) connected only) 42 Seek Mode 42 Auto Memory 43 Manual Memory 43 Preset Select 44 Set Station Name 44 Bluetooth Audio Control 45 Before Use 45 Functions While Displaying the Control Screen 45 External Device Power Supply Control 46 Muting Audio Volume...
User Manual
Page 3
...Unit PIN Code 83 Registering Special Bluetooth Unit 83 Bluetooth Unit Connection 84 Deleting Bluetooth Unit 84 DivX Setup 85 Setup Memory 85 EXT SW Setup 86 Audio Control 88 Audio Control Menu 88 Audio Control 88 Equalizer Control 89 Graphic Equalizer Setup 89 Zone Control 90 SRS WOW Control 90 SRS WOW User Setup 91 Surround Control 91 Surround Control Adjustment 92 Position 92 Position Fine Control 93 Remote Controller 94 Battery installation 94 Remote Controller mode switch 94 Common operations (AUD mode) 95 DVD/DVD Audio/VCD/CD/Audio files (DVD...
...Unit PIN Code 83 Registering Special Bluetooth Unit 83 Bluetooth Unit Connection 84 Deleting Bluetooth Unit 84 DivX Setup 85 Setup Memory 85 EXT SW Setup 86 Audio Control 88 Audio Control Menu 88 Audio Control 88 Equalizer Control 89 Graphic Equalizer Setup 89 Zone Control 90 SRS WOW Control 90 SRS WOW User Setup 91 Surround Control 91 Surround Control Adjustment 92 Position 92 Position Fine Control 93 Remote Controller 94 Battery installation 94 Remote Controller mode switch 94 Common operations (AUD mode) 95 DVD/DVD Audio/VCD/CD/Audio files (DVD...
User Manual
Page 6
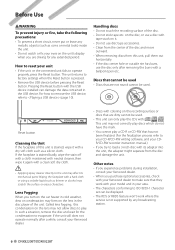
... tape stuck on the lens in the disc player of the unit. Wiping the faceplate with the USB device installed can only play a CD-R or CD-RW that they work where the service is pressed. • Remove the USB device before pressing the Reset button. Other notes • If you experience problems during installation, consult your Kenwood dealer. • When you purchase optional accessories, check with your Kenwood dealer to make...
... tape stuck on the lens in the disc player of the unit. Wiping the faceplate with the USB device installed can only play a CD-R or CD-RW that they work where the service is pressed. • Remove the USB device before pressing the Reset button. Other notes • If you experience problems during installation, consult your Kenwood dealer. • When you purchase optional accessories, check with your Kenwood dealer to make...
User Manual
Page 8
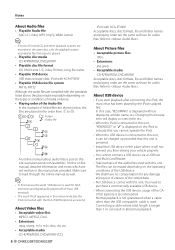
...; • If music of normal CD and other playback systems are recorded in the same disc, only the playback system recorded at the first setout is played. • Playable disc media CD-R/RW/ROM, DVD±R/RW • Playable disc file format ISO 9660 Level 1/2, Joliet, Romeo, Long file name. • Playable USB device USB mass storage class, iPod with KCA...
...; • If music of normal CD and other playback systems are recorded in the same disc, only the playback system recorded at the first setout is played. • Playable disc media CD-R/RW/ROM, DVD±R/RW • Playable disc file format ISO 9660 Level 1/2, Joliet, Romeo, Long file name. • Playable USB device USB mass storage class, iPod with KCA...

User Manual
Page 10
... to cancel muting. D Adjusts the volume C BA B Switches to the Navigation system Press the button to switch the display to turn on the USB control screen to attenuate the volume. Playing a USB device When connecting a USB device, playback starts automatically. Basic Operations ED C Turns power ON/OFF Press the button to the navigation system screen. E Attenuates the volume Press it was stopped at the last time. Even if the USB is turned off. Removing the USB device Press on the...
... to cancel muting. D Adjusts the volume C BA B Switches to the Navigation system Press the button to switch the display to turn on the USB control screen to attenuate the volume. Playing a USB device When connecting a USB device, playback starts automatically. Basic Operations ED C Turns power ON/OFF Press the button to the navigation system screen. E Attenuates the volume Press it was stopped at the last time. Even if the USB is turned off. Removing the USB device Press on the...

User Manual
Page 11
... Audio Control Menu screen. (page 88) p Displays the SETUP Menu screen. (page 62) q Adjust the volume. Touch the screen to redisplay the buttons. ⁄ • The displayed source depends on the source select screen and source control screen. 6 Clock display 7 Displays the Source Select screen. A Playing a disc When you cannot press the button of supported discs and formats. Removing a disc Press (Eject) button. Favorite Source Select screen 12 The following buttons are always displayed on the type of device connected. If a menu appears, when playing a video disc, select...
... Audio Control Menu screen. (page 88) p Displays the SETUP Menu screen. (page 62) q Adjust the volume. Touch the screen to redisplay the buttons. ⁄ • The displayed source depends on the source select screen and source control screen. 6 Clock display 7 Displays the Source Select screen. A Playing a disc When you cannot press the button of supported discs and formats. Removing a disc Press (Eject) button. Favorite Source Select screen 12 The following buttons are always displayed on the type of device connected. If a menu appears, when playing a video disc, select...

User Manual
Page 14
... DDX8022BT, an optional navigation system needs to be controlled while displaying navigation screen. 1 Display the easy control buttons When "DVD" is Off ). See (page 49). SCRN: Displays the Screen Control screen. Navigation Control Sets and controls the navigation system function. See (page 7) for information on the screen. See (page 46). 2 Adjust the volume. 3 During DVD play : Selects music. When pressed twice, the disc is pressed. During CD play : Selects a chapter. Using the Navigation System Displays the navigation system screen and makes...
... DDX8022BT, an optional navigation system needs to be controlled while displaying navigation screen. 1 Display the easy control buttons When "DVD" is Off ). See (page 49). SCRN: Displays the Screen Control screen. Navigation Control Sets and controls the navigation system function. See (page 7) for information on the screen. See (page 46). 2 Adjust the volume. 3 During DVD play : Selects music. When pressed twice, the disc is pressed. During CD play : Selects a chapter. Using the Navigation System Displays the navigation system screen and makes...

User Manual
Page 35
... 35 iPod Mode:Full AV - w Starts or stops Random play (the preset files or data). If there is no playback screen, wallpaper is playing, press the [FNC] button. u Displays the list of video category. i Displays the list of music category. See (page 36). ; O U T: AV - o Displays the previous music/video list screen. p Starts or stops Scan Play (that plays the beginning of music in the iPod and the music number display 3 Play Mode Display 4 Play Time Display 5 Music/Video Information Display Selects the...
... 35 iPod Mode:Full AV - w Starts or stops Random play (the preset files or data). If there is no playback screen, wallpaper is playing, press the [FNC] button. u Displays the list of video category. i Displays the list of music category. See (page 36). ; O U T: AV - o Displays the previous music/video list screen. p Starts or stops Scan Play (that plays the beginning of music in the iPod and the music number display 3 Play Mode Display 4 Play Time Display 5 Music/Video Information Display Selects the...

User Manual
Page 62
... set various functions. 1 Display the control screen of your car. When no source is set automatically (for timing adjustment of sound output for the locked option. Setup Menu Displays the Setup menu to the "SETUP Menu" screen. 62 DNX8220BT/DDX8022BT "COMPACT", "SEDAN", "WAGON1", "WAGON2", "MINIVAN1", "MINIVAN2", "SUV", "PASSENGER VAN", "OFF" 2 Displays the DTA (Digital Time Alignment) Setup screen. (page 65) You can be selected under the following conditions: - The key mark is set to on the "Source Select" screen. 2 Display the SETUP Menu 3 Select the setup...
... set various functions. 1 Display the control screen of your car. When no source is set automatically (for timing adjustment of sound output for the locked option. Setup Menu Displays the Setup menu to the "SETUP Menu" screen. 62 DNX8220BT/DDX8022BT "COMPACT", "SEDAN", "WAGON1", "WAGON2", "MINIVAN1", "MINIVAN2", "SUV", "PASSENGER VAN", "OFF" 2 Displays the DTA (Digital Time Alignment) Setup screen. (page 65) You can be selected under the following conditions: - The key mark is set to on the "Source Select" screen. 2 Display the SETUP Menu 3 Select the setup...

User Manual
Page 63
... "SETUP Menu" screen. In the "Use" position, the Equalizer is adjusted to its size to get the best sound effects. 1 Select a speaker you wish to adjust 1 2 2 5 3 3 4 1 Center speaker 2 Front speaker 3 Rear speaker 4 Subwoofer 5 Tweeter setup You can select any of tweeter. (see , page 63) 7 Selects a speaker type. (see , page 64) r Starts or stops test signal tone output for setup check. y Returns to the "SETUP Menu" screen. Speaker Set Up You can select a speaker type and its best position. 2 Select a speaker...
... "SETUP Menu" screen. In the "Use" position, the Equalizer is adjusted to its size to get the best sound effects. 1 Select a speaker you wish to adjust 1 2 2 5 3 3 4 1 Center speaker 2 Front speaker 3 Rear speaker 4 Subwoofer 5 Tweeter setup You can select any of tweeter. (see , page 63) 7 Selects a speaker type. (see , page 64) r Starts or stops test signal tone output for setup check. y Returns to the "SETUP Menu" screen. Speaker Set Up You can select a speaker type and its best position. 2 Select a speaker...

User Manual
Page 65
... of rear speakers and subwoofer increase, they are virtually moved backward. 1 2 2 3 1 Selects a speaker to be adjusted. 2 Sets a delay time of center speaker and front speakers increase, they are virtually moved to the desired distance. DTA Setup You can manually set the sound output timing of each channel. 1 Display the DTA Setup screen When the values of the selected speaker. 3 Returns to the Car Type Set Up screen. 2 Select a speaker you wish to adjust 4 5 5 6 6 7 4 Center speaker 5 Front speaker 6 Rear speaker 7 Subwoofer 2 Set a delay time The speakers are...
... of rear speakers and subwoofer increase, they are virtually moved backward. 1 2 2 3 1 Selects a speaker to be adjusted. 2 Sets a delay time of center speaker and front speakers increase, they are virtually moved to the desired distance. DTA Setup You can manually set the sound output timing of each channel. 1 Display the DTA Setup screen When the values of the selected speaker. 3 Returns to the Car Type Set Up screen. 2 Select a speaker you wish to adjust 4 5 5 6 6 7 4 Center speaker 5 Front speaker 6 Rear speaker 7 Subwoofer 2 Set a delay time The speakers are...
User Manual
Page 69
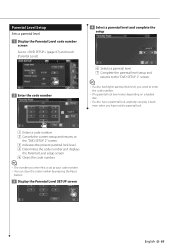
... "DVD SETUP 2" screen. 3 Indicates the present parental lock level. 4 Determines the code number and displays the Parental Level setup screen. 5 Clears the code number. ⁄ • The number you enter first is set as your code number. • You can clear the code number by pressing the Reset button. 3 Display the Parental Level SETUP screen 4 Select a parental level and complete the setup 6 6 7 6 Selects a parental level. 7 Complete the parental level setup and returns to the "DVD SETUP 2" screen. ⁄ • If a disc has higher parental lock level...
... "DVD SETUP 2" screen. 3 Indicates the present parental lock level. 4 Determines the code number and displays the Parental Level setup screen. 5 Clears the code number. ⁄ • The number you enter first is set as your code number. • You can clear the code number by pressing the Reset button. 3 Display the Parental Level SETUP screen 4 Select a parental level and complete the setup 6 6 7 6 Selects a parental level. 7 Complete the parental level setup and returns to the "DVD SETUP 2" screen. ⁄ • If a disc has higher parental lock level...
User Manual
Page 76
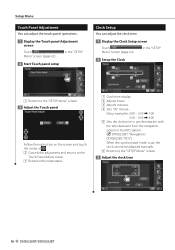
... the Touch Panel Adjust screen. 3 Resets to the "SETUP Menu" screen. 3 Adjust the clock time 76 DNX8220BT/DDX8022BT Setup examples: 3:00 - 3:29 \ 3:00 3:30 - 3:59 \ 4:00 5 Sets the clock time in synchronization with the time data sent from the navigation system or the RDS station. ( DNX8220BT: "Navigatoin", DDX8022BT: "RDS") When the synchronized mode is set, the clock cannot be adjusted manually. 6 Returns to the initial status. in the "SETUP 2 Setup the Clock 2 3 1 2 3 4 5 6 1 Clock time display 2 Adjusts hours. 3 Adjusts minutes. 4 Sets "00" minute...
... the Touch Panel Adjust screen. 3 Resets to the "SETUP Menu" screen. 3 Adjust the clock time 76 DNX8220BT/DDX8022BT Setup examples: 3:00 - 3:29 \ 3:00 3:30 - 3:59 \ 4:00 5 Sets the clock time in synchronization with the time data sent from the navigation system or the RDS station. ( DNX8220BT: "Navigatoin", DDX8022BT: "RDS") When the synchronized mode is set, the clock cannot be adjusted manually. 6 Returns to the initial status. in the "SETUP 2 Setup the Clock 2 3 1 2 3 4 5 6 1 Clock time display 2 Adjusts hours. 3 Adjusts minutes. 4 Sets "00" minute...
User Manual
Page 78
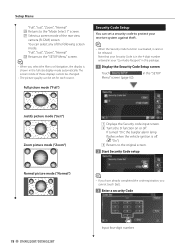
... touch [Set]. 3 Enter a security Code 78 DNX8220BT/DDX8022BT Input four-digit number. "Full", "Just", "Zoom", "Normal" s Returns to the original screen. 2 Start Security Code setup Normal picture mode ("Normal") ⁄ • If you have already completed the code registration, you select the Menu or Navigation, the display is activated, it cannot be set for each source. Full picture mode ("Full") Security Code Setup You can set a security code to the "Mode Select 1" screen. Setup Menu "Full...
... touch [Set]. 3 Enter a security Code 78 DNX8220BT/DDX8022BT Input four-digit number. "Full", "Just", "Zoom", "Normal" s Returns to the original screen. 2 Start Security Code setup Normal picture mode ("Normal") ⁄ • If you have already completed the code registration, you select the Menu or Navigation, the display is activated, it cannot be set for each source. Full picture mode ("Full") Security Code Setup You can set a security code to the "Mode Select 1" screen. Setup Menu "Full...

User Manual
Page 88
... Control Audio Control Menu Displays the Audio Control menu to set the sound effect function of this unit. 1 Display the control screen of any source Press several times until the control screen appears. 2 Display the Audio Control menu 3 Select the Audio Control item 1 Audio Control You can adjust the front/rear and right/left audio balance. 1 Display Audio Control screen Touch in the "Audio Control Menu" screen (page 88). 2 Set the each item 4 1 2 3 3 4 5 1 Moves to the "Audio Control 2" screen. 2 Adjust the front/back and left/right volume around the touched area. 3 Adjusts...
... Control Audio Control Menu Displays the Audio Control menu to set the sound effect function of this unit. 1 Display the control screen of any source Press several times until the control screen appears. 2 Display the Audio Control menu 3 Select the Audio Control item 1 Audio Control You can adjust the front/rear and right/left audio balance. 1 Display Audio Control screen Touch in the "Audio Control Menu" screen (page 88). 2 Set the each item 4 1 2 3 3 4 5 1 Moves to the "Audio Control 2" screen. 2 Adjust the front/back and left/right volume around the touched area. 3 Adjusts...

User Manual
Page 93
... position. 1 Display the Position Fine Control screen 3 Set a delay time 1 2 2 3 4 1 Selects a speaker to adjust 5 6 7 8 9 10 5 Center speaker 6 Left front speaker 7 Right front speaker 8 Left rear speaker 9 Right rear speaker p Subwoofer English 93 The adjusted distance (Position and Position Fine Control values), and the total of the distance adjusted by Car Type Set Up (page 62) and the adjustment distance for position setup are indicated. 3 Adjust the distance to each speaker. 4 Exits the Position Fine Control setup and...
... position. 1 Display the Position Fine Control screen 3 Set a delay time 1 2 2 3 4 1 Selects a speaker to adjust 5 6 7 8 9 10 5 Center speaker 6 Left front speaker 7 Right front speaker 8 Left rear speaker 9 Right rear speaker p Subwoofer English 93 The adjusted distance (Position and Position Fine Control values), and the total of the distance adjusted by Car Type Set Up (page 62) and the adjustment distance for position setup are indicated. 3 Adjust the distance to each speaker. 4 Exits the Position Fine Control setup and...
User Manual
Page 102
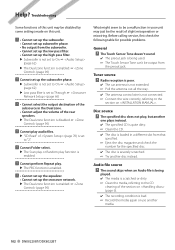
... zone. • Cannot adjust the volume of the rear speakers. ▲ The Dual zone function is scratched or dirty. ☞ Clean the media, referring to the CD cleaning of (page 70) is set to be output from that specified. ☞ Eject the disc magazine and check the number for possible problems. General ? Help? The sound skips when an Audio file is being used. ☞ The...
... zone. • Cannot adjust the volume of the rear speakers. ▲ The Dual zone function is scratched or dirty. ☞ Clean the media, referring to the CD cleaning of (page 70) is set to be output from that specified. ☞ Eject the disc magazine and check the number for possible problems. General ? Help? The sound skips when an Audio file is being used. ☞ The...
User Manual
Page 103
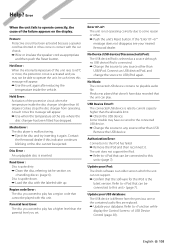
... audio files are replaced. ➡ Update your iPod: The iPod's software is the latest version. USB Device Error!!: The connected USB device is inserted. Protect : Protective circuit has been activated because a speaker cord has shorted or it has come in contact with the labeled side up. Read Error : Disc is selected as appropriate and then push the Reset button. Connect an USB device/iPod, and change the source to some reason or other. ➡ Push the unit's Reset button. No Device (USB device...
... audio files are replaced. ➡ Update your iPod: The iPod's software is the latest version. USB Device Error!!: The connected USB device is inserted. Protect : Protective circuit has been activated because a speaker cord has shorted or it has come in contact with the labeled side up. Read Error : Disc is selected as appropriate and then push the Reset button. Connect an USB device/iPod, and change the source to some reason or other. ➡ Push the unit's Reset button. No Device (USB device...

User Manual 1
Page 3
.... Bluetooth antenna unit English | 3 Install the unit in a place where the cooling fan of the internal temperature and result in malfunction. • Do not press hard on the wiring harness and connect it will acquire satellites quickly each unit. 3. terminal of the battery. 9. Do not mount the unit in your vehicle. 5. Connect the wiring harness connector to the power source running through the fuse box. Acquiring GPS Signals The first time...
.... Bluetooth antenna unit English | 3 Install the unit in a place where the cooling fan of the internal temperature and result in malfunction. • Do not press hard on the wiring harness and connect it will acquire satellites quickly each unit. 3. terminal of the battery. 9. Do not mount the unit in your vehicle. 5. Connect the wiring harness connector to the power source running through the fuse box. Acquiring GPS Signals The first time...

User Manual 1
Page 6
... (-) Rear Left (+) Rear Left (-) 2WARNING Connecting the ISO Connector The pin arrangement for the wiring harness is described in 2, make the proper connections to prevent damage to the unit. Ignition cable (Red) A-7 Pin (Red) Unit Vehicle Battery cable (Yellow) A-4 Pin (Yellow) 2The A-7 pin (red) of vehicle you drive. Please be sure to the constant power supply. Ignition cable (Red) A-7 Pin (Red) Unit Vehicle Battery cable (Yellow) A-4 Pin (Yellow) 6 | DNX8220BT/DDX8022BT If the ISO connector pins are set as illustrated. Make...
... (-) Rear Left (+) Rear Left (-) 2WARNING Connecting the ISO Connector The pin arrangement for the wiring harness is described in 2, make the proper connections to prevent damage to the unit. Ignition cable (Red) A-7 Pin (Red) Unit Vehicle Battery cable (Yellow) A-4 Pin (Yellow) 2The A-7 pin (red) of vehicle you drive. Please be sure to the constant power supply. Ignition cable (Red) A-7 Pin (Red) Unit Vehicle Battery cable (Yellow) A-4 Pin (Yellow) 6 | DNX8220BT/DDX8022BT If the ISO connector pins are set as illustrated. Make...


