Instruction Manual
Page 3
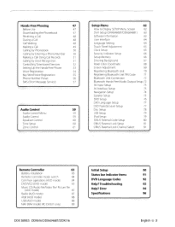
Hands-Free Phoning 47 Before Use 47 Downloading the Phonebook 47 Receiving a Call 48 During a Call 48 Call Waiting 48 iViaking a Caii 49 Calling by Phonebook 50 Calling by Entering a Phone Number 50 Making a Call Using Call Records 51 Calling by Voice Recognition 51 Controlling Tone-based Services 52 Setting Up the Hands-Free Phone 53 Voice Registration 54 Key Word Voice Registration 55 Phone Number Preset 56 SMS (Short Message Service) 57 t···h>;n:.;> ><
Hands-Free Phoning 47 Before Use 47 Downloading the Phonebook 47 Receiving a Call 48 During a Call 48 Call Waiting 48 iViaking a Caii 49 Calling by Phonebook 50 Calling by Entering a Phone Number 50 Making a Call Using Call Records 51 Calling by Voice Recognition 51 Controlling Tone-based Services 52 Setting Up the Hands-Free Phone 53 Voice Registration 54 Key Word Voice Registration 55 Phone Number Preset 56 SMS (Short Message Service) 57 t···h>;n:.;> ><

Instruction Manual
Page 4
... with coloring on the unit's display when you try to factory settings when the Reset button is not supported by any metallic objects (such as a silicon cloth. In such a situation, remove the disc and wait for any extended period. Pressing the Reset button with the USB device installed can only play the CDs with its mechanical parts. o When the unit is turned on after pressing the Reset button, the Initial SETUP screen is displayed...
... with coloring on the unit's display when you try to factory settings when the Reset button is not supported by any metallic objects (such as a silicon cloth. In such a situation, remove the disc and wait for any extended period. Pressing the Reset button with the USB device installed can only play the CDs with its mechanical parts. o When the unit is turned on after pressing the Reset button, the Initial SETUP screen is displayed...
Instruction Manual
Page 5
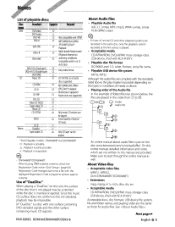
... video format DVD-RAM CD Music CD x 0 CD-TEXT18-cm (3 inch) -:;:--_ discs supported. CD-ROM 0 MP3/WMAlAAClWAVI CD-R CD-RW -----=0'------ Registration Code changes each time a file with the standards listed above, the play maybe impossible depending on this manual are provided. Playable USB device file system FAT16, FAT32 Although the audio files are complied with the displayed Registration Code is inserted or ejected. t=J>@ Q] "J J>@@ An online manual about audio files...
... video format DVD-RAM CD Music CD x 0 CD-TEXT18-cm (3 inch) -:;:--_ discs supported. CD-ROM 0 MP3/WMAlAAClWAVI CD-R CD-RW -----=0'------ Registration Code changes each time a file with the standards listed above, the play maybe impossible depending on this manual are provided. Playable USB device file system FAT16, FAT32 Although the audio files are complied with the displayed Registration Code is inserted or ejected. t=J>@ Q] "J J>@@ An online manual about audio files...
Instruction Manual
Page 6
... and changed to this unit by SIRIUS and XM. KTC-HR200 When you connect an HD Radio, Tuner features of the USB device. About Satellite Radio tuner This unit supports Satellite Radio tuners which have no compensation for any damage arising out of erasure of the stored data. • No USB device comes with this unit You need to this unit Made for flash memories and digital audio players which are released by connecting an iPod/iPhone (commercial...
... and changed to this unit by SIRIUS and XM. KTC-HR200 When you connect an HD Radio, Tuner features of the USB device. About Satellite Radio tuner This unit supports Satellite Radio tuners which have no compensation for any damage arising out of erasure of the stored data. • No USB device comes with this unit You need to this unit Made for flash memories and digital audio players which are released by connecting an iPod/iPhone (commercial...
Instruction Manual
Page 7
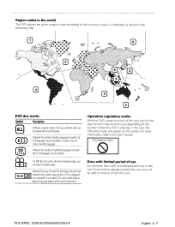
... to the disc manual. DDX SERIES DDX616/DDX6046BT/DDX516 English 7 Indicates the number of the screen (letter box). The left mark "91 116" LB 1 indicates that awide image picture (169) is displayed on the location where the DVD is marketed, as the play function may not be recorded. In this DVD, some functions of audio languages recorded. You can select afavorite angle. Operation regulatory marks...
... to the disc manual. DDX SERIES DDX616/DDX6046BT/DDX516 English 7 Indicates the number of the screen (letter box). The left mark "91 116" LB 1 indicates that awide image picture (169) is displayed on the location where the DVD is marketed, as the play function may not be recorded. In this DVD, some functions of audio languages recorded. You can select afavorite angle. Operation regulatory marks...

Instruction Manual
Page 19
... the play time display. [ .. ] When .. I I "P" Play Time Display Use the [TIME] to change play time display in use various playback functions. "TItle" Title Number Display "Chap" Chapter Number Display "Scene"l "Track" ScenefTrack Number Display DDX SERIES DDX616/DDX6046BT/DDXS16 "~" Play Mode Display "T"I "C"I "R"I Operation on the Source Control Screen ~VlDEOI1M).VR 6¥JdeoCD [~II] Plays or pauses. [_] Stops playing. When touched twice, the disc is scrolled by touching it the next time. [~] Ejects a disc Fast Forwards or Fast Backwards. D Display the Source Control Screen See...
... the play time display. [ .. ] When .. I I "P" Play Time Display Use the [TIME] to change play time display in use various playback functions. "TItle" Title Number Display "Chap" Chapter Number Display "Scene"l "Track" ScenefTrack Number Display DDX SERIES DDX616/DDX6046BT/DDXS16 "~" Play Mode Display "T"I "C"I "R"I Operation on the Source Control Screen ~VlDEOI1M).VR 6¥JdeoCD [~II] Plays or pauses. [_] Stops playing. When touched twice, the disc is scrolled by touching it the next time. [~] Ejects a disc Fast Forwards or Fast Backwards. D Display the Source Control Screen See...

Instruction Manual
Page 37
,,;~.,.;$f~..,~;.i#;;~jt.!.·!.~1·1'i!"1!,';/~j',1.if-:>t
,,;~.,.;$f~..,~;.i#;;~jt.!.·!.~1·1'i!"1!,';/~j',1.if-:>t
Instruction Manual
Page 46
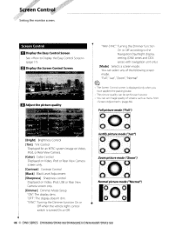
... navigation unit only) [Mode] Selects a screen mode. Justify picture mode (''Just'') , "- O~; ':-0 "'- ~/ " I/ /I ' Zoom picture mode ("Zoom") Normal picture mode ("Normal") 46 DNX SERIES DNX6960/DNX6160/DNX6020EX/DNX6460BT/DNX5160 Screen Control D Display the Easy Control Screen See (page 17). You can set for an NTSC system image on Video, iPod, or Rear View Camera. [Color] Color Control Displayed on Video, iPod or Rear View Camera screen only. [Contrast] Contrast Control [Black] Black Level Adjustment [Sharpness] Sharpness control Displayed on Video, iPod, USB or Rear View...
... navigation unit only) [Mode] Selects a screen mode. Justify picture mode (''Just'') , "- O~; ':-0 "'- ~/ " I/ /I ' Zoom picture mode ("Zoom") Normal picture mode ("Normal") 46 DNX SERIES DNX6960/DNX6160/DNX6020EX/DNX6460BT/DNX5160 Screen Control D Display the Easy Control Screen See (page 17). You can set for an NTSC system image on Video, iPod, or Rear View Camera. [Color] Color Control Displayed on Video, iPod or Rear View Camera screen only. [Contrast] Contrast Control [Black] Black Level Adjustment [Sharpness] Sharpness control Displayed on Video, iPod, USB or Rear View...

Instruction Manual
Page 49
...). [Direct Number] Displays the Dialing Display screen. See (page 70). [TEL SETUP] Displays the Hands Free Setup screen. Incoming Calls] Displays the Incoming Calls screen. See (page 51). [Ii;t Missed Calls] Displays the Missed Calls screen. See (page 50). The butTons associated with the disabled functions become ineffective if pressed. • When the Hands-Free Control screen appears, the name of the connected cell-phone is displayed for Phonebook screen. D Display the Hands-Free Control screen D Select a dialing...
...). [Direct Number] Displays the Dialing Display screen. See (page 70). [TEL SETUP] Displays the Hands Free Setup screen. Incoming Calls] Displays the Incoming Calls screen. See (page 51). [Ii;t Missed Calls] Displays the Missed Calls screen. See (page 50). The butTons associated with the disabled functions become ineffective if pressed. • When the Hands-Free Control screen appears, the name of the connected cell-phone is displayed for Phonebook screen. D Display the Hands-Free Control screen D Select a dialing...
Instruction Manual
Page 59
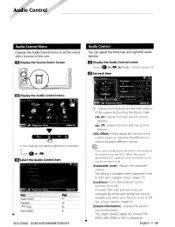
D Display the Source Select Screen Audio Control You can adjust the front/rear and right/left audio balance. D Select the Audio Control item Jt:etni~h~s:;:}.'~!Ti~t':;r"f~ .\';·'~;;D Displays the Audio Control menu to set the sound effect function of this manual, the above selection is indicated as: Touch [e] > [~]. D Display the Audio Control screen Touch [.J > [ . ] > [Audio Control]. (page 59) I I Set each item I I Display the Audio Control menu In this unit.
D Display the Source Select Screen Audio Control You can adjust the front/rear and right/left audio balance. D Select the Audio Control item Jt:etni~h~s:;:}.'~!Ti~t':;r"f~ .\';·'~;;D Displays the Audio Control menu to set the sound effect function of this manual, the above selection is indicated as: Touch [e] > [~]. D Display the Audio Control screen Touch [.J > [ . ] > [Audio Control]. (page 59) I I Set each item I I Display the Audio Control menu In this unit.
Instruction Manual
Page 67
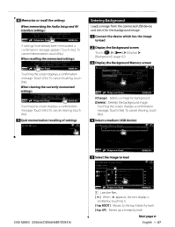
.../recalling of settings SETUP M~nl()ty • 1~~'1 Entering Background Loads a image from the connected USB device and sets it . [tl!lil ROOT] Moves to load DDX SERIES DDX616/DDX6046BTIDDX516 [I Select the image to the top hierarchy level. [t-1!IiI UP] Moves up a hierarchy level. D Connect the device which has the image to load D Display the Background screen Touch [e Display] > [Background]. (page 62) IJ Display the Background Memory screen [Change] Selects a image...
.../recalling of settings SETUP M~nl()ty • 1~~'1 Entering Background Loads a image from the connected USB device and sets it . [tl!lil ROOT] Moves to load DDX SERIES DDX616/DDX6046BTIDDX516 [I Select the image to the top hierarchy level. [t-1!IiI UP] Moves up a hierarchy level. D Connect the device which has the image to load D Display the Background screen Touch [e Display] > [Background]. (page 62) IJ Display the Background Memory screen [Change] Selects a image...

Instruction Manual
Page 68
... settings made at the factory. [Panel Color Scan] When set to the preset buttons ([Pl] - [P3J). 68 DNX SERIES DNX6960/DNX6160/DNX6020EX/DNX6460BT/DNX5160 Setup Menu iii Load the image IT] Rotates the image. ~ • See (page 6) for background. I I Select a color P e! Background Change Selects a image for readable image specifications. • The [Memory] button on the "Background" screen becomes active only in STANDBY source mode. • Pressing the [Memory] button on the "Background" screen switches...
... settings made at the factory. [Panel Color Scan] When set to the preset buttons ([Pl] - [P3J). 68 DNX SERIES DNX6960/DNX6160/DNX6020EX/DNX6460BT/DNX5160 Setup Menu iii Load the image IT] Rotates the image. ~ • See (page 6) for background. I I Select a color P e! Background Change Selects a image for readable image specifications. • The [Memory] button on the "Background" screen becomes active only in STANDBY source mode. • Pressing the [Memory] button on the "Background" screen switches...
Instruction Manual
Page 70
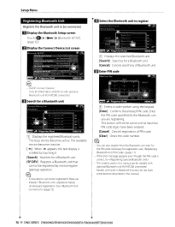
... service becomes inactive. [ ... ] When ... Setup Menu Registering Bluetooth Unit Registers the Bluetooth unit to register lIJ Displays the searched Bluetooth unit. [Search] Searches for a Bluetooth unit. [Cancel] Cancels searching of PIN code. [Clear] Clears the code number. Enter the PIN code specified for models with optional Bluetooth unit KCA-BT200 connected. appears, the text display is correct, try . • The screens used in this manual are for the Bluetooth unit you are already 5 Bluetooth units registered. This button will not be active...
... service becomes inactive. [ ... ] When ... Setup Menu Registering Bluetooth Unit Registers the Bluetooth unit to register lIJ Displays the searched Bluetooth unit. [Search] Searches for a Bluetooth unit. [Cancel] Cancels searching of PIN code. [Clear] Clears the code number. Enter the PIN code specified for models with optional Bluetooth unit KCA-BT200 connected. appears, the text display is correct, try . • The screens used in this manual are for the Bluetooth unit you are already 5 Bluetooth units registered. This button will not be active...
Instruction Manual
Page 71
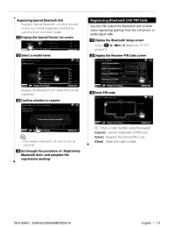
.... D Display the Special Device List screen SPf}FV Y Oo-'.I Select a model name Registering Bluetooth Unit PIN Code Sets the PIN code of PIN code. [Enter] Registers the entered PIN code. [Clear] Clears the code number. I , ! D Go through the procedure of and complete the registration (pairing) II] Enters a code number using the keypad. [Cancel] Cancels registration of the Bluetooth unit to register D Enter PIN code ~ ~ • Only models in error by normal registration method, by selecting from the cell-phone or audio player...
.... D Display the Special Device List screen SPf}FV Y Oo-'.I Select a model name Registering Bluetooth Unit PIN Code Sets the PIN code of PIN code. [Enter] Registers the entered PIN code. [Clear] Clears the code number. I , ! D Go through the procedure of and complete the registration (pairing) II] Enters a code number using the keypad. [Cancel] Cancels registration of the Bluetooth unit to register D Enter PIN code ~ ~ • Only models in error by normal registration method, by selecting from the cell-phone or audio player...

Instruction Manual
Page 72
... service to use [TEL (HFP)] Connects/disconnects cell-phone to use for DNX5160 and DDX516 with optional Bluetooth unit KCA-BT200 connected. 72 DNX SERIES DNX6960/DNX6160/DNX6020EX/DNX6460BT/DNXS160 To cancel clearing, touch [No]. ~ • [Audio (A2DP)] Only for Bluetooth Audio. [Remove] Deletes registration (pairing). D Display the Bluetooth Setup screen Touch [GI Bluetooth SETUP]. (page 62) D Display the Connect Device List screen Bluetooth Hands-Free/Audio Output Setup Selects speakers to use for DNX5160 and DDX516 with optional Bluetooth unit KCA-BT200 connected. Setup Menu...
... service to use [TEL (HFP)] Connects/disconnects cell-phone to use for DNX5160 and DDX516 with optional Bluetooth unit KCA-BT200 connected. 72 DNX SERIES DNX6960/DNX6160/DNX6020EX/DNX6460BT/DNXS160 To cancel clearing, touch [No]. ~ • [Audio (A2DP)] Only for Bluetooth Audio. [Remove] Deletes registration (pairing). D Display the Bluetooth Setup screen Touch [GI Bluetooth SETUP]. (page 62) D Display the Connect Device List screen Bluetooth Hands-Free/Audio Output Setup Selects speakers to use for DNX5160 and DDX516 with optional Bluetooth unit KCA-BT200 connected. Setup Menu...

Instruction Manual
Page 75
... get the best sound effects. I I Select a speaker you selected the speaker type. D Set the crossover [Phase] Sets the phase of the sub woofer. D Select a speaker type You can select a speaker type and its size to "ON" in Speaker Setup) DDX SERIES DDX616/DDX6046BT/DDX516 English 7S Ridgeview Roa?_~ x-" ...t 4',~ 99999.99. Sets the subwoofer phase. (Only when "Subwoofer" is set to "ON" in STANDBY source mode. D Display the Speaker Select screen Touch [8 Audio SETUP] > [Speaker Select]. (page 62) I I Display the Crossover setup screen -~ ~ ,..
... get the best sound effects. I I Select a speaker you selected the speaker type. D Set the crossover [Phase] Sets the phase of the sub woofer. D Select a speaker type You can select a speaker type and its size to "ON" in Speaker Setup) DDX SERIES DDX616/DDX6046BT/DDX516 English 7S Ridgeview Roa?_~ x-" ...t 4',~ 99999.99. Sets the subwoofer phase. (Only when "Subwoofer" is set to "ON" in STANDBY source mode. D Display the Speaker Select screen Touch [8 Audio SETUP] > [Speaker Select]. (page 62) I I Display the Crossover setup screen -~ ~ ,..
Instruction Manual
Page 93
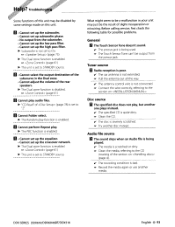
...; Cannot adjust the volume of the rear speakers. • The Dual zone function is disabled. ~ (page 61) o Cannot play . • The PBC function is enabled. ow Connect the wire correctly, referring to STANDBY source. ow Clean the media, referring to "2". ow Record the media again or use another one plays instead. o Cannot folder select. • The Random play , but another media. Before calling service, first...
...; Cannot adjust the volume of the rear speakers. • The Dual zone function is disabled. ~ (page 61) o Cannot play . • The PBC function is enabled. ow Connect the wire correctly, referring to STANDBY source. ow Clean the media, referring to "2". ow Record the media again or use another one plays instead. o Cannot folder select. • The Random play , but another media. Before calling service, first...
Instruction Manual
Page 102
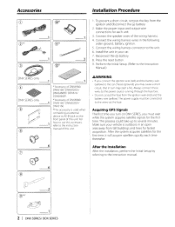
..., remove the key from the ignition and disconnect the 8 battery. 2. Make the proper input and output wire connections for fastest acquisition. The power supply must wait while the system acquires satellite signals for the first time, it will acquire satellites quickly each unit 3. Connect the wiring harness connector to t e wires via the fuse. Perform the Initial Setup. (Refer to the power source running through the fuse box. Always connect those wires to the Instruction Manual.) DNX...
..., remove the key from the ignition and disconnect the 8 battery. 2. Make the proper input and output wire connections for fastest acquisition. The power supply must wait while the system acquires satellite signals for the first time, it will acquire satellites quickly each unit 3. Connect the wiring harness connector to t e wires via the fuse. Perform the Initial Setup. (Refer to the power source running through the fuse box. Always connect those wires to the Instruction Manual.) DNX...

Instruction Manual
Page 103
... have been activated. Do not mount the unit in the console of your vehicle. If you connect the c:B connector of the left speaker to a front output terminal, do not remove the caps on the panel surface when installing the unit to a power source with battery wires, the battery may drop if there are metal objects near the Bluetooth antenna. (DNX6960/ DNX6160/ DNX6020EX/ DNX6460BT/ DDX616/ DDX6046BT only) Bluetooth antenna unit & CAUTION Install this unit in...
... have been activated. Do not mount the unit in the console of your vehicle. If you connect the c:B connector of the left speaker to a front output terminal, do not remove the caps on the panel surface when installing the unit to a power source with battery wires, the battery may drop if there are metal objects near the Bluetooth antenna. (DNX6960/ DNX6160/ DNX6020EX/ DNX6460BT/ DDX616/ DDX6046BT only) Bluetooth antenna unit & CAUTION Install this unit in...
Instruction Manual
Page 104
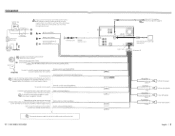
...Battery wire (Yellow) e Ground wire (Black) (To car chassis) @@ @}O a © ©© ( a = !~ ="c==:D=======i~;-:--=O--@rc~;;;~;;4 Antenna Cord FM/AM antenna input O@ GPS Antenna (Accessory @) (see page 8) A rh....L;Ac.:.:C:..;:C_ B connect those wires to ~ an exclusive remote adapter (not supplied) matches your navigation manual. : Mute control wire (Brown) Depending on . : Dimmer control wire (OrangelWhite) To car light control switch Connect to the terminal that in use the steering wheel remote control feature, you may cause a short circuit, that is not in turn...
...Battery wire (Yellow) e Ground wire (Black) (To car chassis) @@ @}O a © ©© ( a = !~ ="c==:D=======i~;-:--=O--@rc~;;;~;;4 Antenna Cord FM/AM antenna input O@ GPS Antenna (Accessory @) (see page 8) A rh....L;Ac.:.:C:..;:C_ B connect those wires to ~ an exclusive remote adapter (not supplied) matches your navigation manual. : Mute control wire (Brown) Depending on . : Dimmer control wire (OrangelWhite) To car light control switch Connect to the terminal that in use the steering wheel remote control feature, you may cause a short circuit, that is not in turn...


