User Manual
Page 2
... COMPONENTS 32 Using external audio/video players-AV-IN ........32 Using a rear view camera 33 BLUETOOTH (Only for DDX672BH/DDX492/ DDX415BT/DDX392/DDX372BT/DDX320BT).... 34 SETTINGS 42 Sound adjustment 42 Adjustment for video playback 43 Changing display design 45 Customizing the screen 46 Customizing the system settings 46 Setting menu items 48 REMOTE CONTROLLER 51 CONNECTION/INSTALLATION 53 REFERENCES 58 Maintenance 58 More information 58 Error message list 61 Troubleshooting 63 Specifications 65 BEFORE USE IMPORTANT To...
... COMPONENTS 32 Using external audio/video players-AV-IN ........32 Using a rear view camera 33 BLUETOOTH (Only for DDX672BH/DDX492/ DDX415BT/DDX392/DDX372BT/DDX320BT).... 34 SETTINGS 42 Sound adjustment 42 Adjustment for video playback 43 Changing display design 45 Customizing the screen 46 Customizing the system settings 46 Setting menu items 48 REMOTE CONTROLLER 51 CONNECTION/INSTALLATION 53 REFERENCES 58 Maintenance 58 More information 58 Error message list 61 Troubleshooting 63 Specifications 65 BEFORE USE IMPORTANT To...

User Manual
Page 3
... with the instructions. The user could lose the authority to direct sunlight. • Do not operate the touch panel using an antenna of a type and maximum (or lesser) gain approved for the transmitter by blocking outside sounds, and may cause hearing loss. • Stop the car before the certification/registration number only signifies that the Industry Canada technical specification were met...
... with the instructions. The user could lose the authority to direct sunlight. • Do not operate the touch panel using an antenna of a type and maximum (or lesser) gain approved for the transmitter by blocking outside sounds, and may cause hearing loss. • Stop the car before the certification/registration number only signifies that the Industry Canada technical specification were met...
User Manual
Page 4
...]). * Adjust the panel angle. (Page 8) Select an external (Page 49) component connected to the iPod/Audio Video input terminal to play. Select the color of the (Page 45) buttons on -screen information. • Set to display the operation buttons and menu items in . 4 INITIAL SETTINGS Initial setup When you power on the unit for the first time or reset the unit, the initial setting screen appears. • You can set a security code to change the settings on the menu screen. 3 Display the screen. On the source control screen: 2 Display...
...]). * Adjust the panel angle. (Page 8) Select an external (Page 49) component connected to the iPod/Audio Video input terminal to play. Select the color of the (Page 45) buttons on -screen information. • Set to display the operation buttons and menu items in . 4 INITIAL SETTINGS Initial setup When you power on the unit for the first time or reset the unit, the initial setting screen appears. • You can set a security code to change the settings on the menu screen. 3 Display the screen. On the source control screen: 2 Display...

User Manual
Page 5
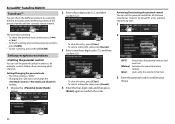
... source control screen: 2 Display the screen. 3 Display the screen. FM RBDS. Enter the correct security code, then press [Enter]. ❏ Activating the security function You can activate the security function to enter the security code. Sets the clock manually. (See below.) When selecting : Adjust the hour (1), then adjust the minute (2). • Press [Reset] to set the minute to "00". 5 Finish the procedure. • Press [ ] repeatedly to change the page on the monitor panel flashes...
... source control screen: 2 Display the screen. 3 Display the screen. FM RBDS. Enter the correct security code, then press [Enter]. ❏ Activating the security function You can activate the security function to enter the security code. Sets the clock manually. (See below.) When selecting : Adjust the hour (1), then adjust the minute (2). • Press [Reset] to set the minute to "00". 5 Finish the procedure. • Press [ ] repeatedly to change the page on the monitor panel flashes...

User Manual
Page 6
... panel. * You can change the color of the buttons on the monitor panel. (Page 45) DDX492/DDX392/DDX372BT/DDX320BT/DDX272 DDX492/DDX392/ DDX372BT/ DDX320BT DDX272 DDX415BT/DDX315 DDX415BT DDX315 1 Reset button/Power indicator/Security indicator • Resets the unit. (Page 3) • Lights up while the unit is turned on. • Flashes when the security function is activated. (Page 5) 4 Volume K/J button Adjusts the audio volume. (Page 7) 5 AV/R-CAM button • Displays the current source screen. (Press) • The function...
... panel. * You can change the color of the buttons on the monitor panel. (Page 45) DDX492/DDX392/DDX372BT/DDX320BT/DDX272 DDX492/DDX392/ DDX372BT/ DDX320BT DDX272 DDX415BT/DDX315 DDX415BT DDX315 1 Reset button/Power indicator/Security indicator • Resets the unit. (Page 3) • Lights up while the unit is turned on. • Flashes when the security function is activated. (Page 5) 4 Volume K/J button Adjusts the audio volume. (Page 7) 5 AV/R-CAM button • Displays the current source screen. (Press) • The function...

User Manual
Page 10
...; Using short-cut buttons While displaying the source control screen or the screen, you can use the short-cut buttons: Press [ ]. 10 BASICS Selecting the playback source On the screen: [DISC] [HD Radio]*1 [TUNER]*2 [iPod] [USB] [SiriusXM]*3 [PANDORA]*3 [Bluetooth]*4 [APPs]*5 Plays a disc. (Page 11) Switches to the HD Radio broadcast. (Page 24) Switches to the conventional radio broadcast. (Page 22) Plays an iPod/iPhone. (Page 16) Plays files on a USB device. (Page 15) Switches to the SiriusXM® Satellite Radio broadcast. (Page 27) Switches...
...; Using short-cut buttons While displaying the source control screen or the screen, you can use the short-cut buttons: Press [ ]. 10 BASICS Selecting the playback source On the screen: [DISC] [HD Radio]*1 [TUNER]*2 [iPod] [USB] [SiriusXM]*3 [PANDORA]*3 [Bluetooth]*4 [APPs]*5 Plays a disc. (Page 11) Switches to the HD Radio broadcast. (Page 24) Switches to the conventional radio broadcast. (Page 22) Plays an iPod/iPhone. (Page 16) Plays files on a USB device. (Page 15) Switches to the SiriusXM® Satellite Radio broadcast. (Page 27) Switches...
User Manual
Page 19
... change settings for video playback, see page 43. ❏ Playback operations 1 Start the App on the touch panel. • For some functions of the connected iPod touch/ iPhone on the touch panel, such as the source. Pauses playback. Displays the screen. • You can operate some applications such as navigation applications, the operation buttons and information are not shown. Preparation 1 Connect iPod touch/iPhone using iPod/iPhone itself instead of the unit. Selects an audio/video...
... change settings for video playback, see page 43. ❏ Playback operations 1 Start the App on the touch panel. • For some functions of the connected iPod touch/ iPhone on the touch panel, such as the source. Pauses playback. Displays the screen. • You can operate some applications such as navigation applications, the operation buttons and information are not shown. Preparation 1 Connect iPod touch/iPhone using iPod/iPhone itself instead of the unit. Selects an audio/video...

User Manual
Page 20
..." source control screen is displayed. Press [OK] to the USB terminal using Pandora on the screen. (Page 36) "Connected" appears. For iPod touch/iPhone 1 Connect the iPod touch/iPhone to confirm the operation. Pandora® (Only for using KCA-iP202, KCA-iP102 or KCA-iP103 (optional accessory). (Page 56) 2 Start the Pandora application on the connected iPod touch/iPhone. For Android/BlackBerry 1 Pair the Android/BlackBerry device through Bluetooth. (Page 34) 2 Select...
..." source control screen is displayed. Press [OK] to the USB terminal using Pandora on the screen. (Page 36) "Connected" appears. For iPod touch/iPhone 1 Connect the iPod touch/iPhone to confirm the operation. Pandora® (Only for using KCA-iP202, KCA-iP102 or KCA-iP103 (optional accessory). (Page 56) 2 Start the Pandora application on the connected iPod touch/iPhone. For Android/BlackBerry 1 Pair the Android/BlackBerry device through Bluetooth. (Page 34) 2 Select...
User Manual
Page 30
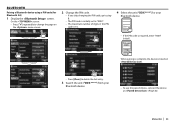
... children from receiving adult channels. Activating/Deactivating the parental control You can check the buffered contents by user. 1 The unit starts scanning. • To select the previous/next content, press [S] or [T]. • To finish scanning and continue playing contents, press [SCAN]. • To exit scanning, press and hold [SCAN]. SiriusXM® Satellite RADIO TuneScan™ You can set the parental control in...
... children from receiving adult channels. Activating/Deactivating the parental control You can check the buffered contents by user. 1 The unit starts scanning. • To select the previous/next content, press [S] or [T]. • To finish scanning and continue playing contents, press [SCAN]. • To exit scanning, press and hold [SCAN]. SiriusXM® Satellite RADIO TuneScan™ You can set the parental control in...
User Manual
Page 32
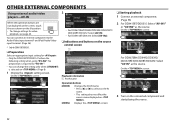
... source control screen 1 Playback information 1 AV-IN name Operation buttons [MODE] Changes the AV-IN name. • Press [H] or [I] to the Audio Video input terminal* and iPod/Audio Video input terminal. (Page 56) * Only for DDX415BT/DDX315. ❏ Preparation Select an appropriate input setting for . • Only for video playback, see page 43. You can change settings for DDX415BT/DDX315: Perform the following setting when using "AV-IN2". On the screen: 3 Turn on . [MENU] Displays the screen...
... source control screen 1 Playback information 1 AV-IN name Operation buttons [MODE] Changes the AV-IN name. • Press [H] or [I] to the Audio Video input terminal* and iPod/Audio Video input terminal. (Page 56) * Only for DDX415BT/DDX315. ❏ Preparation Select an appropriate input setting for . • Only for video playback, see page 43. You can change settings for DDX415BT/DDX315: Perform the following setting when using "AV-IN2". On the screen: 3 Turn on . [MENU] Displays the screen...
User Manual
Page 35
...; The maximum number of digits in the PIN code is 16. 4 Select the unit ("DDX ****") for Bluetooth 2.0) 1 Display the screen. On the screen: • Press [ ] repeatedly to change the page on the menu screen. 2 Change the PIN code. • If you skip changing the PIN code, go to step 3. • The PIN code is initially set to delete the last entry. 3 Search the unit ("DDX ****") from your Bluetooth device. • To use the paired device, connect the device on...
...; The maximum number of digits in the PIN code is 16. 4 Select the unit ("DDX ****") for Bluetooth 2.0) 1 Display the screen. On the screen: • Press [ ] repeatedly to change the page on the menu screen. 2 Change the PIN code. • If you skip changing the PIN code, go to step 3. • The PIN code is initially set to delete the last entry. 3 Search the unit ("DDX ****") from your Bluetooth device. • To use the paired device, connect the device on...

User Manual
Page 39
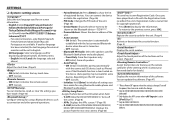
... entries). 1 Display the screen. (Page 37) 2 The PIN code (initial: 0000) necessary for copying the phonebook from the mobile phone and the number of copied phone book entries are displayed. 4 Operate the target mobile phone. • Refer to call lists. (Page 38) 3 Select a phone number. BLUETOOTH Voice dialing ❏ Presetting phone numbers 3 • Available only when the connected mobile phone You can copy the phone book memory of a mobile phone into the unit (up to 6 phone numbers.
... entries). 1 Display the screen. (Page 37) 2 The PIN code (initial: 0000) necessary for copying the phonebook from the mobile phone and the number of copied phone book entries are displayed. 4 Operate the target mobile phone. • Refer to call lists. (Page 38) 3 Select a phone number. BLUETOOTH Voice dialing ❏ Presetting phone numbers 3 • Available only when the connected mobile phone You can copy the phone book memory of a mobile phone into the unit (up to 6 phone numbers.
User Manual
Page 50
... security code for Bluetooth (both phone and audio player). - OFF: Cancels. • Bluetooth HF/Audio: Select the speakers used for the unit. (Page 4) Activate or deactivate the security function. (Page 5) *5 Displays the serial number. Once you have made for using Bluetooth mobile phone and Bluetooth audio player. All (Initial): From all settings you have played back a file with the connected iOS device (such as connection and other general operations. • Paired Device List: Press [Enter] to initialize all speakers. • Auto Pairing...
... security code for Bluetooth (both phone and audio player). - OFF: Cancels. • Bluetooth HF/Audio: Select the speakers used for the unit. (Page 4) Activate or deactivate the security function. (Page 5) *5 Displays the serial number. Once you have made for using Bluetooth mobile phone and Bluetooth audio player. All (Initial): From all settings you have played back a file with the connected iOS device (such as connection and other general operations. • Paired Device List: Press [Enter] to initialize all speakers. • Auto Pairing...
User Manual
Page 51
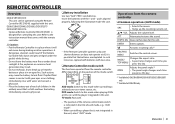
... this mode when playing DVDs or CDs etc. Insert the batteries with this mode when controlling a selected source or tuner source, etc. In such instances, replace both batteries with new ones. ❏ Remote Controller mode switch The functions operated from the remote controller ❏ Common operations (AUD mode) SRC • Selects the source. • Hangs up or heat the battery or place it is designed for DDX672BH only. ATT Attenuates/restores the sound. with the remote controller. ❏ Battery installation Use two...
... this mode when playing DVDs or CDs etc. Insert the batteries with this mode when controlling a selected source or tuner source, etc. In such instances, replace both batteries with new ones. ❏ Remote Controller mode switch The functions operated from the remote controller ❏ Common operations (AUD mode) SRC • Selects the source. • Hangs up or heat the battery or place it is designed for DDX672BH only. ATT Attenuates/restores the sound. with the remote controller. ❏ Battery installation Use two...
User Manual
Page 53
... fuse blows, first make sure the wires are being connected to the system, connect both connectors either to the front output terminals or to a power source that can be checked. • If your vehicle. For best safety, leave the mounting and wiring work if you connect the ignition wire to a rear output terminal. • After the unit is displayed), the speaker wire may have a short circuit or have been activated. Always connect...
... fuse blows, first make sure the wires are being connected to the system, connect both connectors either to the front output terminals or to a power source that can be checked. • If your vehicle. For best safety, leave the mounting and wiring work if you connect the ignition wire to a rear output terminal. • After the unit is displayed), the speaker wire may have a short circuit or have been activated. Always connect...
User Manual
Page 54
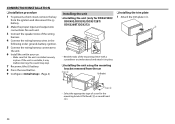
CONNECTION/INSTALLATION ❏ Installation procedure Installing the unit ❏ Installing the trim plate 1 To prevent a short circuit, remove the key ❏ Installing the unit (only for the mounting bracket: flat head (5) or round head (6). 54 DDX320BT/DDX272) 2 Make the proper input and output wire 2 connections for each unit. 3 Connect the speaker wires of the wiring harness. 4 Connect the wiring harness wires in the following order: ground, battery, ignition. 5 Connect the wiring harness connector to the unit. 6 Install the unit in your car. • Make sure that ...
CONNECTION/INSTALLATION ❏ Installation procedure Installing the unit ❏ Installing the trim plate 1 To prevent a short circuit, remove the key ❏ Installing the unit (only for the mounting bracket: flat head (5) or round head (6). 54 DDX320BT/DDX272) 2 Make the proper input and output wire 2 connections for each unit. 3 Connect the speaker wires of the wiring harness. 4 Connect the wiring harness wires in the following order: ground, battery, ignition. 5 Connect the wiring harness connector to the unit. 6 Install the unit in your car. • Make sure that ...
User Manual
Page 60
... (when the characters are 1 byte): - iPod classic - iPhone 5C* - iPhone 3G - In this unit, the iPod/iPhone is shown on the shape of the USB devices and connection ports, some operations may be displayed correctly. 60 Notes on using a USB device: • This unit may not play back files in a USB device properly when using a USB extension cable. • USB devices equipped with special functions such as data security functions cannot be loose. • This...
... (when the characters are 1 byte): - iPod classic - iPhone 5C* - iPhone 3G - In this unit, the iPod/iPhone is shown on the shape of the USB devices and connection ports, some operations may be displayed correctly. 60 Notes on using a USB device: • This unit may not play back files in a USB device properly when using a USB extension cable. • USB devices equipped with special functions such as data security functions cannot be loose. • This...
User Manual
Page 63
... again. While playing a track, sound is not supported by the parental controls. Enter the correct lock code. Check the following points before calling a service center. • For operations with the external components, refer also to the instructions supplied with the adapters used for recording. No picture appears on the external monitor. • Connect the video cord correctly. • Select the correct input on the external...
... again. While playing a track, sound is not supported by the parental controls. Enter the correct lock code. Check the following points before calling a service center. • For operations with the external components, refer also to the instructions supplied with the adapters used for recording. No picture appears on the external monitor. • Connect the video cord correctly. • Select the correct input on the external...
User Manual
Page 64
...) Phone sound quality is poor. • Reduce the distance between the unit and the Bluetooth audio player. • Disconnect the device connected for . (Page 17) ❏ Tuner AME automatic presetting does not work . • Check the connecting cable and its connection. • Update the firmware version. • Charge the battery. • Reset the iPod/iPhone. Other cables cannot be used . • Select [iPod] for . (Page 17) Videos cannot be heard. • The HD Radio reception mode is...
...) Phone sound quality is poor. • Reduce the distance between the unit and the Bluetooth audio player. • Disconnect the device connected for . (Page 17) ❏ Tuner AME automatic presetting does not work . • Check the connecting cable and its connection. • Update the firmware version. • Charge the battery. • Reset the iPod/iPhone. Other cables cannot be used . • Select [iPod] for . (Page 17) Videos cannot be heard. • The HD Radio reception mode is...
User Manual
Page 65
... unit does not pair with the Bluetooth device. • For devices compatible with Bluetooth 2.1: Register the device using a PIN code. (Page 35) • For devices compatible with Bluetooth 2.0: Enter the same PIN code for DDX672BH/ DDX492/DDX415BT/DDX392/ DDX372BT/DDX320BT) Technology Bluetooth 2.1 + EDR Frequency 2.402 GHz - 2.480 GHz Output Power +4 dBm (MAX), 0 dBm (AVE), Power Class 2 Maximum Communication Range Line of the device is not indicated in its instructions, try to copy the phone book...
... unit does not pair with the Bluetooth device. • For devices compatible with Bluetooth 2.1: Register the device using a PIN code. (Page 35) • For devices compatible with Bluetooth 2.0: Enter the same PIN code for DDX672BH/ DDX492/DDX415BT/DDX392/ DDX372BT/DDX320BT) Technology Bluetooth 2.1 + EDR Frequency 2.402 GHz - 2.480 GHz Output Power +4 dBm (MAX), 0 dBm (AVE), Power Class 2 Maximum Communication Range Line of the device is not indicated in its instructions, try to copy the phone book...


