Instruction Manual
Page 2
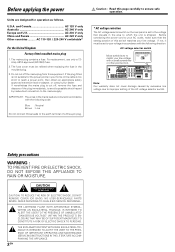
... selector switch on the rear panel is set to your voltage in accordance with a small screwdriver or other pointed tool. NO USER-SERVICEABLE PARTS INSIDE. REFER SERVICING TO QUALIFIED SERVICE PERSONNEL. The fuse cover must be refitted when replacing the fuse in the area to which the unit is too short to improper setting of a three-pin plug. The mains plug contains a fuse. Before connecting the power cord to...
... selector switch on the rear panel is set to your voltage in accordance with a small screwdriver or other pointed tool. NO USER-SERVICEABLE PARTS INSIDE. REFER SERVICING TO QUALIFIED SERVICE PERSONNEL. The fuse cover must be refitted when replacing the fuse in the area to which the unit is too short to improper setting of a three-pin plug. The mains plug contains a fuse. Before connecting the power cord to...

Instruction Manual
Page 3
...the power 2 Safety precautions 2 Unpacking 3 How to use is damaged or fails to the AV AUX jacks 20 Connecting the antennas 20 Connecting the system control 21 Preparing the remote control 22 RF remote control function (For VR-6070 only) .... 22 Preparing for surround sound 23 Speaker settings 23 Operations Normal playback 26 Preparing for future reference. 3 EN only 8 Setting up the system 9 Connecting audio components 10 Connecting video components 11 Digital connections 12 Connecting video components (COMPONENT VIDEO 13 Connecting a DVD player (6-channel input) ..... 14...
...the power 2 Safety precautions 2 Unpacking 3 How to use is damaged or fails to the AV AUX jacks 20 Connecting the antennas 20 Connecting the system control 21 Preparing the remote control 22 RF remote control function (For VR-6070 only) .... 22 Preparing for surround sound 23 Speaker settings 23 Operations Normal playback 26 Preparing for future reference. 3 EN only 8 Setting up the system 9 Connecting audio components 10 Connecting video components 11 Digital connections 12 Connecting video components (COMPONENT VIDEO 13 Connecting a DVD player (6-channel input) ..... 14...

Instruction Manual
Page 4
... setting. • Bass peak level. • Input mode setting. • Midnight mode setting. • PRO LOGIC II mode setting. • CS II mode setting. • Broadcast band. • Frequency setting. • Preset stations. • Tuning mode. • THX mode. • ACTIVE EQ mode. • SPEAKER EQ mode. • DSP mode. 4 EN For the U.S.A. The user could cause a malfunction. For the U.S.A. FCC Compliance Notice Audio-video Receiver, VR-6070 These devices comply with a soft, dry cloth. Operation is not installed and used in...
... setting. • Bass peak level. • Input mode setting. • Midnight mode setting. • PRO LOGIC II mode setting. • CS II mode setting. • Broadcast band. • Frequency setting. • Preset stations. • Tuning mode. • THX mode. • ACTIVE EQ mode. • SPEAKER EQ mode. • DSP mode. 4 EN For the U.S.A. The user could cause a malfunction. For the U.S.A. FCC Compliance Notice Audio-video Receiver, VR-6070 These devices comply with a soft, dry cloth. Operation is not installed and used in...

Instruction Manual
Page 5
... features True home theater sound This receiver incorporates a wide variety of surround modes to Dolby digital sound/DTS multi-channel sound with your multi-speakers. You can operate the receiver by specifying the type of program you maximum enjoyment from a stereo source or conventional surround-encoded video source. only) Tune the stations by sending RF remote signal from music CD. Remote control Some of the remote controls have connected. DTS-ES will be achieved with almost any condition. It is turned on its...
... features True home theater sound This receiver incorporates a wide variety of surround modes to Dolby digital sound/DTS multi-channel sound with your multi-speakers. You can operate the receiver by specifying the type of program you maximum enjoyment from a stereo source or conventional surround-encoded video source. only) Tune the stations by sending RF remote signal from music CD. Remote control Some of the remote controls have connected. DTS-ES will be achieved with almost any condition. It is turned on its...

Instruction Manual
Page 6
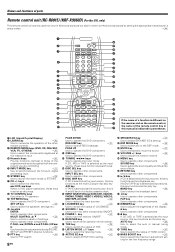
...Frequency display Input display Preset channel display Surround mode display AUTO indicator MEMORY indicator STEREO indicator TUNED indicator POWER STANDBY ON/STANDBY (For VR-6070) STANDBY ON/STANDBY A SPEAKERS B THX SPEAKER EQ ACTIVE EQ DOLBY DIGITAL DTS CS II THX SPEAKER EQ ACTIVE EQ DSP STEREO INPUT MODE DIMMER POWER -ON -OFF PHONES DVD/6CH CD/DVD PHONO TUNER VIDEO 1 VIDEO 2 VIDEO 3 MD/TAPE SOUND TONE SETUP BAND AUTO MEMORY VOLUME CONTROL MULTI CONTROL LISTEN MODE DOWN UP MUTE AV AUX S VIDEO VIDEO L-AUDIO-R 1 POWER ON/OFF key (For KRF-X9060D) £ Use to turn...
...Frequency display Input display Preset channel display Surround mode display AUTO indicator MEMORY indicator STEREO indicator TUNED indicator POWER STANDBY ON/STANDBY (For VR-6070) STANDBY ON/STANDBY A SPEAKERS B THX SPEAKER EQ ACTIVE EQ DOLBY DIGITAL DTS CS II THX SPEAKER EQ ACTIVE EQ DSP STEREO INPUT MODE DIMMER POWER -ON -OFF PHONES DVD/6CH CD/DVD PHONO TUNER VIDEO 1 VIDEO 2 VIDEO 3 MD/TAPE SOUND TONE SETUP BAND AUTO MEMORY VOLUME CONTROL MULTI CONTROL LISTEN MODE DOWN UP MUTE AV AUX S VIDEO VIDEO L-AUDIO-R 1 POWER ON/OFF key (For KRF-X9060D) £ Use to turn...

Instruction Manual
Page 7
...to adjust the receiver volume. • MENU key § Use to memorize the operation of the other components. º 3/8 key If CD is selected as the input source, this key functions as the multi-CD player disc skip key. e 1 2 3 4 5 6 7 8 9 0 SOURCE POWER LEARN DVD CBL DSS/SAT REMOTE MODE VCR TV OTHERS RECEIVER THX 1 2 3 LISTEN MODE 4 5 6 ACTIVE EQ 7 8 9 SPEAKER EQ +10 0 +100 INPUT MODE STEREO DSP MODE MUTE ¢+ DVD 4- ting for selection adjustments during SOUND, SET UP and PRESET channel functions. ! Names and functions of parts Remote control...
...to adjust the receiver volume. • MENU key § Use to memorize the operation of the other components. º 3/8 key If CD is selected as the input source, this key functions as the multi-CD player disc skip key. e 1 2 3 4 5 6 7 8 9 0 SOURCE POWER LEARN DVD CBL DSS/SAT REMOTE MODE VCR TV OTHERS RECEIVER THX 1 2 3 LISTEN MODE 4 5 6 ACTIVE EQ 7 8 9 SPEAKER EQ +10 0 +100 INPUT MODE STEREO DSP MODE MUTE ¢+ DVD 4- ting for selection adjustments during SOUND, SET UP and PRESET channel functions. ! Names and functions of parts Remote control...
Instruction Manual
Page 8
... tuner mode. keys § Use to adjust the receiver volume. • MENU key Use to STEREO. 7 CH +/- PAGE UP Use to operate the DVD component. @ OSD key Use to operate the DVD component. # TUNING 1/¡ keys Use to operate the DVD component. PTY key ¤ Use for selection adjustments during SOUND, SET UP and PRESET channel functions. ! Names and functions of TONE control. fi BASS BOOST key ¶ Use to select the maximum adjustment set- BAND key º Use to select the broadcast band. ⁄ 2 key Use to switch the status of parts Remote...
... tuner mode. keys § Use to adjust the receiver volume. • MENU key Use to STEREO. 7 CH +/- PAGE UP Use to operate the DVD component. @ OSD key Use to operate the DVD component. # TUNING 1/¡ keys Use to operate the DVD component. PTY key ¤ Use for selection adjustments during SOUND, SET UP and PRESET channel functions. ! Names and functions of TONE control. fi BASS BOOST key ¶ Use to select the maximum adjustment set- BAND key º Use to select the broadcast band. ⁄ 2 key Use to switch the status of parts Remote...
Instruction Manual
Page 9
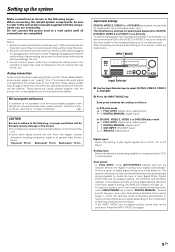
... type of input signal (Dolby Digital, PCM, DTS) and the speaker setting. Be sure to remove the power cord from a cassette deck, VCR, or record player. Analog connections Audio connections are imperfect, sound may not be sure to refer to the instruction manuals supplied with the source unit, or are completed. i CAUTION Be sure to adhere to the following pages. To use the INPUT MODE key to select "DIGITAL MANUAL" (manual sound). The receiver will light up. Priority...
... type of input signal (Dolby Digital, PCM, DTS) and the speaker setting. Be sure to remove the power cord from a cassette deck, VCR, or record player. Analog connections Audio connections are imperfect, sound may not be sure to refer to the instruction manuals supplied with the source unit, or are completed. i CAUTION Be sure to adhere to the following pages. To use the INPUT MODE key to select "DIGITAL MANUAL" (manual sound). The receiver will light up. Priority...

Instruction Manual
Page 12
...Connecting video components".) ! DOLBY DIGITAL RF OUT (AUDIO) PCM OUT LD player To connect an LD player with DTS, Dolby Digital, or PCM COAXIAL DIGITAL OUT Connect the video signal and analog audio signals to the DIGITAL IN jacks of outputting DTS, Dolby Digital, or standard PCM (CD) format digital signals. If you have connected any digital components to the receiver, be sure to read the "Input mode settings" section carefully. 9 COAXIAL VIDEO 2 OPTICAL OPTICAL OPTICAL CD/DVD VIDEO 3 MONITOR DVD/ 6CH DIGITAL IN DIGITAL OUT OPTICAL DIGITAL IN (AUDIO) Optical fiber cable MD player...
...Connecting video components".) ! DOLBY DIGITAL RF OUT (AUDIO) PCM OUT LD player To connect an LD player with DTS, Dolby Digital, or PCM COAXIAL DIGITAL OUT Connect the video signal and analog audio signals to the DIGITAL IN jacks of outputting DTS, Dolby Digital, or standard PCM (CD) format digital signals. If you have connected any digital components to the receiver, be sure to read the "Input mode settings" section carefully. 9 COAXIAL VIDEO 2 OPTICAL OPTICAL OPTICAL CD/DVD VIDEO 3 MONITOR DVD/ 6CH DIGITAL IN DIGITAL OUT OPTICAL DIGITAL IN (AUDIO) Optical fiber cable MD player...

Instruction Manual
Page 22
... receiver. 2 Change the receiver's RF reception frequency. • Press and hold the SETUP key on the front panel of your remote control. Notes 1. Remote control operation When the STANDBY indicator is lit, the power turns ON when you want to the IR remote function. The VR-6070 can receive the remote control commands even when they are conducted in direct light from the remote control, the control distance of the system installation to use during operation checks. 2. When the remote-controllable...
... receiver. 2 Change the receiver's RF reception frequency. • Press and hold the SETUP key on the front panel of your remote control. Notes 1. Remote control operation When the STANDBY indicator is lit, the power turns ON when you want to the IR remote function. The VR-6070 can receive the remote control commands even when they are conducted in direct light from the remote control, the control distance of the system installation to use during operation checks. 2. When the remote-controllable...

Instruction Manual
Page 23
... "FRNT LARGE" selection, no sound. However, if you select "SW RE-MIX ON" when subwoofer is connected to the receiver. 3 CNTR OFF : Center speaker setting mode to step 6. SP MUTE OPTICAL 6CH INPUT AUTO DETECT CINEMA EQ. POWER ON/STANDBY (VR-6070) ON/STANDBY (KRF-X9060D) SETUP MULTI CONTROL POWER ON/OFF (KRF-X9060D) SET UP POWER Joystick (MULTI CONTROL 5 / ∞, DOWN 2 / UP3) 1 Turn on the power to complete the speaker settings (subwoofer, front, center, and surround speakers) as described below. Use M/? Preparing for surround sound Speaker settings To enable...
... "FRNT LARGE" selection, no sound. However, if you select "SW RE-MIX ON" when subwoofer is connected to the receiver. 3 CNTR OFF : Center speaker setting mode to step 6. SP MUTE OPTICAL 6CH INPUT AUTO DETECT CINEMA EQ. POWER ON/STANDBY (VR-6070) ON/STANDBY (KRF-X9060D) SETUP MULTI CONTROL POWER ON/OFF (KRF-X9060D) SET UP POWER Joystick (MULTI CONTROL 5 / ∞, DOWN 2 / UP3) 1 Turn on the power to complete the speaker settings (subwoofer, front, center, and surround speakers) as described below. Use M/? Preparing for surround sound Speaker settings To enable...

Instruction Manual
Page 24
... left speaker for the selected channels of AUTO/MANUAL TEST TONE is selected, the procedure skips to step #. 9 Press the M key or Joystick (3) again to accept the setting. • The surround speaker setting indication "SB" appears. 0 Use the MULTI CONTROL knob or Joystick (5/∞) to select appropriate surround back speaker setting. SP MUTE OPTICAL 6CH INPUT AUTO DETECT CINEMA EQ. If you change the volume level settings for surround sound 8 Use the MULTI CONTROL knob or Joystick (5/∞) to select the appropriate surround speaker setting. DOLBY DIGITAL STEREO NEO...
... left speaker for the selected channels of AUTO/MANUAL TEST TONE is selected, the procedure skips to step #. 9 Press the M key or Joystick (3) again to accept the setting. • The surround speaker setting indication "SB" appears. 0 Use the MULTI CONTROL knob or Joystick (5/∞) to select appropriate surround back speaker setting. SP MUTE OPTICAL 6CH INPUT AUTO DETECT CINEMA EQ. If you change the volume level settings for surround sound 8 Use the MULTI CONTROL knob or Joystick (5/∞) to select the appropriate surround speaker setting. DOLBY DIGITAL STEREO NEO...
Instruction Manual
Page 26
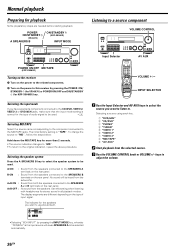
... for stereo sound in all playback modes. POWER ON/STANDBY (VR-6070) A SPEAKERS B ON/STANDBY (KRF-X9060D) INPUT MODE Listening to a source component VOLUME CONTROL Input Selector AV AUX POWER ON/OFF MD/TAPE (KRF-X9060D) Turning on the receiver 1 Turn on the power to the related components. 2 Turn on the type of audio signal to use should be heard from the speakers connected to adjust the volume. 26 EN A ON : Sound from the subwoofer. VOLUME / INPUT SELECTOR 1 Use the Input Selector and AV AUX keys to select the source you have selected a component connected...
... for stereo sound in all playback modes. POWER ON/STANDBY (VR-6070) A SPEAKERS B ON/STANDBY (KRF-X9060D) INPUT MODE Listening to a source component VOLUME CONTROL Input Selector AV AUX POWER ON/OFF MD/TAPE (KRF-X9060D) Turning on the receiver 1 Turn on the power to the related components. 2 Turn on the type of audio signal to use should be heard from the speakers connected to adjust the volume. 26 EN A ON : Sound from the subwoofer. VOLUME / INPUT SELECTOR 1 Use the Input Selector and AV AUX keys to select the source you have selected a component connected...
Instruction Manual
Page 27
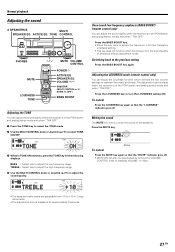
... LOUDNESS TONE MUTE VOLUME CONTROL POWER ACTIVE EQ SPEAKER EQ VOLUME / Joystick (MULTI CONTROL 5 / ∞, DOWN 2 / UP3) BASS BOOST Adjusting the TONE You can adjust the sound quality when the receiver is in the PCM stereo and analog stereo mode and when "THX OFF". 1 Press the TONE key to select the TONE mode. 2 Use the MULTI CONTROL knob or Joystick (5/∞) to maintain the music's richness. Adjusting the LOUDNESS mode (remote control only) You can adjust the Loudness function which controls the low volume settings to select TONE...
... LOUDNESS TONE MUTE VOLUME CONTROL POWER ACTIVE EQ SPEAKER EQ VOLUME / Joystick (MULTI CONTROL 5 / ∞, DOWN 2 / UP3) BASS BOOST Adjusting the TONE You can adjust the sound quality when the receiver is in the PCM stereo and analog stereo mode and when "THX OFF". 1 Press the TONE key to select the TONE mode. 2 Use the MULTI CONTROL knob or Joystick (5/∞) to maintain the music's richness. Adjusting the LOUDNESS mode (remote control only) You can adjust the Loudness function which controls the low volume settings to select TONE...

Instruction Manual
Page 30
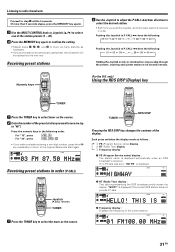
... text data is being received in stereo. SP MUTE OPTICAL 6CH INPUT AUTO DETECT CINEMA EQ. DOLBY DIGITAL STEREO NEO:6 THX L ACTIVE EQ. Before using the following operations to manually store AM stations and other stations. DTS. DTS. DTS. PS (Program Service Name) Display Automatically displays the station name transmitted by referring to the description in "Presetting RDS stations (RDS AUTO MEMORY)". ¤ Presetting radio stations manually The RDS auto memory function assigns preset numbers to RDS stations starting from the...
... text data is being received in stereo. SP MUTE OPTICAL 6CH INPUT AUTO DETECT CINEMA EQ. DOLBY DIGITAL STEREO NEO:6 THX L ACTIVE EQ. Before using the following operations to manually store AM stations and other stations. DTS. DTS. DTS. PS (Program Service Name) Display Automatically displays the station name transmitted by referring to the description in "Presetting RDS stations (RDS AUTO MEMORY)". ¤ Presetting radio stations manually The RDS auto memory function assigns preset numbers to RDS stations starting from the...
Instruction Manual
Page 31
... preset station is displayed. SP MUTE OPTICAL 6CH INPUT AUTO DETECT CINEMA EQ. DOLBY DIGITAL STEREO NEO:6 THX L ACTIVE EQ. Each press switches the display mode as the source. DOLBY DIGITAL STEREO NEO:6 THX L ACTIVE EQ. MATRIX C SW R A B CLIP COAXIAL ANALOG 96kHzfs DSP MODE DISCRETE PRO LOGIC LOUDNESS CSII Surround EX LFE SL S SB SR RDS RTY AUTO MEMO STEREO TUNED 31 EN Receiving preset stations 2 Use the Joystick to adjust the P.CALL 4/ ¢ direction to select the desired station...
... preset station is displayed. SP MUTE OPTICAL 6CH INPUT AUTO DETECT CINEMA EQ. DOLBY DIGITAL STEREO NEO:6 THX L ACTIVE EQ. Each press switches the display mode as the source. DOLBY DIGITAL STEREO NEO:6 THX L ACTIVE EQ. MATRIX C SW R A B CLIP COAXIAL ANALOG 96kHzfs DSP MODE DISCRETE PRO LOGIC LOUDNESS CSII Surround EX LFE SL S SB SR RDS RTY AUTO MEMO STEREO TUNED 31 EN Receiving preset stations 2 Use the Joystick to adjust the P.CALL 4/ ¢ direction to select the desired station...
Instruction Manual
Page 33
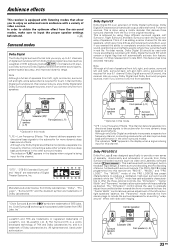
... done using a matrix decoder that allow optimization of sounds from Dolby Surround encoded sources (such as desired. The "MOVIE" mode of digital surround sound from the surround modes, make sure to provide a new sense of spatiality, directionality and articulation of the soundfields as video and Laserdisc software marked ). Note Although a full set of speakers. Although only Dolby Digital soundtracks incorporate a separate low frequency channel, connecting a subwoofer will also improve deep bass performance in this receiver...
... done using a matrix decoder that allow optimization of sounds from Dolby Surround encoded sources (such as desired. The "MOVIE" mode of digital surround sound from the surround modes, make sure to provide a new sense of spatiality, directionality and articulation of the soundfields as video and Laserdisc software marked ). Note Although a full set of speakers. Although only Dolby Digital soundtracks incorporate a separate low frequency channel, connecting a subwoofer will also improve deep bass performance in this receiver...

Instruction Manual
Page 36
... STEREO indicator lights up.) • Dolby Digital or DTS signal having more channels than the maximum number of playback channels available using the receiver's current settings is input, downmixing is played by selecting the analog input. 1 Start playing the video software. 2 Turn the LISTEN MODE knob or LISTEN MODE %/ fi keys to select the listening mode. THX DSP INPUT MODE Input Selector INPUT MODE LISTEN MODE THX LISTEN MODE %/ fi DSP MODE INPUT SELECTOR Preparations • Turn ON related components. • Complete "Preparing for surround sound" (speaker...
... STEREO indicator lights up.) • Dolby Digital or DTS signal having more channels than the maximum number of playback channels available using the receiver's current settings is input, downmixing is played by selecting the analog input. 1 Start playing the video software. 2 Turn the LISTEN MODE knob or LISTEN MODE %/ fi keys to select the listening mode. THX DSP INPUT MODE Input Selector INPUT MODE LISTEN MODE THX LISTEN MODE %/ fi DSP MODE INPUT SELECTOR Preparations • Turn ON related components. • Complete "Preparing for surround sound" (speaker...
Instruction Manual
Page 38
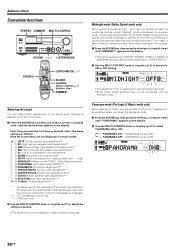
...input selection is changed. ** Pro Logic II Music mode only. *** CS II mode only. 2 Use the MULTI CONTROL knob or Joystick (5/∞) to raise the volume as loud as normal. SP MUTE OPTICAL 6CH INPUT AUTO DETECT CINEMA EQ. DTS. The value will be able to minimize the difference in certain modes. 1 CNTR (Center speaker level adjustment)* 2 SR (Right surround speaker level adjustment)* 3 SBR (Surround back right speaker level adjustment)* 4 SBL (Surround back left speaker level adjustment)* 5 SL (Left surround speaker level adjustment)* 6 SUBW (Subwoofer level adjustment)* 7 INPUT (Input...
...input selection is changed. ** Pro Logic II Music mode only. *** CS II mode only. 2 Use the MULTI CONTROL knob or Joystick (5/∞) to raise the volume as loud as normal. SP MUTE OPTICAL 6CH INPUT AUTO DETECT CINEMA EQ. DTS. The value will be able to minimize the difference in certain modes. 1 CNTR (Center speaker level adjustment)* 2 SR (Right surround speaker level adjustment)* 3 SBR (Surround back right speaker level adjustment)* 4 SBL (Surround back left speaker level adjustment)* 5 SL (Left surround speaker level adjustment)* 6 SUBW (Subwoofer level adjustment)* 7 INPUT (Input...
Instruction Manual
Page 48
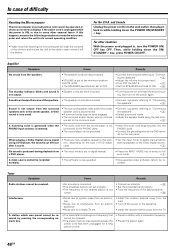
... playing a Dolby Digital source signal using a DVD player, the sound is cut off soon after it properly referring to "Connecting the speakers". % • Select a surround mode. • Adjust the speaker levels using the test tone. ¢ A humming noise is generated when the PHONO input selector is selected. • The audio cord from the record player is not connected to the PHONO jacks. • The record player is not tuned. • Connect an antenna. ) • Set the broadcast band properly. • Tune the frequency of...
... playing a Dolby Digital source signal using a DVD player, the sound is cut off soon after it properly referring to "Connecting the speakers". % • Select a surround mode. • Adjust the speaker levels using the test tone. ¢ A humming noise is generated when the PHONO input selector is selected. • The audio cord from the record player is not connected to the PHONO jacks. • The record player is not tuned. • Connect an antenna. ) • Set the broadcast band properly. • Tune the frequency of...


