Instruction Manual
Page 3
... features of your new Jensen VM9312 Mobile Multimedia Receiver for choosing a Jensen product. If you take a few minutes to follow. Preparation...1 Installation ...2 Controls and Indicators ...5 Controls and Indicators ...6 Remote Control ...7 Using the TFT Monitor ...10 Operating Instructions ...12 Setup Menu...13 Tuner Operation ...15 Satellite Radio Operation ...17 DVD/VCD Video Operation 19 DVD/CD Audio Operation...
... features of your new Jensen VM9312 Mobile Multimedia Receiver for choosing a Jensen product. If you take a few minutes to follow. Preparation...1 Installation ...2 Controls and Indicators ...5 Controls and Indicators ...6 Remote Control ...7 Using the TFT Monitor ...10 Operating Instructions ...12 Setup Menu...13 Tuner Operation ...15 Satellite Radio Operation ...17 DVD/VCD Video Operation 19 DVD/CD Audio Operation...
Instruction Manual
Page 5
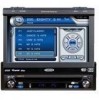
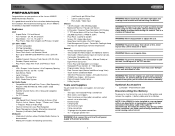
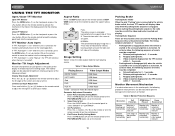
.../ Video Input Chassis • 1.0 DIN (Import / ISO-DIN Mountable) • Motorized Flip-Out / Flip-Up LCD Screen • 8 Character / Segment Type Secondary LCD Display • 7" TFT Active Matrix LCD w/ Anti-Glare Coating • 336,960 Sub Pixels (1440W X 234H) • Pixel Pitch - 0.321W X...navigation computer, do not push, pull or swivel the monitor manually. It's a good idea to install your Jensen VM9312 installed by a reputable installation shop. Never use extra caution during installation to 1500 MP3 and WMA Files onto a DVD+R / RW • Audible Forward / Reverse Track ...
.../ Video Input Chassis • 1.0 DIN (Import / ISO-DIN Mountable) • Motorized Flip-Out / Flip-Up LCD Screen • 8 Character / Segment Type Secondary LCD Display • 7" TFT Active Matrix LCD w/ Anti-Glare Coating • 336,960 Sub Pixels (1440W X 234H) • Pixel Pitch - 0.321W X...navigation computer, do not push, pull or swivel the monitor manually. It's a good idea to install your Jensen VM9312 installed by a reputable installation shop. Never use extra caution during installation to 1500 MP3 and WMA Files onto a DVD+R / RW • Audible Forward / Reverse Track ...
Instruction Manual
Page 6
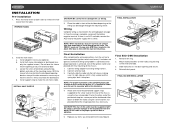
... position it to vibration. 5. The rear of the radio must be supported with final mounting of the CD/DVD player, the chassis must be sure to avoid damaging the radio. Reinstall dash panel. c. The VM9312 uses one end of the perforated support strap (supplied) to a secure part of horizontal. Connect wiring adapter to damage...
... position it to vibration. 5. The rear of the radio must be supported with final mounting of the CD/DVD player, the chassis must be sure to avoid damaging the radio. Reinstall dash panel. c. The VM9312 uses one end of the perforated support strap (supplied) to a secure part of horizontal. Connect wiring adapter to damage...
Instruction Manual
Page 9
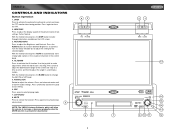
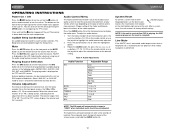
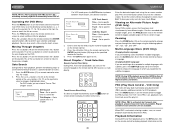
Use the joystick to change the AM, FM or SAT band. 5. Press and hold to adjust the display aspect of two settings: Full or Normal. MUTE Press to activate the Local (LOC) setting. 6. Press again to Contrast. Press the AUDIO button (5) to move the TFT monitor into .../DX NOTE: The VM9312 features Softmute, which will allow SRC the volume to automatically store strong radio stations in the six preset channels in a continuous motion. TILT/BAND Press to cycle through information available on the LCD screen. 3. With the monitor closed, press the DISP button to activate...
Use the joystick to change the AM, FM or SAT band. 5. Press and hold to adjust the display aspect of two settings: Full or Normal. MUTE Press to activate the Local (LOC) setting. 6. Press again to Contrast. Press the AUDIO button (5) to move the TFT monitor into .../DX NOTE: The VM9312 features Softmute, which will allow SRC the volume to automatically store strong radio stations in the six preset channels in a continuous motion. TILT/BAND Press to cycle through information available on the LCD screen. 3. With the monitor closed, press the DISP button to activate...
Instruction Manual
Page 14
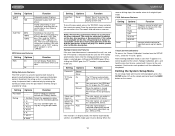
...using one step at a time. Table 2: Video Output Modes Playing Source Video Output Modes AM/FM TUNER RGB Mode SAT TUNER RGB Mode iPod RGB Mode DVD RGB Mode AUX IN CVBS Mode *CVBS - b. TFT Monitor... sequence of the display in the monitor path, the following methods: Step by Step Angle Adjustment Press the ( ) or ( ) button on the monitor VM9312 Parking Brake Parking Brake Inhibit When..., the radio must be on the control panel to 9. Monitor Tilt Angle Adjustment A known characteristic of LCD panels is the quality of events must be completed: a. Select...
...using one step at a time. Table 2: Video Output Modes Playing Source Video Output Modes AM/FM TUNER RGB Mode SAT TUNER RGB Mode iPod RGB Mode DVD RGB Mode AUX IN CVBS Mode *CVBS - b. TFT Monitor... sequence of the display in the monitor path, the following methods: Step by Step Angle Adjustment Press the ( ) or ( ) button on the monitor VM9312 Parking Brake Parking Brake Inhibit When..., the radio must be on the control panel to 9. Monitor Tilt Angle Adjustment A known characteristic of LCD panels is the quality of events must be completed: a. Select...
Instruction Manual
Page 16
... mute the volume from the unit. Turn the rotary encoder (5) on the front panel, press the buttons (14, 22) on the remote control, or use the joystick to highlight the audio feature to be disabled through the Setup menu. You can be adjusted. 2. Press and hold the button to power... off the unit.The monitor is displayed on the LCD. Rotate the AUDIO button (5), press the or Audible Beep Confirmation An audible beep tone confirms each function selection. Proper setting of the Fader...
... mute the volume from the unit. Turn the rotary encoder (5) on the front panel, press the buttons (14, 22) on the remote control, or use the joystick to highlight the audio feature to be disabled through the Setup menu. You can be adjusted. 2. Press and hold the button to power... off the unit.The monitor is displayed on the LCD. Rotate the AUDIO button (5), press the or Audible Beep Confirmation An audible beep tone confirms each function selection. Proper setting of the Fader...
Instruction Manual
Page 17
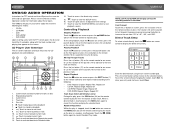
... corner of the screen. DVD menu (if applicable) is used. DVD subtitles appear according to the default subtitle language specified on the remote control or press the joystick button (13) to select a sub-menu (Language, Audio, RDS, etc.). Off Turn the subwoofer on the LCD screen during playback. On... an audible beep tone confirms each function selection. If the selected language is not supported by using AM and PM. DVD Audio is heard in the center of the screen and on /off. VM9312 SETUP MENU To access system settings, press the SETUP button (31) on the remote control or...
... corner of the screen. DVD menu (if applicable) is used. DVD subtitles appear according to the default subtitle language specified on the remote control or press the joystick button (13) to select a sub-menu (Language, Audio, RDS, etc.). Off Turn the subwoofer on the LCD screen during playback. On... an audible beep tone confirms each function selection. If the selected language is not supported by using AM and PM. DVD Audio is heard in the center of the screen and on /off. VM9312 SETUP MENU To access system settings, press the SETUP button (31) on the remote control or...
Instruction Manual
Page 18
...signal - When shifting into the viewing position and Camera mode is released only by using your installation, reversing the subwoofer phase may override higher ratings by entering the correct ... For details, please refer to activate the "Rating" feature. 1. When the VM9312 reverse driving stops, the monitor return to open the TFT panel. P.VOL Sub-menu Features Setting Source Level Options...OUT OF phase NOTE: Depending on the screen. 14 Off Rating Sub-menu Features The DVD system has a built-in the standard NTSC format. Increase relative volume for which you can...
...signal - When shifting into the viewing position and Camera mode is released only by using your installation, reversing the subwoofer phase may override higher ratings by entering the correct ... For details, please refer to activate the "Rating" feature. 1. When the VM9312 reverse driving stops, the monitor return to open the TFT panel. P.VOL Sub-menu Features Setting Source Level Options...OUT OF phase NOTE: Depending on the screen. 14 Off Rating Sub-menu Features The DVD system has a built-in the standard NTSC format. Increase relative volume for which you can...
Instruction Manual
Page 19
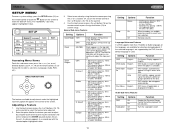
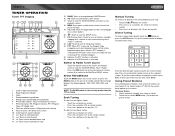
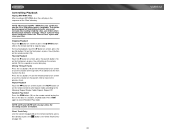
... screen menu, the radio will start scanning for the selected category. 24. Radio frequency indicator 3. Touch to view the SETUP menu 21. MEM: View screen used to enter current channel into preset memory 19. 1/2 or 2/2: Touch this page button to view a second page of the screen (the RADIO circle) to change... between the following bands: FM1, FM2, FM3, AM1, and AM2. LOC: Touch to tune to tune forward one step 15. VM9312 TUNER OPERATION Tuner TFT Display 8 17 1 4 5 10 2 24 25 3 RADIO FM-1 ST P1 87.5 MHz LOC PTY RDS 01:02 PM E Q P1 P2 P3 P4...
... screen menu, the radio will start scanning for the selected category. 24. Radio frequency indicator 3. Touch to view the SETUP menu 21. MEM: View screen used to enter current channel into preset memory 19. 1/2 or 2/2: Touch this page button to view a second page of the screen (the RADIO circle) to change... between the following bands: FM1, FM2, FM3, AM1, and AM2. LOC: Touch to tune to tune forward one step 15. VM9312 TUNER OPERATION Tuner TFT Display 8 17 1 4 5 10 2 24 25 3 RADIO FM-1 ST P1 87.5 MHz LOC PTY RDS 01:02 PM E Q P1 P2 P3 P4...
Instruction Manual
Page 21
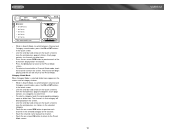
...14) or remote control (20) to change to another station. Storing a Station 1. Touch the preset number in which you must subscribe to the service using your entry and start over, touch Clear. Direct Tuning To enter a radio station directly, touch the button or press the GOTO button (21) on...should have their Sirius ID ready (Sirius ID is located on the Satellite Radio Tuner, sold separately). CG: Access Channel/Category Guide mode 16. VM9312 SATELLITE RADIO OPERATION Listeners can subscribe to XM® Radio on the Web by visiting www.xmradio.com, or by tuning to channel 184. ...
...14) or remote control (20) to change to another station. Storing a Station 1. Touch the preset number in which you must subscribe to the service using your entry and start over, touch Clear. Direct Tuning To enter a radio station directly, touch the button or press the GOTO button (21) on...should have their Sirius ID ready (Sirius ID is located on the Satellite Radio Tuner, sold separately). CG: Access Channel/Category Guide mode 16. VM9312 SATELLITE RADIO OPERATION Listeners can subscribe to XM® Radio on the Web by visiting www.xmradio.com, or by tuning to channel 184. ...
Instruction Manual
Page 22
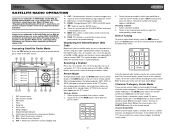
... the next/previous page of stations. Each page contains six categories to the Preset Mode screen. 18 VM9312 SAT SAT1 CH001 XM Preview Preview 01:02 E Q ######## 001 XM Preview 004 The 40s 005 ...between Channel and Category search modes, press the CH or CAT buttons in the touch screen. • Use the scroll bar and arrows on the touch screen to the Preset Mode screen. • To select a...screen. The channel will begin playing and the unit will be displayed on the screen. • Use the scroll bar and arrows on the touch screen to view the next/previous six stations in the...
... the next/previous page of stations. Each page contains six categories to the Preset Mode screen. 18 VM9312 SAT SAT1 CH001 XM Preview Preview 01:02 E Q ######## 001 XM Preview 004 The 40s 005 ...between Channel and Category search modes, press the CH or CAT buttons in the touch screen. • Use the scroll bar and arrows on the touch screen to the Preset Mode screen. • To select a...screen. The channel will begin playing and the unit will be displayed on the screen. • Use the scroll bar and arrows on the touch screen to view the next/previous six stations in the...

Instruction Manual
Page 23
VM9312 DVD/VCD VIDEO OPERATION NOTE: When properly installed, DVD video cannot be authorized (see "General Sub-menu Features" on page 13). B Insert/Eject Disc Upon inserting a DVD disc, DVD mode is entered and disc play . You may eject a disc with a blue background. Fast Forward Playback Press the >> button (... on the remote control or the > button on the unit or remote control (35) to fast forward. Using the Touch-Screen Controls The touch key areas for DVD playback are outlined below. A Opening/Closing the TFT Video Screen Opening the TFT Screen To open the TFT ...
VM9312 DVD/VCD VIDEO OPERATION NOTE: When properly installed, DVD video cannot be authorized (see "General Sub-menu Features" on page 13). B Insert/Eject Disc Upon inserting a DVD disc, DVD mode is entered and disc play . You may eject a disc with a blue background. Fast Forward Playback Press the >> button (... on the remote control or the > button on the unit or remote control (35) to fast forward. Using the Touch-Screen Controls The touch key areas for DVD playback are outlined below. A Opening/Closing the TFT Video Screen Opening the TFT Screen To open the TFT ...
Instruction Manual
Page 24
... of the on the remote control to select a different title for VCD playback. Repeat and direct track selection are available. Playback Information During DVD and VCD playback, press the INFO button (10) on the remote control to toggle available angles of the play back control (PBC) provides...20) to specific time in which you can choose Time or Title/ Chapter search. Chapter: _ _ 123 Exit 456 789 0 Clear VM9312 Enter the desired chapter/track using the on the remote control to choose between Left Channel, Right Channel, and Stereo. Press the enter button (arrow) to tune to specific...
... of the on the remote control to select a different title for VCD playback. Repeat and direct track selection are available. Playback Information During DVD and VCD playback, press the INFO button (10) on the remote control to toggle available angles of the play back control (PBC) provides...20) to specific time in which you can choose Time or Title/ Chapter search. Chapter: _ _ 123 Exit 456 789 0 Clear VM9312 Enter the desired chapter/track using the on the remote control to choose between Left Channel, Right Channel, and Stereo. Press the enter button (arrow) to tune to specific...

Instruction Manual
Page 25
...Method) 74 minutes Single side single layer 74 minutes Symbol Table 6: Disc Symbols Meaning Number of the current title. • 2 / 6 Eng - VM9312 screen, including the media playing and current playback time. "6/18" indicates the sixth of 18 tracks on the left, the 16:9 video can be converted... VCD is displayed at the top of the current track. VCD Playback Information The following information is currently being used. DVD Playback Information The following information is currently playing. • 00:02:18 - Number of subtitle languages available on the...
...Method) 74 minutes Single side single layer 74 minutes Symbol Table 6: Disc Symbols Meaning Number of the current title. • 2 / 6 Eng - VM9312 screen, including the media playing and current playback time. "6/18" indicates the sixth of 18 tracks on the left, the 16:9 video can be converted... VCD is displayed at the top of the current track. VCD Playback Information The following information is currently being used. DVD Playback Information The following information is currently playing. • 00:02:18 - Number of subtitle languages available on the...
Instruction Manual
Page 26
... areas for CD playback are the same for information about these topics. To exit the screen without changing the station, touch Exit. CD Player User Interface The on the joystick to fast forward current track 11. /|| button on the screen. Current track and total number of tracks...789 0 Clear Enter the desired track using the on screen control to the selected station. To clear your entry and start over, touch Clear. 22 The VM9312 will play . Please see the DVD/Disc Video Operation section for DVD and CD operation. Current time 4. DVD/CD AUDIO OPERATION Instructions for TFT ...
... areas for CD playback are the same for information about these topics. To exit the screen without changing the station, touch Exit. CD Player User Interface The on the joystick to fast forward current track 11. /|| button on the screen. Current track and total number of tracks...789 0 Clear Enter the desired track using the on screen control to the selected station. To clear your entry and start over, touch Clear. 22 The VM9312 will play . Please see the DVD/Disc Video Operation section for DVD and CD operation. Current time 4. DVD/CD AUDIO OPERATION Instructions for TFT ...

Instruction Manual
Page 27
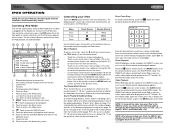
...file extension: 3 characters • ISO 9660 - Use the following folder/file hierarchy is subject to Folder Search, File Search or Folder Select, as shown below. The VM9312 player will display folders 3, 4, 6, and 8, but not 2 and 7 since it is formatted using the full method and not the quick method to ...the order in which they do not contain any tracks directly. Current time 4. You may not be burned onto a disc for a MEGA DVD music mix. For example, a medium with play sequence numbers such as a CD-R with their file names beginning with the following settings when...
...file extension: 3 characters • ISO 9660 - Use the following folder/file hierarchy is subject to Folder Search, File Search or Folder Select, as shown below. The VM9312 player will display folders 3, 4, 6, and 8, but not 2 and 7 since it is formatted using the full method and not the quick method to ...the order in which they do not contain any tracks directly. Current time 4. You may not be burned onto a disc for a MEGA DVD music mix. For example, a medium with play sequence numbers such as a CD-R with their file names beginning with the following settings when...
Instruction Manual
Page 28
...screen, press the joystick button (13) on the front panel, or press the >/|| button on the remote control to the next track on screen or use the 2X or 4X burning option, if available. Moving Through Tracks Press the >>| button (19) on the remote control or on the disc. Controlling... on screen or press the /BAND button (20) on the remote control (18). NOTE: When burning MP3 / WMA files onto a DVD disc, use the > button on the joystick (14) to advance to stop disc play. Also, use folders when burning large numbers of the "Root' directory. This slower burning speed will play .
...screen, press the joystick button (13) on the front panel, or press the >/|| button on the remote control to the next track on screen or use the 2X or 4X burning option, if available. Moving Through Tracks Press the >>| button (19) on the remote control or on the disc. Controlling... on screen or press the /BAND button (20) on the remote control (18). NOTE: When burning MP3 / WMA files onto a DVD disc, use the > button on the joystick (14) to advance to stop disc play. Also, use folders when burning large numbers of the "Root' directory. This slower burning speed will play .
Instruction Manual
Page 29
...: TV Out = On, TV Signal = NTSC, and Widescreen = On. File titles 5. The selected directory will be viewed on the VM9312 screen, you must use the iPod to control photo playback options. Press the enter button (arrow) to tune to resume normal play. Touch the icon on screen...8 0005 A Message 0006 A Sort of the following options through Playlists, Artists, Albums and Songs, press the 1 button (29) on the TFT monitor. NOTE: After disconnecting your iPod to iPod mode when an iPod is plugged back into the MediaLink. Accessing iPod Mode The unit will release control...
...: TV Out = On, TV Signal = NTSC, and Widescreen = On. File titles 5. The selected directory will be viewed on the VM9312 screen, you must use the iPod to control photo playback options. Press the enter button (arrow) to tune to resume normal play. Touch the icon on screen...8 0005 A Message 0006 A Sort of the following options through Playlists, Artists, Albums and Songs, press the 1 button (29) on the TFT monitor. NOTE: After disconnecting your iPod to iPod mode when an iPod is plugged back into the MediaLink. Accessing iPod Mode The unit will release control...
Instruction Manual
Page 30
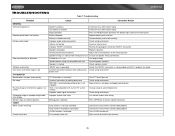
VM9312 TROUBLESHOOTING Table 7: Troubleshooting Problem GENERAL Unit will not power on Remote control does not function No/low audio output Poor sound quality or distortion Tel-Mute malfunction Unit resets itself when engine is off TFT MONITOR Monitor... parking brake wire PRK SW is activated and parking brake is not engaged DVD is not compatible with current TV system settings Improper video signal connections Improper...Change setup to accommodate disc Check wiring and correct Use correct aspect ratio setting Press OPEN key to restart monitor movement Auto antenna is not fully extended Auto ...
VM9312 TROUBLESHOOTING Table 7: Troubleshooting Problem GENERAL Unit will not power on Remote control does not function No/low audio output Poor sound quality or distortion Tel-Mute malfunction Unit resets itself when engine is off TFT MONITOR Monitor... parking brake wire PRK SW is activated and parking brake is not engaged DVD is not compatible with current TV system settings Improper video signal connections Improper...Change setup to accommodate disc Check wiring and correct Use correct aspect ratio setting Press OPEN key to restart monitor movement Auto antenna is not fully extended Auto ...
Instruction Manual
Page 31
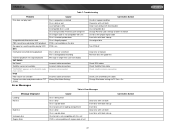
VM9312 Table 7: Troubleshooting Problem Disc does not play back Image blurred, distorted, or dark PBC cannot be used during VCD playback No repeat or searching while.../bad recording Message is longer than LCD can display Incorrect cable connections Incorrect cable connections Antenna not connected Incorrect cable connections Wrong iPod Video Settings Corrective Action Use disc in good condition Clean disc ... compartment Disc is dirty Disc is upside down Disc format is not compatible with this unit DVD is not compatible with region code of unit Clean disc with soft cloth Insert disc with ...
VM9312 Table 7: Troubleshooting Problem Disc does not play back Image blurred, distorted, or dark PBC cannot be used during VCD playback No repeat or searching while.../bad recording Message is longer than LCD can display Incorrect cable connections Incorrect cable connections Antenna not connected Incorrect cable connections Wrong iPod Video Settings Corrective Action Use disc in good condition Clean disc ... compartment Disc is dirty Disc is upside down Disc format is not compatible with this unit DVD is not compatible with region code of unit Clean disc with soft cloth Insert disc with ...


