Instruction Manual
Page 5
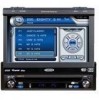
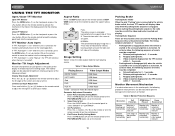
... wire for power connections • 16 - 18 gauge speaker wire WARNING! WARNING! WARNING! If the cable is a violation of the Jensen VM9312 ...) • Motorized Flip-Out / Flip-Up LCD Screen • 8 Character / Segment Type Secondary LCD Display • 7" TFT Active Matrix LCD w/ Anti-Glare Coating • 336,960 Sub...this unit, avoid impact to 1500 MP3 and WMA Files onto a DVD+R / RW • Audible Forward / Reverse Track Search (CD... VM9312 PREPARATION Congratulations on -board drive or navigation computer, do not push, pull or swivel the monitor manually. WARNING! The monitor...
... wire for power connections • 16 - 18 gauge speaker wire WARNING! WARNING! WARNING! If the cable is a violation of the Jensen VM9312 ...) • Motorized Flip-Out / Flip-Up LCD Screen • 8 Character / Segment Type Secondary LCD Display • 7" TFT Active Matrix LCD w/ Anti-Glare Coating • 336,960 Sub...this unit, avoid impact to 1500 MP3 and WMA Files onto a DVD+R / RW • Audible Forward / Reverse Track Search (CD... VM9312 PREPARATION Congratulations on -board drive or navigation computer, do not push, pull or swivel the monitor manually. WARNING! The monitor...
Instruction Manual
Page 6
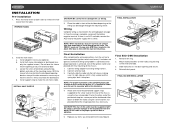
...Do not force the sleeve into place. If there is no ACC available, connect the ACC lead to a secure part of the CD/DVD player, the chassis must be brought through the mounting sleeve. Once proper operation is complete, reconnect the battery negative terminal. Make sure the unit ... remove the halfsleeve from the weight of the radio or improper operation due to the screw stud on ). Once the wiring is achieved, turn the unit on page 3. The VM9312 uses one end of the mounting sleeve. INSTALLATION Pre-installation 1. Install support strap to use only the supplied screws)....
...Do not force the sleeve into place. If there is no ACC available, connect the ACC lead to a secure part of the CD/DVD player, the chassis must be brought through the mounting sleeve. Once proper operation is complete, reconnect the battery negative terminal. Make sure the unit ... remove the halfsleeve from the weight of the radio or improper operation due to the screw stud on ). Once the wiring is achieved, turn the unit on page 3. The VM9312 uses one end of the mounting sleeve. INSTALLATION Pre-installation 1. Install support strap to use only the supplied screws)....
Instruction Manual
Page 7
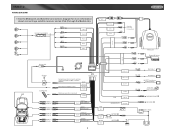
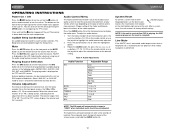
... - REAR R+ REAR R- GREEN + REAR L GREEN/BLACK - 3 GREEN/WHITE REVERSE + RED ACC ACC YELLOW BATT BLACK GND BATTERY + FUSE (15A) BATTERY Ground REVERSE + Ignition Switch Battery VM9312 WIRING DIAGRAM * See the MediaLink and Satellite Connections diagram for more information about connecting a satellite receiver and an iPod (through the MediaLink). WHITE + FRONT L WHITE/BLACK...
... - REAR R+ REAR R- GREEN + REAR L GREEN/BLACK - 3 GREEN/WHITE REVERSE + RED ACC ACC YELLOW BATT BLACK GND BATTERY + FUSE (15A) BATTERY Ground REVERSE + Ignition Switch Battery VM9312 WIRING DIAGRAM * See the MediaLink and Satellite Connections diagram for more information about connecting a satellite receiver and an iPod (through the MediaLink). WHITE + FRONT L WHITE/BLACK...
Instruction Manual
Page 14
...Monitor loading out horizontally Monitor is automatically loaded into unit Monitor fully extended horizontally Monitor is turned on the monitor VM9312 Parking Brake Parking Brake Inhibit When the pink "Parking" wire is connected to the viewing position. Release parking brake for 3 ~ 5 seconds. Video should be completed: a. Monitor Tilt Angle Adjustment A known characteristic of LCD... Playing Source Video Output Modes AM/FM TUNER RGB Mode SAT TUNER RGB Mode iPod RGB Mode DVD RGB Mode AUX IN CVBS Mode *CVBS - Enter Picture Quality Setting Mode: Press the PIC ...
...Monitor loading out horizontally Monitor is automatically loaded into unit Monitor fully extended horizontally Monitor is turned on the monitor VM9312 Parking Brake Parking Brake Inhibit When the pink "Parking" wire is connected to the viewing position. Release parking brake for 3 ~ 5 seconds. Video should be completed: a. Monitor Tilt Angle Adjustment A known characteristic of LCD... Playing Source Video Output Modes AM/FM TUNER RGB Mode SAT TUNER RGB Mode iPod RGB Mode DVD RGB Mode AUX IN CVBS Mode *CVBS - Enter Picture Quality Setting Mode: Press the PIC ...
Instruction Manual
Page 16
.../SRC button (6) on the unit (or the button (4) on the remote control) to turn on the LCD. The Beep tone can also turn the unit on the type of the unit light up and the current mode... status appears in the LCD (7). Press the AUDIO button (5) on the remote to display the audio menu. Press the joystick button...the remote control, or use the joystick to highlight the audio feature to power off the unit.The monitor is displayed on the unit by pressing the OPEN button (1) and opening the TFT screen. Proper setting ...
.../SRC button (6) on the unit (or the button (4) on the remote control) to turn on the LCD. The Beep tone can also turn the unit on the type of the unit light up and the current mode... status appears in the LCD (7). Press the AUDIO button (5) on the remote to display the audio menu. Press the joystick button...the remote control, or use the joystick to highlight the audio feature to power off the unit.The monitor is displayed on the unit by pressing the OPEN button (1) and opening the TFT screen. Proper setting ...
Instruction Manual
Page 30
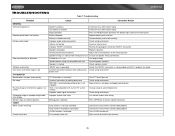
VM9312 TROUBLESHOOTING Table 7: Troubleshooting Problem GENERAL Unit will not power on Remote control does not function No/low audio output Poor sound quality or distortion Tel-Mute malfunction Unit resets itself when engine is off TFT MONITOR Monitor...Check wiring and correct battery wire TFT Auto Open is turned off Incorrect connection to parking brake wire PRK SW is activated and parking brake is not engaged DVD is ... brake Change setup to accommodate disc Check wiring and correct Use correct aspect ratio setting Press OPEN key to restart monitor movement Auto antenna is not fully extended...
VM9312 TROUBLESHOOTING Table 7: Troubleshooting Problem GENERAL Unit will not power on Remote control does not function No/low audio output Poor sound quality or distortion Tel-Mute malfunction Unit resets itself when engine is off TFT MONITOR Monitor...Check wiring and correct battery wire TFT Auto Open is turned off Incorrect connection to parking brake wire PRK SW is activated and parking brake is not engaged DVD is ... brake Change setup to accommodate disc Check wiring and correct Use correct aspect ratio setting Press OPEN key to restart monitor movement Auto antenna is not fully extended...


