
Operation Manual
Page 5
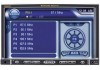
...Jensen VM9223 Mobile Multimedia Receiver. All installation and operating instructions will become active. Never disassemble or adjust the unit. America 1, Arabia, China, S. All Channels • RCA Audio/Video Input • 2.5mm Front Panel Audio/Video Input • SWC Interface - Once the navigation module is "navigation... • Motorized Slide-Down LCD Screen • 2.0 DIN (Import / ISO-DIN Mountable) • 7" TFT Active Matrix LCD with purchase of a traffic accident (except when using for rear view video camera or navigation) never use irregular discs. Compatible with...
...Jensen VM9223 Mobile Multimedia Receiver. All installation and operating instructions will become active. Never disassemble or adjust the unit. America 1, Arabia, China, S. All Channels • RCA Audio/Video Input • 2.5mm Front Panel Audio/Video Input • SWC Interface - Once the navigation module is "navigation... • Motorized Slide-Down LCD Screen • 2.0 DIN (Import / ISO-DIN Mountable) • 7" TFT Active Matrix LCD with purchase of a traffic accident (except when using for rear view video camera or navigation) never use irregular discs. Compatible with...
Operation Manual
Page 6
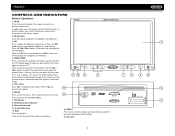
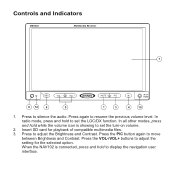
... to adjust the downward tilt angle of the screen while the yellow tilt icon is connected to the VM9223, press and hold to display the navigation user interface. 4. Press VOL+ to access the SOURCE MENU. 7. Press to increase the volume. 13 VM9223 Multimedia Receiver SRC VOL - Audio/Video Input 11. to...and slide the TFT monitor down to adjust the Brightness and Contrast. VM9223 CONTROLS AND INDICATORS Button Operation 1. PIC Press to reveal the disc and SD slots. Press again to adjust the angle of the screen one step at a time or press and hold to adjust the ...
... to adjust the downward tilt angle of the screen while the yellow tilt icon is connected to the VM9223, press and hold to display the navigation user interface. 4. Press VOL+ to access the SOURCE MENU. 7. Press to increase the volume. 13 VM9223 Multimedia Receiver SRC VOL - Audio/Video Input 11. to...and slide the TFT monitor down to adjust the Brightness and Contrast. VM9223 CONTROLS AND INDICATORS Button Operation 1. PIC Press to reveal the disc and SD slots. Press again to adjust the angle of the screen one step at a time or press and hold to adjust the ...
Operation Manual
Page 7
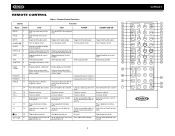
... correct error in Direct wards to specific time frame and Enter radio station directly playback/dial call playback/dial call Dial call when Bluetooth connected 3 VM9223 3 4 9 13 1 2 14 31 18 19 22 24 10 20 29 34 33 back quency / 20 Stop playback/end call Stop playback/end call End ...call Stop playback/end call GOTO/ 21 Go to specific time frame and Go to correct error in Direct Access mode Access mode PRESET /\ 11 Navigate the preset station list 26 PRESET \/ 12 Navigate the preset station list 6 ANGLE 13 Play back disc in different Play back Picture CD with dif-
... correct error in Direct wards to specific time frame and Enter radio station directly playback/dial call playback/dial call Dial call when Bluetooth connected 3 VM9223 3 4 9 13 1 2 14 31 18 19 22 24 10 20 29 34 33 back quency / 20 Stop playback/end call Stop playback/end call End ...call Stop playback/end call GOTO/ 21 Go to specific time frame and Go to correct error in Direct Access mode Access mode PRESET /\ 11 Navigate the preset station list 26 PRESET \/ 12 Navigate the preset station list 6 ANGLE 13 Play back disc in different Play back Picture CD with dif-
Operation Manual
Page 19
Elapsed playing time 3. Bouncin' R Phish - Track titles 5. Current time 4. Birds Of A Phish - Baby Crazy Town - VM9223 MP3 Player User Interface The on your media device 2. Butt Phish - Current file and total number of files on -screen indicators and touch key areas for MP3 playback are outlined below. 16 17 18 1 2 DISC (Root) MP3 4/84...
Elapsed playing time 3. Bouncin' R Phish - Track titles 5. Current time 4. Birds Of A Phish - Baby Crazy Town - VM9223 MP3 Player User Interface The on your media device 2. Butt Phish - Current file and total number of files on -screen indicators and touch key areas for MP3 playback are outlined below. 16 17 18 1 2 DISC (Root) MP3 4/84...
Operation Manual
Page 22
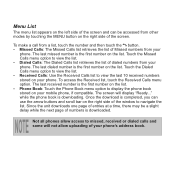
... necessary to navigate the list. Functionality varies depending on the list. The last received number is set...screen will display "Cannot get dialed record" when the feature is downloading. 2. To turn "Auto answer" on your paired Bluetooth phone. NOTE: Please quit A2DP mode before attempting to view the list. VM9223 Dialed Calls The Dialed Calls list retrieves the list of the phone, not the VM9223. Touch... the Dialed Calls menu option to make a call , as unexpected results may occur depending on your mobile phone model. Received Calls Use the Received...
... necessary to navigate the list. Functionality varies depending on the list. The last received number is set...screen will display "Cannot get dialed record" when the feature is downloading. 2. To turn "Auto answer" on your paired Bluetooth phone. NOTE: Please quit A2DP mode before attempting to view the list. VM9223 Dialed Calls The Dialed Calls list retrieves the list of the phone, not the VM9223. Touch... the Dialed Calls menu option to make a call , as unexpected results may occur depending on your mobile phone model. Received Calls Use the Received...

Quick Reference Guide
Page 1
VM9223 VM9223 Quick Reference Guide Multimedia Receiver SRC VOL - VOL + MUTE PIC A / V Input Featuring: DVD, CD, MP3, WMA, USB and SD Playback Touch Screen Interface RCA and Front Panel A/V Input USB Connector Composite Video Out Remote Control Navigation Ready (NAV102 Only) Bluetooth Ready (Requires BTM10)
VM9223 VM9223 Quick Reference Guide Multimedia Receiver SRC VOL - VOL + MUTE PIC A / V Input Featuring: DVD, CD, MP3, WMA, USB and SD Playback Touch Screen Interface RCA and Front Panel A/V Input USB Connector Composite Video Out Remote Control Navigation Ready (NAV102 Only) Bluetooth Ready (Requires BTM10)
Quick Reference Guide
Page 3
Ÿ Navigation operation requires NAV102 installation Ÿ Bluetooth operation requires BTM10 installation Ÿ Rear Camera operation requires rear camera installation
Ÿ Navigation operation requires NAV102 installation Ÿ Bluetooth operation requires BTM10 installation Ÿ Rear Camera operation requires rear camera installation
Quick Reference Guide
Page 4
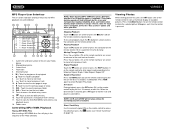
...showing to display the navigation user interface. In all other modes, press and hold while the volume icon is connected, press and hold to adjust the Brightness and Contrast. Press the VOL-/VOL+ buttons to silence the audio. Controls and Indicators VM9223 Multimedia Receiver 7 SRC VOL -... Insert SD card for the selected option. Press to adjust the setting for playback of compatible multimedia files. 3.
...showing to display the navigation user interface. In all other modes, press and hold while the volume icon is connected, press and hold to adjust the Brightness and Contrast. Press the VOL-/VOL+ buttons to silence the audio. Controls and Indicators VM9223 Multimedia Receiver 7 SRC VOL -... Insert SD card for the selected option. Press to adjust the setting for playback of compatible multimedia files. 3.
Quick Reference Guide
Page 17
Not all phones allow uploading of the screen. Touch the Dialed Calls menu option to view the list. Ÿ Received Calls: Use the Received Calls list to navigate the list. The last dialed number is downloading. The screen will not allow access to missed, received or dialed calls and some will display "Ready..." while the phone book is...
Not all phones allow uploading of the screen. Touch the Dialed Calls menu option to view the list. Ÿ Received Calls: Use the Received Calls list to navigate the list. The last dialed number is downloading. The screen will not allow access to missed, received or dialed calls and some will display "Ready..." while the phone book is...
Installation Guide
Page 2
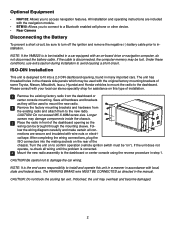
...To prevent a short circuit, be sure to turn off the ignition and remove the negative (-) battery cable prior to installation. NOTE: If the VM9223 is the end-users responsibility to fit into the mating sockets on "). If the unit does not operate, re-check all wiring until ...all hardware and brackets as directed in step 1. After completing the wiring connections, plug the ISO connectors into a 2.0 DIN dashboard opening so the wiring can be used with the navigation module. • BTM10: Allows you to the dashboard or center console using the reverse procedure in the manual. ...
...To prevent a short circuit, be sure to turn off the ignition and remove the negative (-) battery cable prior to installation. NOTE: If the VM9223 is the end-users responsibility to fit into the mating sockets on "). If the unit does not operate, re-check all wiring until ...all hardware and brackets as directed in step 1. After completing the wiring connections, plug the ISO connectors into a 2.0 DIN dashboard opening so the wiring can be used with the navigation module. • BTM10: Allows you to the dashboard or center console using the reverse procedure in the manual. ...

