
Operation Manual
Page 5
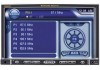
...Down LCD Screen • 2.0 DIN (Import / ISO-DIN Mountable) • 7" TFT Active Matrix LCD with Eight Preset EQ Curves • Front, Rear and Subwoofer Line Output • Programmable Volume Control • Rear Camera Input (Normal and Mirror Image View) • Touch Screen Calibration Mode...for an Additional Screen • Two Audio / Video Auxiliary Inputs for rear view video camera or navigation) never use irregular discs. We recommend having your purchase of federal law. Once the navigation module is a violation of the Jensen VM9223 Mobile Multimedia Receiver. This is...
...Down LCD Screen • 2.0 DIN (Import / ISO-DIN Mountable) • 7" TFT Active Matrix LCD with Eight Preset EQ Curves • Front, Rear and Subwoofer Line Output • Programmable Volume Control • Rear Camera Input (Normal and Mirror Image View) • Touch Screen Calibration Mode...for an Additional Screen • Two Audio / Video Auxiliary Inputs for rear view video camera or navigation) never use irregular discs. We recommend having your purchase of federal law. Once the navigation module is a violation of the Jensen VM9223 Mobile Multimedia Receiver. This is...
Operation Manual
Page 10
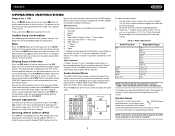
... on the front of vehicle and its measurements. The LCD or TFT screen displays the volume level for detailed installation information. Vol Up 3. Touch the +/- If "Select" (function 7 or 8) is held down and function 5 is compatible with the PAC adapter for 3 seconds. VM9223 OPERATING INSTRUCTIONS Power On / Off Press the /SRC button (6) on the...
... on the front of vehicle and its measurements. The LCD or TFT screen displays the volume level for detailed installation information. Vol Up 3. Touch the +/- If "Select" (function 7 or 8) is held down and function 5 is compatible with the PAC adapter for 3 seconds. VM9223 OPERATING INSTRUCTIONS Power On / Off Press the /SRC button (6) on the...
Operation Manual
Page 14
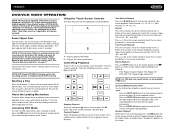
... screen. Displays playing information B - VM9223 DVD/VCD VIDEO OPERATION NOTE: When properly installed, DVD video cannot be authorized. Touch the 1/2 button to DVD mode when a disc is applied. Fast Forward Playback Press the >> button (14) on the remote control or the >> button on the remote control for DVD playback are outlined below. Using the Touch-Screen...
... screen. Displays playing information B - VM9223 DVD/VCD VIDEO OPERATION NOTE: When properly installed, DVD video cannot be authorized. Touch the 1/2 button to DVD mode when a disc is applied. Fast Forward Playback Press the >> button (14) on the remote control or the >> button on the remote control for DVD playback are outlined below. Using the Touch-Screen...
Operation Manual
Page 18
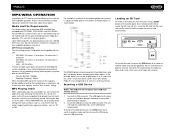
...a medium with removal. 14 Locate the USB connector. To remove the USB device, press the SRC button (6) to switch to an accessible place during installation. 2. Push in which MP3/WMA files are actually played. Folder 5 is not recognized at all since they are expected to be played may be ...burned onto a disc for a MEGA DVD music mix. The USB pigtail on the USB device automatically. VM9223 MP3/WMA OPERATION Instructions for TFT control and Insert/Eject are accessed in the order they were written by writing them onto a medium such as...
...a medium with removal. 14 Locate the USB connector. To remove the USB device, press the SRC button (6) to switch to an accessible place during installation. 2. Push in which MP3/WMA files are actually played. Folder 5 is not recognized at all since they are expected to be played may be ...burned onto a disc for a MEGA DVD music mix. The USB pigtail on the USB device automatically. VM9223 MP3/WMA OPERATION Instructions for TFT control and Insert/Eject are accessed in the order they were written by writing them onto a medium such as...
Operation Manual
Page 20
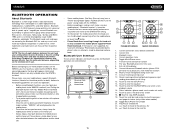
.... PLEASE DO NOT use the Bluetooth functions on -screen indicators and touch key areas for Bluetooth operation are only available when ...the BTM10 is under license. Before attempting to use the power saving mode with the phone, the unit's model number, "VM9223", will display "Phone book not provided by Audiovox Corporation is installed... below. 14 15 BT 1 16 Disconnected 2 01:02 AM E Q 1 2 Missed Calls Received Calls 3 Dialed Calls MENU 4 Phone Book Menu List 3 4 19 17 13 20 MENU 8...
.... PLEASE DO NOT use the Bluetooth functions on -screen indicators and touch key areas for Bluetooth operation are only available when ...the BTM10 is under license. Before attempting to use the power saving mode with the phone, the unit's model number, "VM9223", will display "Phone book not provided by Audiovox Corporation is installed... below. 14 15 BT 1 16 Disconnected 2 01:02 AM E Q 1 2 Missed Calls Received Calls 3 Dialed Calls MENU 4 Phone Book Menu List 3 4 19 17 13 20 MENU 8...
Operation Manual
Page 23
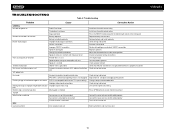
... interference appears on Radio Fuse blown Car battery fuse blown Illegal operation Remote control does not function Battery depleted Battery installed incorrectly No/low audio output Improper audio output connection Volume set too low Improper "MUTE" connection Speakers damaged Heavily ...biased volume balance Speaker wiring is not compatible with new one VM9223 19 TROUBLESHOOTING Table 6: Troubleshooting Problem Cause Corrective Action GENERAL Unit will not power on screen DVD is in contact with metal part of the front panel Replace battery ...
... interference appears on Radio Fuse blown Car battery fuse blown Illegal operation Remote control does not function Battery depleted Battery installed incorrectly No/low audio output Improper audio output connection Volume set too low Improper "MUTE" connection Speakers damaged Heavily ...biased volume balance Speaker wiring is not compatible with new one VM9223 19 TROUBLESHOOTING Table 6: Troubleshooting Problem Cause Corrective Action GENERAL Unit will not power on screen DVD is in contact with metal part of the front panel Replace battery ...
Operation Manual
Page 79
...humidity, excessive temperature, extreme environmental conditions or external natural causes Please review the "Care and Maintenance" section of your Installation and Operation Manual for additional information regarding the proper use , be repaired or replaced with a new or reconditioned product... incurred for parts and repair labor. Limited Warranty CD or Multimedia Radios/Headunits Audiovox Electronics Corporation ("the Company") is committed to quality and customer service, and are not covered by improper installation, mishandling, misuse, neglect, accident, blown fuse, battery leakage...
...humidity, excessive temperature, extreme environmental conditions or external natural causes Please review the "Care and Maintenance" section of your Installation and Operation Manual for additional information regarding the proper use , be repaired or replaced with a new or reconditioned product... incurred for parts and repair labor. Limited Warranty CD or Multimedia Radios/Headunits Audiovox Electronics Corporation ("the Company") is committed to quality and customer service, and are not covered by improper installation, mishandling, misuse, neglect, accident, blown fuse, battery leakage...
Quick Reference Guide
Page 3
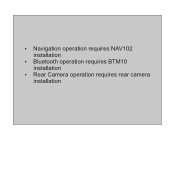
Ÿ Navigation operation requires NAV102 installation Ÿ Bluetooth operation requires BTM10 installation Ÿ Rear Camera operation requires rear camera installation
Ÿ Navigation operation requires NAV102 installation Ÿ Bluetooth operation requires BTM10 installation Ÿ Rear Camera operation requires rear camera installation
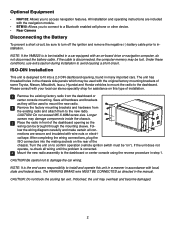
Installation Guide
Page 2
...brought through the mounting sleeve. NOTE: If the VM9223 is designed to fit into the mating sockets on this unit in a manner in a car equipped with wire nuts or electrical tape. ISO-DIN Installation This unit is to be installed in accordance with your local car stereo specialty shop... CAUTION: Do not exceed M5 X 6MM screw size. After completing the wiring connections, plug the ISO connectors into a 2.0 DIN dashboard opening, found in front of installation. 1 Remove the existing factory radio from the existing radio and attach them to the new radio. CAUTION: Do not block ...
...brought through the mounting sleeve. NOTE: If the VM9223 is designed to fit into the mating sockets on this unit in a manner in a car equipped with wire nuts or electrical tape. ISO-DIN Installation This unit is to be installed in accordance with your local car stereo specialty shop... CAUTION: Do not exceed M5 X 6MM screw size. After completing the wiring connections, plug the ISO connectors into a 2.0 DIN dashboard opening, found in front of installation. 1 Remove the existing factory radio from the existing radio and attach them to the new radio. CAUTION: Do not block ...
Installation Guide
Page 3
...the supplied screws to attach the radio to the wiring harness connector. Remove the mounting sleeve. 2 Install half-sleeve in the wiring diagram. c. Once proper operation is corrected. a. b. The VM9223 uses one 10 amp fuse, located in the black filter box in-line with the main... connections, turn off the ignition switch and proceed with a switch. This unit will accept a Double-DIN chassis, but there is usually a small gap between the radio and dash piece after installation is no modification to confirm operation (ignition switch must be on to the...
...the supplied screws to attach the radio to the wiring harness connector. Remove the mounting sleeve. 2 Install half-sleeve in the wiring diagram. c. Once proper operation is corrected. a. b. The VM9223 uses one 10 amp fuse, located in the black filter box in-line with the main... connections, turn off the ignition switch and proceed with a switch. This unit will accept a Double-DIN chassis, but there is usually a small gap between the radio and dash piece after installation is no modification to confirm operation (ignition switch must be on to the...

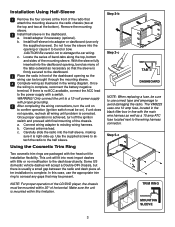
Installation Guide
Page 4
Wiring Diagram IMPORTANT: Incorrect wiring connections can damage the unit. Need Help? Follow the wiring instructions carefully, or have the installation handled by an experienced technician. For technical assistance, call the Jensen customer support line at 1-800-323-4815. 4
Wiring Diagram IMPORTANT: Incorrect wiring connections can damage the unit. Need Help? Follow the wiring instructions carefully, or have the installation handled by an experienced technician. For technical assistance, call the Jensen customer support line at 1-800-323-4815. 4


