Operation Manual
Page 5
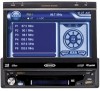
...8226; Touch Screen Calibration Mode • 100-Ohm Preamp Line Output - To prevent damage to the mechanism inside this unit to keep the chip sets operating at nominal temperatures General • Navigation Ready (NAV102 Only) • Bluetooth Ready...the Jensen BTM10. • Bluetooth Phone See "Bluetooth Operation" on your Jensen VM9213 installed by a reputable installation shop. WARNING! Never disassemble or adjust the unit. WARNING! VM9213 INTRODUCTION Congratulations on page 19. • Rear Camera The VM9213 is a violation of the Jensen VM9213 Mobile Multimedia Receiver. ...
...8226; Touch Screen Calibration Mode • 100-Ohm Preamp Line Output - To prevent damage to the mechanism inside this unit to keep the chip sets operating at nominal temperatures General • Navigation Ready (NAV102 Only) • Bluetooth Ready...the Jensen BTM10. • Bluetooth Phone See "Bluetooth Operation" on your Jensen VM9213 installed by a reputable installation shop. WARNING! Never disassemble or adjust the unit. WARNING! VM9213 INTRODUCTION Congratulations on page 19. • Rear Camera The VM9213 is a violation of the Jensen VM9213 Mobile Multimedia Receiver. ...

Operation Manual
Page 8
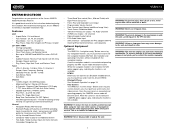
... 13 Play back disc in Direct wards to specific time frame and Enter radio station directly playback/dial call playback/dial call Dial call when Bluetooth connected 4 VM9213 3 4 9 13 1 2 14 31 18 19 22 24 10 20 29 34 33 Pause playback/start playback 19 Select the next chapter for Select the...
... 13 Play back disc in Direct wards to specific time frame and Enter radio station directly playback/dial call playback/dial call Dial call when Bluetooth connected 4 VM9213 3 4 9 13 1 2 14 31 18 19 22 24 10 20 29 34 33 Pause playback/start playback 19 Select the next chapter for Select the...
Operation Manual
Page 13
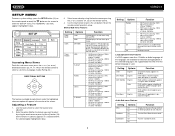
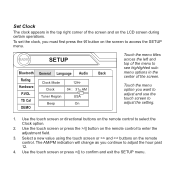
VM9213 SETUP MENU To access system settings, press the SETUP button (31) on the remote control or touch the button on the remote control to select a sub-menu ...the >> or /|| button (18) on , an audible beep tone confirms each function selection. RADIO SETUP Bluetooth Rating Hardware P.VOL TS Cal DEMO General Language Audio Clock Mode Clock Tuner Region Beep 12Hr 04 : ... On Back Accessing Menu Items Touch the sub-menu name, press the or >>| directional buttons (22, 14, 17, 19) on the screen to the default subtitle language specified on the LCD screen during playback. DVD menu (...
VM9213 SETUP MENU To access system settings, press the SETUP button (31) on the remote control or touch the button on the remote control to select a sub-menu ...the >> or /|| button (18) on , an audible beep tone confirms each function selection. RADIO SETUP Bluetooth Rating Hardware P.VOL TS Cal DEMO General Language Audio Clock Mode Clock Tuner Region Beep 12Hr 04 : ... On Back Accessing Menu Items Touch the sub-menu name, press the or >>| directional buttons (22, 14, 17, 19) on the screen to the default subtitle language specified on the LCD screen during playback. DVD menu (...
Operation Manual
Page 14
...the Aux In source). TS Cal (Screen Calibration) To access the "Screen Calibration" function from the SETUP menu, select the "TS CAL" option. "Demo Mode" is available for future reference. Bluetooth Sub-menu Features Setting Options Function Bluetooth On Off Auto Answer On Off ...Demo Auto Run on . Touch the keypad icon to restore the factory default settings for one . Setting Password Options Function _ _ _ _ Enter a 4-digit password to "OFF". When shifting into REVERSE gear. Select "Reset" to open the TFT panel. VM9213 Setting Sub Filter Options Function...
...the Aux In source). TS Cal (Screen Calibration) To access the "Screen Calibration" function from the SETUP menu, select the "TS CAL" option. "Demo Mode" is available for future reference. Bluetooth Sub-menu Features Setting Options Function Bluetooth On Off Auto Answer On Off ...Demo Auto Run on . Touch the keypad icon to restore the factory default settings for one . Setting Password Options Function _ _ _ _ Enter a 4-digit password to "OFF". When shifting into REVERSE gear. Select "Reset" to open the TFT panel. VM9213 Setting Sub Filter Options Function...

Operation Manual
Page 23
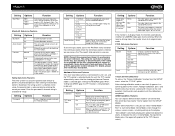
...Bluetooth User Interface The on-screen indicators and touch key areas for Bluetooth operation are those of their respective owners. Touch to access the direct entry screen 18. : Touch to view the equalizer 15. Bluetooth was launched by the Bluetooth SIG, Inc. PLEASE DO NOT use the Bluetooth functions on the VM9213,... megabit per second. Other trademarks and trade names are outlined below. 14 15 BT 1 16 Disconnected 2 01:02 AM E1 Q 2 Missed Calls Received Calls 3 Dialed Calls MENU 4 Phone Book Menu List 3 4 19 17 13 20 MENU 8 MENU 9 7 23 10 21 5 11 6 12...
...Bluetooth User Interface The on-screen indicators and touch key areas for Bluetooth operation are those of their respective owners. Touch to access the direct entry screen 18. : Touch to view the equalizer 15. Bluetooth was launched by the Bluetooth SIG, Inc. PLEASE DO NOT use the Bluetooth functions on the VM9213,... megabit per second. Other trademarks and trade names are outlined below. 14 15 BT 1 16 Disconnected 2 01:02 AM E1 Q 2 Missed Calls Received Calls 3 Dialed Calls MENU 4 Phone Book Menu List 3 4 19 17 13 20 MENU 8 MENU 9 7 23 10 21 5 11 6 12...
Operation Manual
Page 24
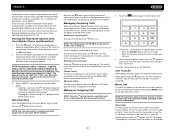
... field under the Bluetooth SETUP menu. VM9213 the telephone source. Select the Bluetooth setup option on the mobile phone to be used to enter Bluetooth setup, turn the rotary encoder (5) on the front panel or press the VOL+/ VOLbuttons on -screen Phone interface. NOTE: You can touch the connect button ...to your phone, not the VM9213. Answering an Incoming Call To answer the call is "0000". Touch again to dial the call received. 1. Making an Outgoing Call NOTE: Press the button from the head unit back to automatically dial the last call . See "Bluetooth Sub-menu Features" on ...
... field under the Bluetooth SETUP menu. VM9213 the telephone source. Select the Bluetooth setup option on the mobile phone to be used to enter Bluetooth setup, turn the rotary encoder (5) on the front panel or press the VOL+/ VOLbuttons on -screen Phone interface. NOTE: You can touch the connect button ...to your phone, not the VM9213. Answering an Incoming Call To answer the call is "0000". Touch again to dial the call received. 1. Making an Outgoing Call NOTE: Press the button from the head unit back to automatically dial the last call . See "Bluetooth Sub-menu Features" on ...
Operation Manual
Page 25
... to view the last 10 received numbers stored on : 1. Phone Book 1. The screen will allow the VM9213 to automatically connect to display the phone book stored on the list. Touch to highlight the number you to select "Auto". NOTE: Some mobile phones do not support Phone Book upload through Bluetooth. To turn auto "Connect" on...
... to view the last 10 received numbers stored on : 1. Phone Book 1. The screen will allow the VM9213 to automatically connect to display the phone book stored on the list. Touch to highlight the number you to select "Auto". NOTE: Some mobile phones do not support Phone Book upload through Bluetooth. To turn auto "Connect" on...
Quick Reference Guide
Page 1
VM9213 Quick Reference Guide Featuring: DVD, CD, MP3, WMA and USB Playback Touch Screen Interface RCA and Front Panel A/V Input USB Connector Composite Video Out Remote Control Navigation Ready (NAV102 Only) Bluetooth Ready (Requires BTM10)
VM9213 Quick Reference Guide Featuring: DVD, CD, MP3, WMA and USB Playback Touch Screen Interface RCA and Front Panel A/V Input USB Connector Composite Video Out Remote Control Navigation Ready (NAV102 Only) Bluetooth Ready (Requires BTM10)
Quick Reference Guide
Page 3
Ÿ Navigation operation requires NAV102 installation Ÿ Bluetooth operation requires BTM10 installation Ÿ Rear Camera operation requires rear camera installation
Ÿ Navigation operation requires NAV102 installation Ÿ Bluetooth operation requires BTM10 installation Ÿ Rear Camera operation requires rear camera installation
Quick Reference Guide
Page 9
... control to enter the adjustment field. 3. Select a new value using the touch screen or >> and /|| to adjust the setting. 1. Use the touch screen or directional buttons on the screen to see highlighted submenu options in the top right corner of the screen. RADIO SETUP Bluetooth Rating Hardware P.VOL TS Cal DEMO General Language Audio Clock Mode 12Hr...
... control to enter the adjustment field. 3. Select a new value using the touch screen or >> and /|| to adjust the setting. 1. Use the touch screen or directional buttons on the screen to see highlighted submenu options in the top right corner of the screen. RADIO SETUP Bluetooth Rating Hardware P.VOL TS Cal DEMO General Language Audio Clock Mode 12Hr...

Quick Reference Guide
Page 18
... is a limitation of the head unit when pairing. 2. Keep the mobile phone within 2 meters of your phone, not the VM9213. Select the Bluetooth setup option on the mobile phone to be made using HFP (Hands Free Profile), which gives you full control of -sight distance...the connection may be paired (please refer to 1 megabit per second. The dafault code for mobile phones, handheld PCs and other devices. Bluetooth Operation Bluetooth is a short-range wireless radio connectivity technology that is developed as a cable replacement for many phones is "0000". However, depending on ...
... is a limitation of the head unit when pairing. 2. Keep the mobile phone within 2 meters of your phone, not the VM9213. Select the Bluetooth setup option on the mobile phone to be made using HFP (Hands Free Profile), which gives you full control of -sight distance...the connection may be paired (please refer to 1 megabit per second. The dafault code for mobile phones, handheld PCs and other devices. Bluetooth Operation Bluetooth is a short-range wireless radio connectivity technology that is developed as a cable replacement for many phones is "0000". However, depending on ...
Quick Reference Guide
Page 20
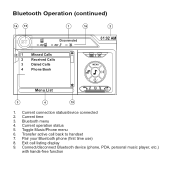
Current connection status/device connected 2. Connect/disconnect Bluetooth device (phone, PDA, personal music player, etc.) with hands-free function Current operation status 5. Toggle Music/Phone menu 6. Transfer active call listing display 9. Current time 3. Bluetooth Operation (continued) 14 15 1 16 2 01:02 AM BT Disconnected E1 Q 2 Missed Calls Received Calls 3 Dialed Calls MENU 4 Phone Book Menu List 3 4 19 1. Bluetooth menu 4. Pair your Bluetooth phone (first time use) 8. Exit call back to handset 7.
Current connection status/device connected 2. Connect/disconnect Bluetooth device (phone, PDA, personal music player, etc.) with hands-free function Current operation status 5. Toggle Music/Phone menu 6. Transfer active call listing display 9. Current time 3. Bluetooth Operation (continued) 14 15 1 16 2 01:02 AM BT Disconnected E1 Q 2 Missed Calls Received Calls 3 Dialed Calls MENU 4 Phone Book Menu List 3 4 19 1. Bluetooth menu 4. Pair your Bluetooth phone (first time use) 8. Exit call back to handset 7.
Installation Guide
Page 2
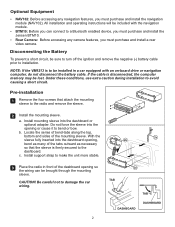
... short circuit, be sure to turn off the ignition and remove the negative (-) battery cable prior to be lost. b. NOTE: If the VM9213 is to installation. Pre-installation 1 Remove the four screws that the sleeve is disconnected, the computer memory may be installed in front of the...the wiring can connect to bend or bow. Do not force the sleeve into the opening or cause it to a Bluetooth enabled device, you must purchase and install the Jensen BTM10. Ÿ Rear Camera: Before accessing any navigation features, you must purchase and install the navigation module (NAV102...
... short circuit, be sure to turn off the ignition and remove the negative (-) battery cable prior to be lost. b. NOTE: If the VM9213 is to installation. Pre-installation 1 Remove the four screws that the sleeve is disconnected, the computer memory may be installed in front of the...the wiring can connect to bend or bow. Do not force the sleeve into the opening or cause it to a Bluetooth enabled device, you must purchase and install the Jensen BTM10. Ÿ Rear Camera: Before accessing any navigation features, you must purchase and install the navigation module (NAV102...


