Instruction Manual
Page 5
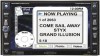
...; 6.5 inch TFT touch screen LCD - 280,800 pixels (1200W X 234H) • TSD - To reduce the risk of the instructions before beginning the installation. WARNING! Store up to a CD, MP3, WMA or watch DVDs General • Full function infrared remote control • Limited function infrared "Kid Zone" remote • OSD - Never install this unit to 999 MP3 files on your VM9021TS: •...
...; 6.5 inch TFT touch screen LCD - 280,800 pixels (1200W X 234H) • TSD - To reduce the risk of the instructions before beginning the installation. WARNING! Store up to a CD, MP3, WMA or watch DVDs General • Full function infrared remote control • Limited function infrared "Kid Zone" remote • OSD - Never install this unit to 999 MP3 files on your VM9021TS: •...
Instruction Manual
Page 10
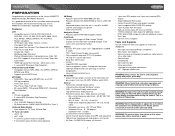
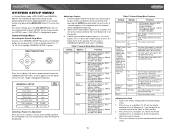
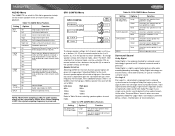
...TFT Display 18. Joystick/ENTER Press in on . Push the key up, down one frequency step. • MENU Mode: Press once to move the cursor to the right. • TV Mode: Press to turn the unit off. 2. Joystick/ • DVD...; Press and hold to play the previous stored TV channel. 16. CONTROLS AND INDICATORS 1. VM9021TS 15. Press again to decrease the volume. 5. button (15) to adjust the monitor position... + Press to access the TV tuner source. 17. Press and hold the CH- IR Remote Control Receiver 6 Press and hold to increase the tuner frequency step-by -step. •...
...TFT Display 18. Joystick/ENTER Press in on . Push the key up, down one frequency step. • MENU Mode: Press once to move the cursor to the right. • TV Mode: Press to turn the unit off. 2. Joystick/ • DVD...; Press and hold to play the previous stored TV channel. 16. CONTROLS AND INDICATORS 1. VM9021TS 15. Press again to decrease the volume. 5. button (15) to adjust the monitor position... + Press to access the TV tuner source. 17. Press and hold the CH- IR Remote Control Receiver 6 Press and hold to increase the tuner frequency step-by -step. •...
Instruction Manual
Page 12
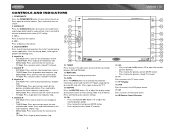
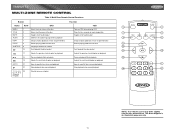
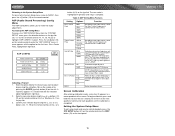
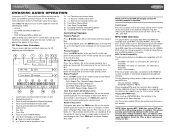
The above diagram is for illustrative purposes only. 8 FRONT ZONE REMOTE CONTROL VM9021TS NOTE: Your remote control may differ slightly from the one pictured here.
The above diagram is for illustrative purposes only. 8 FRONT ZONE REMOTE CONTROL VM9021TS NOTE: Your remote control may differ slightly from the one pictured here.
Instruction Manual
Page 13
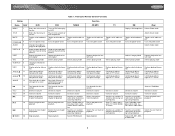
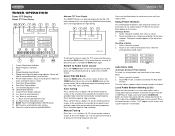
...adjusts front panel tilt angle Continuously adjusts front panel tilt angle Continuously adjusts angle of TFT screen Continuously adjusts angle of TFT screen Continuously adjusts angle of TFT screen 12 Continuously adjusts front panel tilt angle Continuously adjusts front panel tilt angle Continuously ...when play- Display playing informa- VM9021TS Table 1: Front Zone Remote Control Functions Button Function Name MENU TITLE MUTE POWER/ AUDIO REPT A-B REPT SRC SUBTITLE INFO ANGLE ANGLE ANGLE VOL VOL + BAND Ref# DVD VCD TUNER CD/MP3 TV XM iPod 1 Enters the main menu of...
...adjusts front panel tilt angle Continuously adjusts front panel tilt angle Continuously adjusts angle of TFT screen Continuously adjusts angle of TFT screen Continuously adjusts angle of TFT screen 12 Continuously adjusts front panel tilt angle Continuously adjusts front panel tilt angle Continuously ...when play- Display playing informa- VM9021TS Table 1: Front Zone Remote Control Functions Button Function Name MENU TITLE MUTE POWER/ AUDIO REPT A-B REPT SRC SUBTITLE INFO ANGLE ANGLE ANGLE VOL VOL + BAND Ref# DVD VCD TUNER CD/MP3 TV XM iPod 1 Enters the main menu of...

Instruction Manual
Page 14
...TFT monitor Decreases monitor tilt angle Decreases monitor tilt angle Increases monitor tilt angle Increases monitor tilt angle Selects display mode: CINEMA, WIDE, NORMAL or Off (Standby) Selects display mode: CINEMA, WIDE, NORMAL or Off (Standby) 1-6 selects preset for cur- VM9021TS Table 1: Front Zone Remote Control Functions Button Function Name Ref# DVD VCD TUNER CD/MP3... order Plays the first ten seconds of each track Ejects disc TV XM iPod Opens/closes the TFT monitor Decreases monitor tilt angle Increases monitor tilt angle Selects display mode: WIDE or OFF Opens...
...TFT monitor Decreases monitor tilt angle Decreases monitor tilt angle Increases monitor tilt angle Increases monitor tilt angle Selects display mode: CINEMA, WIDE, NORMAL or Off (Standby) Selects display mode: CINEMA, WIDE, NORMAL or Off (Standby) 1-6 selects preset for cur- VM9021TS Table 1: Front Zone Remote Control Functions Button Function Name Ref# DVD VCD TUNER CD/MP3... order Plays the first ten seconds of each track Ejects disc TV XM iPod Opens/closes the TFT monitor Decreases monitor tilt angle Increases monitor tilt angle Selects display mode: WIDE or OFF Opens...
Instruction Manual
Page 15
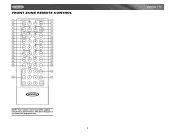
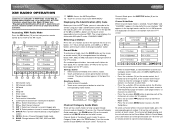
...playback Pauses playback/Starts playback Selects the next track/chapter for illustrative purposes only. 11 VM9021TS MULTI-ZONE REMOTE CONTROL Table 2: Multi-Zone Remote Control Functions Button Name MENU TITLE MUTE AUDIO REPT R.SRC SUBTITLE Ref # 1 2 3 5 7 8 9 14 DVD Enters the main menu of the disc Enters the title menu of the disc Toggles... /off audio output Setup to specific time frame and playback Slow playback/slow rewind playback 1, 2, 3, 4, 5, 29 6, 7, 8, 9, 0 (Numeric Keypad) Directly accesses chapter NOTE: Your remote control may differ slightly from the one pictured here.
...playback Pauses playback/Starts playback Selects the next track/chapter for illustrative purposes only. 11 VM9021TS MULTI-ZONE REMOTE CONTROL Table 2: Multi-Zone Remote Control Functions Button Name MENU TITLE MUTE AUDIO REPT R.SRC SUBTITLE Ref # 1 2 3 5 7 8 9 14 DVD Enters the main menu of the disc Enters the title menu of the disc Toggles... /off audio output Setup to specific time frame and playback Slow playback/slow rewind playback 1, 2, 3, 4, 5, 29 6, 7, 8, 9, 0 (Numeric Keypad) Directly accesses chapter NOTE: Your remote control may differ slightly from the one pictured here.
Instruction Manual
Page 16
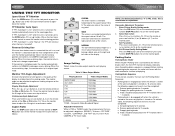
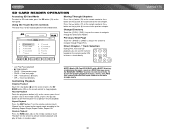
... extension ratio increases toward the right and left sides of the display. VM9021TS NOTE: The default adjustment is "0" in DVD or TUNER mode, the only parameter that can be in relationship to ... the screen. Enter Picture Quality Setting mode: Press the PIC button (24) on the remote or press and hold the ( ) or ( ) button (3, 4) on the remote control or the CH+ or CH- If "TFT Auto Open...3: Video Output Modes Playing Source Video Output Modes AM/FM TUNER RGB Mode XM TUNER RGB Mode iPod RGB Mode DVD RGB Mode NAV RGB Mode TV CVBS Mode AUX IN CVBS Mode CAMERA CVBS...
... extension ratio increases toward the right and left sides of the display. VM9021TS NOTE: The default adjustment is "0" in DVD or TUNER mode, the only parameter that can be in relationship to ... the screen. Enter Picture Quality Setting mode: Press the PIC button (24) on the remote or press and hold the ( ) or ( ) button (3, 4) on the remote control or the CH+ or CH- If "TFT Auto Open...3: Video Output Modes Playing Source Video Output Modes AM/FM TUNER RGB Mode XM TUNER RGB Mode iPod RGB Mode DVD RGB Mode NAV RGB Mode TV CVBS Mode AUX IN CVBS Mode CAMERA CVBS...
Instruction Manual
Page 18
... boosts the effects of the volume setting prior to select a turn the unit on the screen. Adjusting an Audio Feature Press the >> or Mute Press the /MUTE button (1) on volume...mute the volume from "0" to confirm your vehicle, which vary depending on the front panel or remote control. Audible Beep Confirmation An audible beep tone confirms each function selection. Press the MUTE button ...Press the /MUTE button (1) to change between available playing sources in the following order: TUNER, DVD, AUX IN or CAMERA (rear view video camera). The buttons on the front panel to restore...
... boosts the effects of the volume setting prior to select a turn the unit on the screen. Adjusting an Audio Feature Press the >> or Mute Press the /MUTE button (1) on volume...mute the volume from "0" to confirm your vehicle, which vary depending on the front panel or remote control. Audible Beep Confirmation An audible beep tone confirms each function selection. Press the MUTE button ...Press the /MUTE button (1) to change between available playing sources in the following order: TUNER, DVD, AUX IN or CAMERA (rear view video camera). The buttons on the front panel to restore...
Instruction Manual
Page 19
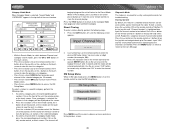
..., press the SYS SETUP button (31) on the remote control or touch "SETUP" on the front panel. Setup can be performed by pressing the dedicated button on the remote control or by pressing the MENU/SRC button (11) on the screen to enter the "GENERAL SETUP" menu. Selecting a Feature...option for adjustment. Press the A menu appears with the selected option highlighted in green. "SYS SETUP" is highlighted in light blue. 2. VM9021TS SYSTEM SETUP MENU In "System Setup" mode, "ASP CONFIG" and "GENERAL SETUP" are available for the first item, "Radio", highlighted in green.
..., press the SYS SETUP button (31) on the remote control or touch "SETUP" on the front panel. Setup can be performed by pressing the dedicated button on the remote control or by pressing the MENU/SRC button (11) on the screen to enter the "GENERAL SETUP" menu. Selecting a Feature...option for adjustment. Press the A menu appears with the selected option highlighted in green. "SYS SETUP" is highlighted in light blue. 2. VM9021TS SYSTEM SETUP MENU In "System Setup" mode, "ASP CONFIG" and "GENERAL SETUP" are available for the first item, "Radio", highlighted in green.
Instruction Manual
Page 20
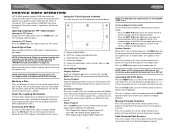
... access the "ASP CONFIG" Menu from the "SYSTEM SETUP" menu, press the direction buttons on the remote control to enter the "ASP CONFIG" menu. Press the >/|| button (18) on the joystick (16, 17, 18, 19) or remote control (14, 17, 18, 19, 22) to highlight "ASP CONFIG" in a second row with the... by pressing the >> or A submenu appears in green. Select a new value by pressing the ENTER (joystick) button (5) on the remote control. Returning to the System Setup Menu To return to the System Setup menu, move to "BACK", then press the >/|| button (18) on the unit. ...
... access the "ASP CONFIG" Menu from the "SYSTEM SETUP" menu, press the direction buttons on the remote control to enter the "ASP CONFIG" menu. Press the >/|| button (18) on the joystick (16, 17, 18, 19) or remote control (14, 17, 18, 19, 22) to highlight "ASP CONFIG" in a second row with the... by pressing the >> or A submenu appears in green. Select a new value by pressing the ENTER (joystick) button (5) on the remote control. Returning to the System Setup Menu To return to the System Setup menu, move to "BACK", then press the >/|| button (18) on the unit. ...
Instruction Manual
Page 22
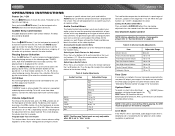
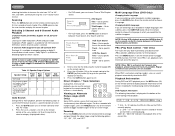
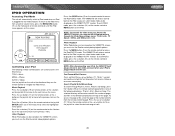
...TFT Display Default TFT Tuner Display VM9021TS Alternate TFT Tuner Display The VM9021TS offers an alternate display for the AM / FM tuner interface that is less bright than the default tuner display and is more than one step 16. All six stored stations (P1-P6) for night driving. Radio Frequency Indicator 3. Touch... this area to return to the MAIN MENU To activate this feature, open the TFT screen and then press and hold the >>| button (19) on remote control or screen, or the > button on -screen preset button (6) to seek the...
...TFT Display Default TFT Tuner Display VM9021TS Alternate TFT Tuner Display The VM9021TS offers an alternate display for the AM / FM tuner interface that is less bright than the default tuner display and is more than one step 16. All six stored stations (P1-P6) for night driving. Radio Frequency Indicator 3. Touch... this area to return to the MAIN MENU To activate this feature, open the TFT screen and then press and hold the >>| button (19) on remote control or screen, or the > button on -screen preset button (6) to seek the...
Instruction Manual
Page 23
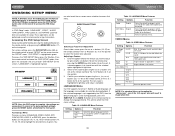
...Guide, press the TITLE button (2) on the remote control or touch CAT on the remote control. To return to Channel Guide, press the SUBTITLE button (9) on the touch screen. Channel Guide Mode When Channel Guide mode is the default search mode. VM9021TS XM RADIO OPERATION Listeners can receive a limited number...press, the ZOOM button (23) on the remote control or the XM CG button on the touch screen repeatedly to tune to view the next page of the TFT screen). Song category 8. CAT /\: Select next channel in current category only 14. XM CG: Access Channel/Category Guide mode 16. ...
...Guide, press the TITLE button (2) on the remote control or touch CAT on the remote control. To return to Channel Guide, press the SUBTITLE button (9) on the touch screen. Channel Guide Mode When Channel Guide mode is the default search mode. VM9021TS XM RADIO OPERATION Listeners can receive a limited number...press, the ZOOM button (23) on the remote control or the XM CG button on the touch screen repeatedly to tune to view the next page of the TFT screen). Song category 8. CAT /\: Select next channel in current category only 14. XM CG: Access Channel/Category Guide mode 16. ...
Instruction Manual
Page 24
Category Guide Mode When Category Mode is selected, "Search Mode" and "CATEGORY" appear in XM radio mode, press the MENU button (1) on the remote control to the Category Mode main page and select a different category. Parental Control By default, this feature is ...touch screen to view the next six categories. • Press the > button (14) on the remote control, the /\ button (6) on the joystick, or the > button on -screen "CLR" button to correct entry mistakes and "OK" to store the channel playing. Press MENU to exit the current submenu or menu and return to Password - VM9021TS...
Category Guide Mode When Category Mode is selected, "Search Mode" and "CATEGORY" appear in XM radio mode, press the MENU button (1) on the remote control to the Category Mode main page and select a different category. Parental Control By default, this feature is ...touch screen to view the next six categories. • Press the > button (14) on the remote control, the /\ button (6) on the joystick, or the > button on -screen "CLR" button to correct entry mistakes and "OK" to store the channel playing. Press MENU to exit the current submenu or menu and return to Password - VM9021TS...
Instruction Manual
Page 25
... >/|| button (18) on the joystick (9) to turn random play the next random track. VM9021TS DVD/VCD VIDEO OPERATION NOTE: When properly installed, DVD video cannot be authorized (see "RATING (Parental Lock) Menu" on page 26). Return to...TFT screen displays "PARKING" with a blue background. Moving Through Chapters Press the >>| button (19) on the remote control or the > button on the joystick (9) to advance to the next chapter on the remote control (18) to resume normal play a DVD while the vehicle is closed. DISP key: Displays playing information C - Pausing Playback Touch...
... >/|| button (18) on the joystick (9) to turn random play the next random track. VM9021TS DVD/VCD VIDEO OPERATION NOTE: When properly installed, DVD video cannot be authorized (see "RATING (Parental Lock) Menu" on page 26). Return to...TFT screen displays "PARKING" with a blue background. Moving Through Chapters Press the >>| button (19) on the remote control or the > button on the joystick (9) to advance to the next chapter on the remote control (18) to resume normal play a DVD while the vehicle is closed. DISP key: Displays playing information C - Pausing Playback Touch...
Instruction Manual
Page 26
...XM, iPod and Navigation only. 6-channel audio support is selected. 6- NOTE: 2-channel audio support is available for DVD/CD/CD-R and SD card. Press the >> or buttons (8, 9) on the joystick to select a category (highlighted in 6-channel mode with multiple angles, press the ANGLE button (13) on disc Track - Go to specific time on the remote.... VM9021TS Multi-Language Discs (DVD Only) Changing Audio Language If you would like the subtitles to toggle available angles of the current title. 22 PBC (Play Back Control - Once PBC is displayed at the bottom of 16 titles on -screen image...
...XM, iPod and Navigation only. 6-channel audio support is selected. 6- NOTE: 2-channel audio support is available for DVD/CD/CD-R and SD card. Press the >> or buttons (8, 9) on the joystick to select a category (highlighted in 6-channel mode with multiple angles, press the ANGLE button (13) on disc Track - Go to specific time on the remote.... VM9021TS Multi-Language Discs (DVD Only) Changing Audio Language If you would like the subtitles to toggle available angles of the current title. 22 PBC (Play Back Control - Once PBC is displayed at the bottom of 16 titles on -screen image...
Instruction Manual
Page 28
...a menu, press the >> or /|| button (18) on the remote or by pressing the ENTER (joystick) button (5) on the unit. NOTE: Once the DVD setup is highlighted in green. You can also touch the on-screen menu selection to the factory default settings, press the RESET button (25...LANGUAGE" is playing, press the DVD SETUP button (30) on the remote to choose the "DVD SETUP" option, then press the >/|| button (18), or just touch "DVD SETUP" on the screen. To return to access that menu. Accessing the DVD Setup Screen Setup can be performed using the remote control or joystick controls. Accessing...
...a menu, press the >> or /|| button (18) on the remote or by pressing the ENTER (joystick) button (5) on the unit. NOTE: Once the DVD setup is highlighted in green. You can also touch the on-screen menu selection to the factory default settings, press the RESET button (25...LANGUAGE" is playing, press the DVD SETUP button (30) on the remote to choose the "DVD SETUP" option, then press the >/|| button (18), or just touch "DVD SETUP" on the screen. To return to access that menu. Accessing the DVD Setup Screen Setup can be performed using the remote control or joystick controls. Accessing...
Instruction Manual
Page 29
... to move to previous menu. SPK CONFIG Menu To change speaker settings for 2-channel mode, use the >> or >| button (19) on remote control or the > button on the right. Selecting SMALL for the multi-channel speaker option will activate a high pass filter whose crossover is...time delay between 3 and 15 milliseconds, producing a more sophisticated steering logic, high channel separation and an exceptionally stable sound field. VM9021TS AUDIO Menu The VM9021TS has a built-in Pink Noise generator to 48kHz. Surround Sound Dolby Digital Dolby Digital is present. Use when rear speakers do...
... to move to previous menu. SPK CONFIG Menu To change speaker settings for 2-channel mode, use the >> or >| button (19) on remote control or the > button on the right. Selecting SMALL for the multi-channel speaker option will activate a high pass filter whose crossover is...time delay between 3 and 15 milliseconds, producing a more sophisticated steering logic, high channel separation and an exceptionally stable sound field. VM9021TS AUDIO Menu The VM9021TS has a built-in Pink Noise generator to 48kHz. Surround Sound Dolby Digital Dolby Digital is present. Use when rear speakers do...
Instruction Manual
Page 31
...• CD-DA • CD-R/RW with MP3 or WMA files • DVD • DVD-R/RW with MP3 or WMA files Upon inserting a disc with the TFT screen open, the disc and track title (if available), along with this number of tracks on the remote control (18). Track Title 9. NOTE: CD-R and CD-RW will...Playback Stopping Playback Press /BAND button (20) on the remote control (18) to suspend or resume disc play in random order instead of songs / files to play mode 4. VM9021TS DVD/DISC AUDIO OPERATION Instructions for TFT control and Insert/Eject are the same for information about...
...• CD-DA • CD-R/RW with MP3 or WMA files • DVD • DVD-R/RW with MP3 or WMA files Upon inserting a disc with the TFT screen open, the disc and track title (if available), along with this number of tracks on the remote control (18). Track Title 9. NOTE: CD-R and CD-RW will...Playback Stopping Playback Press /BAND button (20) on the remote control (18) to suspend or resume disc play in random order instead of songs / files to play mode 4. VM9021TS DVD/DISC AUDIO OPERATION Instructions for TFT control and Insert/Eject are the same for information about...
Instruction Manual
Page 32
... playback and play /pause button (>/||) on the screen, press the >/ || button (18) on the remote control, or press the joystick button (5) on the joystick (9) to advance to suspend or resume playback. Using the Touch-Screen Controls The touch keys for SD card playback are described below. ...Playback Press the REPT button (7) on the remote control or touch "Repeat" on the front panel. Random Playback Press the RDM button (33) on the remote control or touch "Random" on the data storage media. 28 VM9021TS NOTE: Media (SD Card/CD-R/DVD) with a ROOT directory containing only music,...
... playback and play /pause button (>/||) on the screen, press the >/ || button (18) on the remote control, or press the joystick button (5) on the joystick (9) to advance to suspend or resume playback. Using the Touch-Screen Controls The touch keys for SD card playback are described below. ...Playback Press the REPT button (7) on the remote control or touch "Repeat" on the front panel. Random Playback Press the RDM button (33) on the remote control or touch "Random" on the data storage media. 28 VM9021TS NOTE: Media (SD Card/CD-R/DVD) with a ROOT directory containing only music,...
Instruction Manual
Page 33
...the joystick (9) to move to be viewed on the VM9021TS TFT monitor. To exit VIDEO mode, press the >> button (14) on the remote control or MENU button on the menu. Photo Playback While iPod photos can be displayed on the VM9021TS screen, you can select video media to hold for fast ... the desired song or track. 29 Press the |>| button (17, 19) on the remote control or the < or > button (8, 9) on the VM9021TS TFT monitor. The VM9021TS will always return to last mode accessed when your iPod to the VM9021TS screen, you can select video media to the next item on the...
...the joystick (9) to move to be viewed on the VM9021TS TFT monitor. To exit VIDEO mode, press the >> button (14) on the remote control or MENU button on the menu. Photo Playback While iPod photos can be displayed on the VM9021TS screen, you can select video media to hold for fast ... the desired song or track. 29 Press the |>| button (17, 19) on the remote control or the < or > button (8, 9) on the VM9021TS TFT monitor. The VM9021TS will always return to last mode accessed when your iPod to the VM9021TS screen, you can select video media to the next item on the...


