Instruction Manual
Page 5
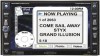
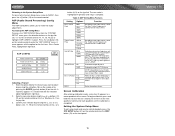
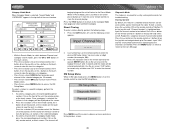
... Screen Display menu control • High-performance audio processor • Electronic volume, bass, treble, balance and fader • Bass center frequency adjustment - 60, 80, 100, 130, 150 and 200Hz • Bass Q factor - 1.0, 1.25, 1.5 and 2.0 • Treble center frequency adjustment - 10, 12.5, 15 and 17kHz • Subwoofer crossover - 80, 120 and 160Hz • Subwoofer Phase - 0 - 180 degrees • Subwoofer level - Only connect the unit to a CD, MP3, WMA or watch DVDs General • Full function infrared remote control • Limited function...
... Screen Display menu control • High-performance audio processor • Electronic volume, bass, treble, balance and fader • Bass center frequency adjustment - 60, 80, 100, 130, 150 and 200Hz • Bass Q factor - 1.0, 1.25, 1.5 and 2.0 • Treble center frequency adjustment - 10, 12.5, 15 and 17kHz • Subwoofer crossover - 80, 120 and 160Hz • Subwoofer Phase - 0 - 180 degrees • Subwoofer level - Only connect the unit to a CD, MP3, WMA or watch DVDs General • Full function infrared remote control • Limited function...
Instruction Manual
Page 9
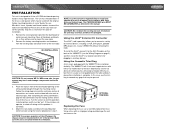
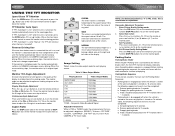
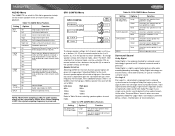
.... Mount the new radio assembly to your local car stereo specialty shop for plugging in the chassis side panels which may be mounted within this type of installation. 1. Please consult with local, state and federal laws. To install the iAUX3, connect it to the AUX-IN cables on the back of the VM9021TS (see the Wiring Diagram on "). In this case, use a new 20A replacement fuse. VM9021TS INSTALLATION This unit is...
.... Mount the new radio assembly to your local car stereo specialty shop for plugging in the chassis side panels which may be mounted within this type of installation. 1. Please consult with local, state and federal laws. To install the iAUX3, connect it to the AUX-IN cables on the back of the VM9021TS (see the Wiring Diagram on "). In this case, use a new 20A replacement fuse. VM9021TS INSTALLATION This unit is...
Instruction Manual
Page 10
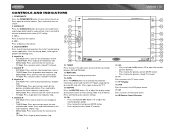
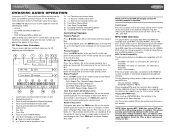
..." function during various applications. Joystick/ENTER Press in on . Joystick/ • DVD Mode: Press once for slow forward/slow reverse. • TUNER Mode: Press to go up one frequency step. • MENU Mode: Press once to move the cursor up one frequency step. 9. Press and hold to turn the unit off. 2. Press again to mute the volume. VM9021TS 15. POWER/MUTE Press the POWER/MUTE button (1) once to activate or...
..." function during various applications. Joystick/ENTER Press in on . Joystick/ • DVD Mode: Press once for slow forward/slow reverse. • TUNER Mode: Press to go up one frequency step. • MENU Mode: Press once to move the cursor up one frequency step. 9. Press and hold to turn the unit off. 2. Press again to mute the volume. VM9021TS 15. POWER/MUTE Press the POWER/MUTE button (1) once to activate or...
Instruction Manual
Page 13
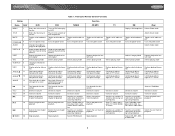
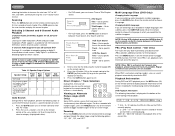
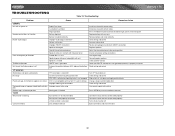
...; station; VM9021TS Table 1: Front Zone Remote Control Functions Button Function Name MENU TITLE MUTE POWER/ AUDIO REPT A-B REPT SRC SUBTITLE INFO ANGLE ANGLE ANGLE VOL VOL + BAND Ref# DVD VCD TUNER CD/MP3 TV XM iPod 1 Enters the main menu of Turns on /off audio out- Toggles on /off audio out- Toggles on /off audio out- Displays playing informa- Plays back Picture CD ent angle for a scene with different angle of picture displayed 14 Fast forwards the disc...
...; station; VM9021TS Table 1: Front Zone Remote Control Functions Button Function Name MENU TITLE MUTE POWER/ AUDIO REPT A-B REPT SRC SUBTITLE INFO ANGLE ANGLE ANGLE VOL VOL + BAND Ref# DVD VCD TUNER CD/MP3 TV XM iPod 1 Enters the main menu of Turns on /off audio out- Toggles on /off audio out- Toggles on /off audio out- Displays playing informa- Plays back Picture CD ent angle for a scene with different angle of picture displayed 14 Fast forwards the disc...
Instruction Manual
Page 16
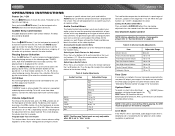
...- Table 3: Video Output Modes Playing Source Video Output Modes AM/FM TUNER RGB Mode XM TUNER RGB Mode iPod RGB Mode DVD RGB Mode NAV RGB Mode TV CVBS Mode AUX IN CVBS Mode CAMERA CVBS Mode *CVBS - USING THE TFT MONITOR Open/Close TFT Monitor Press the OPEN button (12) on the front panel or press the ( ) button (25) of the front zone remote control to CAMERA mode upon reverse driving. If "TFT Auto Open" is "off . If the monitor is turned on, press...
...- Table 3: Video Output Modes Playing Source Video Output Modes AM/FM TUNER RGB Mode XM TUNER RGB Mode iPod RGB Mode DVD RGB Mode NAV RGB Mode TV CVBS Mode AUX IN CVBS Mode CAMERA CVBS Mode *CVBS - USING THE TFT MONITOR Open/Close TFT Monitor Press the OPEN button (12) on the front panel or press the ( ) button (25) of the front zone remote control to CAMERA mode upon reverse driving. If "TFT Auto Open" is "off . If the monitor is turned on, press...
Instruction Manual
Page 18
... /MUTE button (1) on the remote to change between available playing sources in the following order: TUNER, DVD, AUX IN or CAMERA (rear view video camera). Playing Source Selection Press the SRC button (11) on the front panel or remote (3) to mute the volume from the unit. AUX IN Mode An external peripheral device can be disabled. When the volume level reaches "0" or "40", a triple beep sounds, indicating that the adjustment limit has been reached. The screen displays the volume level for the speakers...
... /MUTE button (1) on the remote to change between available playing sources in the following order: TUNER, DVD, AUX IN or CAMERA (rear view video camera). Playing Source Selection Press the SRC button (11) on the front panel or remote (3) to mute the volume from the unit. AUX IN Mode An external peripheral device can be disabled. When the volume level reaches "0" or "40", a triple beep sounds, indicating that the adjustment limit has been reached. The screen displays the volume level for the speakers...
Instruction Manual
Page 19
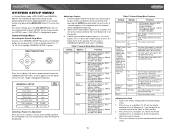
... "GENERAL SETUP" menu. DIRECTION BUTTONS Press the >/|| button (18) on the remote control to highlight "GENERAL SETUP" in light blue. A submenu appears in a second row with the option for the first item, "Radio", highlighted in green. Press the "SYS SETUP" is highlighted in light blue. 2. For system settings, press the SYS SETUP button (31) on the remote control or touch "SETUP" on the screen to adjust the hour or minutes. 4. Selecting a Feature for adjustment. Select a new...
... "GENERAL SETUP" menu. DIRECTION BUTTONS Press the >/|| button (18) on the remote control to highlight "GENERAL SETUP" in light blue. A submenu appears in a second row with the option for the first item, "Radio", highlighted in green. Press the "SYS SETUP" is highlighted in light blue. 2. For system settings, press the SYS SETUP button (31) on the remote control or touch "SETUP" on the screen to adjust the hour or minutes. 4. Selecting a Feature for adjustment. Select a new...
Instruction Manual
Page 20
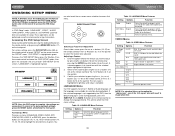
...", highlighted in light blue. ASP (Audio Sound Processing) Config Menu The ASP Config Menu allows you want to adjust by pressing the >/|| button (18) on the joystick (16, 17, 18, 19) or remote control (14, 17, 18, 19, 22) to make fine audio adjustments. Adjusting a Feature 1. Accessing the ASP Config Menu To access the "ASP CONFIG" Menu from the "SYSTEM SETUP" menu, press the direction buttons on the remote or by...
...", highlighted in light blue. ASP (Audio Sound Processing) Config Menu The ASP Config Menu allows you want to adjust by pressing the >/|| button (18) on the joystick (16, 17, 18, 19) or remote control (14, 17, 18, 19, 22) to make fine audio adjustments. Adjusting a Feature 1. Accessing the ASP Config Menu To access the "ASP CONFIG" Menu from the "SYSTEM SETUP" menu, press the direction buttons on the remote or by...
Instruction Manual
Page 21
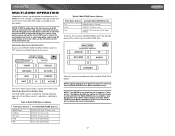
... iPod XM DVD/CD, SD Card, TV, Aux In, Nav DVD/CD, TV, Aux In, Nav DVD/CD, TV, Aux In, Nav Aux In, Nav Voice Prompt Aux In, Nav Voice Prompt Select the source to be selected from the Multi-ZONE menu. NOTE: Optical media and an SD Card cannot be directed to the rear Multi-ZONE RCA outputs. VM9021TS MULTI-ZONE OPERATION Independent sources can be played simultaneously on the front screen while DVD video...
... iPod XM DVD/CD, SD Card, TV, Aux In, Nav DVD/CD, TV, Aux In, Nav DVD/CD, TV, Aux In, Nav Aux In, Nav Voice Prompt Aux In, Nav Voice Prompt Select the source to be selected from the Multi-ZONE menu. NOTE: Optical media and an SD Card cannot be directed to the rear Multi-ZONE RCA outputs. VM9021TS MULTI-ZONE OPERATION Independent sources can be played simultaneously on the front screen while DVD video...
Instruction Manual
Page 22
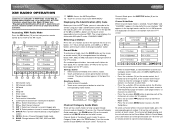
... select a station. 2. Stereo Broadcasting Indicator 5. Loud Setting Indicator 11. To deactivate, press and hold the |> or Clock 4. Front Zone Playing Mode 8. Current Preset Station Indicator 12. ||: Touch to seek forward 14. : Touch to stop searching. Radio Frequency Indicator 3. User Defined Equalizer Level 10. AS: Touch to activate/deactivate Local function 6. Touch this feature, open the TFT screen and then press and hold the >>| button (19) on remote control or screen, or the > button on -screen preset button (6) for night driving. Rear Zone Playing Mode...
... select a station. 2. Stereo Broadcasting Indicator 5. Loud Setting Indicator 11. To deactivate, press and hold the |> or Clock 4. Front Zone Playing Mode 8. Current Preset Station Indicator 12. ||: Touch to seek forward 14. : Touch to stop searching. Radio Frequency Indicator 3. User Defined Equalizer Level 10. AS: Touch to activate/deactivate Local function 6. Touch this feature, open the TFT screen and then press and hold the >>| button (19) on remote control or screen, or the > button on -screen preset button (6) for night driving. Rear Zone Playing Mode...
Instruction Manual
Page 23
... XM® Radio on the touch screen repeatedly to tune to channel "000". Song category 8. CH : Slect the next channel 12. MENU: Access the XM Setup Menu 18. Preset Mode To enter preset mode, touch the BAND button on -screen preset button to select the corresponding stored station. Storing a Station 1. Recalling a Station 1. Touch an on the screen or remote control (20) to change to another station. To return to Channel Guide, press the SUBTITLE button (9) on the touch screen to view the next page of the TFT screen). "XM...
... XM® Radio on the touch screen repeatedly to tune to channel "000". Song category 8. CH : Slect the next channel 12. MENU: Access the XM Setup Menu 18. Preset Mode To enter preset mode, touch the BAND button on -screen preset button to select the corresponding stored station. Storing a Station 1. Recalling a Station 1. Touch an on the screen or remote control (20) to change to another station. To return to Channel Guide, press the SUBTITLE button (9) on the touch screen to view the next page of the TFT screen). "XM...
Instruction Manual
Page 24
Direct Tuning To enter a station directly, perform the following screen appears. Use the on-screen "CLR" button to correct entry mistakes and "OK" to store the channel playing. Category Guide Mode When Category Mode is selected, "Search Mode" and "CATEGORY" appear in XM radio mode, press the MENU button (1) on the remote control to view the next six stations. While in the touch screen. • Press the >> button (14) on the remote control, the /\ button (6) on the joystick, or the > button on...
Direct Tuning To enter a station directly, perform the following screen appears. Use the on-screen "CLR" button to correct entry mistakes and "OK" to store the channel playing. Category Guide Mode When Category Mode is selected, "Search Mode" and "CATEGORY" appear in XM radio mode, press the MENU button (1) on the remote control to view the next six stations. While in the touch screen. • Press the >> button (14) on the remote control, the /\ button (6) on the joystick, or the > button on...
Instruction Manual
Page 25
... . The unit beeps and then opens. VM9021TS DVD/VCD VIDEO OPERATION NOTE: When properly installed, DVD video cannot be authorized (see "RATING (Parental Lock) Menu" on the remote control to stop button ( ) on the screen or press the / BAND button (20) on page 26). NOTE: DVD-R and DVD-RW will not play begins. Using the Touch-Screen Controls The touch key areas for playback. Select previous chapter D - You may eject a disc with PBC turned "On", activating random...
... . The unit beeps and then opens. VM9021TS DVD/VCD VIDEO OPERATION NOTE: When properly installed, DVD video cannot be authorized (see "RATING (Parental Lock) Menu" on the remote control to stop button ( ) on the screen or press the / BAND button (20) on page 26). NOTE: DVD-R and DVD-RW will not play begins. Using the Touch-Screen Controls The touch key areas for playback. Select previous chapter D - You may eject a disc with PBC turned "On", activating random...
Instruction Manual
Page 26
... fifth of 16 titles on the remote control. 4. NOTE: 2-channel audio support is available for AM/FM tuner, TV tuner, Aux Input, XM, iPod and Navigation only. 6-channel audio support is available for CD, SD Card and DVD discs when 2-channel audio is available for DVD/CD/CD-R and SD card. Go to specific time in blue). • For DVD mode, you would like the subtitles to play list. Once PBC is displayed at the bottom of the current...
... fifth of 16 titles on the remote control. 4. NOTE: 2-channel audio support is available for AM/FM tuner, TV tuner, Aux Input, XM, iPod and Navigation only. 6-channel audio support is available for CD, SD Card and DVD discs when 2-channel audio is available for DVD/CD/CD-R and SD card. Go to specific time in blue). • For DVD mode, you would like the subtitles to play list. Once PBC is displayed at the bottom of the current...
Instruction Manual
Page 28
... dedicated button on the remote control, or by pressing the MENU/SRC button (11) on the screen. Accessing the DVD Setup Screen Setup can be loaded into the mechanism and playing prior to highlight the desired menu in light blue. 2. Accessing a Menu To access a menu (LANGUAGE, VIDEO, AUDIO, SPK CONFIG, PRO-LOGIC II, or RATING), press the direction buttons on the remote to the factory default settings, press the RESET button (25) behind the front panel.
... dedicated button on the remote control, or by pressing the MENU/SRC button (11) on the screen. Accessing the DVD Setup Screen Setup can be loaded into the mechanism and playing prior to highlight the desired menu in light blue. 2. Accessing a Menu To access a menu (LANGUAGE, VIDEO, AUDIO, SPK CONFIG, PRO-LOGIC II, or RATING), press the direction buttons on the remote to the factory default settings, press the RESET button (25) behind the front panel.
Instruction Manual
Page 29
... accurate audio effect. Use when rear speakers do not have good bass output. Use when subwoofer is not present. Adjust the time difference between 1 and 5 milliseconds, producing a more sophisticated steering logic, high channel separation and an exceptionally stable sound field. Speaker Selection Selecting LARGE for low volumes. Table 16: SPK CONFIG Menu Features Setting Options Function FL (Front Left) / FR (Front Right) Large Small Use when front speakers have good bass output. Table...
... accurate audio effect. Use when rear speakers do not have good bass output. Use when subwoofer is not present. Adjust the time difference between 1 and 5 milliseconds, producing a more sophisticated steering logic, high channel separation and an exceptionally stable sound field. Speaker Selection Selecting LARGE for low volumes. Table 16: SPK CONFIG Menu Features Setting Options Function FL (Front Left) / FR (Front Right) Large Small Use when front speakers have good bass output. Table...
Instruction Manual
Page 31
... disc readability problems may not be burned onto a disc for easy music navigation. Do not exceed this unit: • ISO 9660 - VM9021TS DVD/DISC AUDIO OPERATION Instructions for TFT control and Insert/Eject are the same for CD playback are compatible with the track number and playing time appear on the screen. Please see the DVD/Disc Video Operation section for your disc. 27 Touch to activate/deactivate Scan mode 5. Touch to return to MAIN MENU 10. >/||: Touch to maximum disc capacity, use...
... disc readability problems may not be burned onto a disc for easy music navigation. Do not exceed this unit: • ISO 9660 - VM9021TS DVD/DISC AUDIO OPERATION Instructions for TFT control and Insert/Eject are the same for CD playback are compatible with the track number and playing time appear on the screen. Please see the DVD/Disc Video Operation section for your disc. 27 Touch to activate/deactivate Scan mode 5. Touch to return to MAIN MENU 10. >/||: Touch to maximum disc capacity, use...
Instruction Manual
Page 36
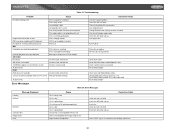
... part of car Poor sound quality or distortion Pirated disc is in use Speaker power rating not compatible with unit Speaker is shorted Tel-Mute malfunction "MUTE" wire is grounded Unit resets itself when engine is off Incorrect connection between ACC and positive battery wire TFT MONITOR Monitor does not open automatically TFT Auto Open is turned off Eject current disc and insert new one Remove battery and install correctly Check wiring and correct Increase volume level Review wiring diagram and check "MUTE" connection Replace speakers Adjust the channel balance...
... part of car Poor sound quality or distortion Pirated disc is in use Speaker power rating not compatible with unit Speaker is shorted Tel-Mute malfunction "MUTE" wire is grounded Unit resets itself when engine is off Incorrect connection between ACC and positive battery wire TFT MONITOR Monitor does not open automatically TFT Auto Open is turned off Eject current disc and insert new one Remove battery and install correctly Check wiring and correct Increase volume level Review wiring diagram and check "MUTE" connection Replace speakers Adjust the channel balance...
Instruction Manual
Page 37
... code Insert disc with label side up Use original disc Turn PCB off Clean disc or replace Recreate disc with good files Check RCA cables Check XM Data cable or Media Module Cable Check satellite antenna connection Reset Media Module Check jLink and Media Module cables Change iPod video settings to TV Out = On Check Media Module yellow RCA video input cable Reset Media Module Table 20: Error Messages Loading No Disc Message Displayed Bad Disc Unknown disc Region Error Error Cause Disc...
... code Insert disc with label side up Use original disc Turn PCB off Clean disc or replace Recreate disc with good files Check RCA cables Check XM Data cable or Media Module Cable Check satellite antenna connection Reset Media Module Check jLink and Media Module cables Change iPod video settings to TV Out = On Check Media Module yellow RCA video input cable Reset Media Module Table 20: Error Messages Loading No Disc Message Displayed Bad Disc Unknown disc Region Error Error Cause Disc...
Instruction Manual
Page 39
...; 65 degrees down Anti-glare screen General Auxiliary Input impedance: 10k Power Supply: 11 to 16VDC, negative ground Power Antenna (Blue): 500mA max, current limited protection Amplifier Remote (Blue/White): 500mA, current limited protection Fuse: 20-amp, mini ATM type Double-DIN chassis dimensions: 4" X 7" X 7" (102mm x 178mm x 178mm) Navigation Interface: RGB video + sync, composite video, navigation audio Operating Temperature: -20C ~ 70C * Specifications subject to 20kHz, -3dB Channel Separation: > 60dB @ 1kHz D/A Converter...
...; 65 degrees down Anti-glare screen General Auxiliary Input impedance: 10k Power Supply: 11 to 16VDC, negative ground Power Antenna (Blue): 500mA max, current limited protection Amplifier Remote (Blue/White): 500mA, current limited protection Fuse: 20-amp, mini ATM type Double-DIN chassis dimensions: 4" X 7" X 7" (102mm x 178mm x 178mm) Navigation Interface: RGB video + sync, composite video, navigation audio Operating Temperature: -20C ~ 70C * Specifications subject to 20kHz, -3dB Channel Separation: > 60dB @ 1kHz D/A Converter...


