Instruction Manual
Page 5
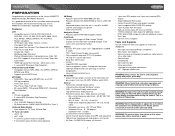
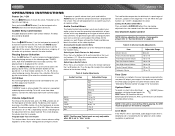
...; 1-pair headphone/Multi-ZONE RCA outputs • 1-pair auxiliary RCA A/V inputs • Back-up to install your Jensen VM9021TS installed by a reputable installation shop. Store up camera input with proper grounding. cooling to moisture or water. 1 variable • 22...all iPod's except "Shuffle" • Displays all text information including category, track name, artist and channel number Chassis • 6.5 inch TFT touch screen LCD - 280,800 pixels (1200W X 234H) • TSD - Features DVD • Compatible formats: DVD-R, DVD-RW, DVD+R, DVD+RW, CD-R, CD-RW, CD-DA, MP3, WMA, ...
...; 1-pair headphone/Multi-ZONE RCA outputs • 1-pair auxiliary RCA A/V inputs • Back-up to install your Jensen VM9021TS installed by a reputable installation shop. Store up camera input with proper grounding. cooling to moisture or water. 1 variable • 22...all iPod's except "Shuffle" • Displays all text information including category, track name, artist and channel number Chassis • 6.5 inch TFT touch screen LCD - 280,800 pixels (1200W X 234H) • TSD - Features DVD • Compatible formats: DVD-R, DVD-RW, DVD+R, DVD+RW, CD-R, CD-RW, CD-DA, MP3, WMA, ...
Instruction Manual
Page 6
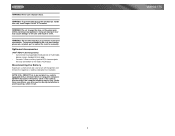
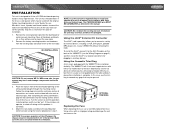
To prevent damage to the TFT monitor. WARNING! To prevent damage to the mechanism inside this unit, avoid impact to the core mechanism, please do not push, pull or swivel the monitor manually. WARNING! NOTE: If the VM9021TS is disconnected, the computer memory may cause damage to be installed in a fire. If the cable...
To prevent damage to the TFT monitor. WARNING! To prevent damage to the mechanism inside this unit, avoid impact to the core mechanism, please do not push, pull or swivel the monitor manually. WARNING! NOTE: If the VM9021TS is disconnected, the computer memory may cause damage to be installed in a fire. If the cable...
Instruction Manual
Page 7
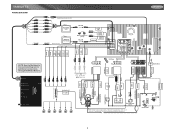
...: The white multipin connector will not void any warranty that the unit may have. Head Unit XM Audio Left XM Audio Right XM Control Data iPod TV Ant - In this case, it can be used in every installation. VM9021TS WIRING DIAGRAM RED GREEN BLUE BLACK WHITE YELLOW RED GREEN BLUE BLACK WHITE Media Module Cable / BLACK...
...: The white multipin connector will not void any warranty that the unit may have. Head Unit XM Audio Left XM Audio Right XM Control Data iPod TV Ant - In this case, it can be used in every installation. VM9021TS WIRING DIAGRAM RED GREEN BLUE BLACK WHITE YELLOW RED GREEN BLUE BLACK WHITE Media Module Cable / BLACK...
Instruction Manual
Page 9
...the CD player, the chassis must be brought through the mounting sleeve. To install the iAUX3, connect it to the dashboard. Place the radio in a location convenient for installation ... the unit may touch and damage components inside the chassis. 3. If the unit does not operate, re-check all connections are secure and insulated with your VM9021TS without removing the radio... be used with the VM9021TS for plugging in step 1. Make sure the unit is corrected. 4. In this type of external devices, including a VCR, DVD player, portable MP3 player, etc., to the...
...the CD player, the chassis must be brought through the mounting sleeve. To install the iAUX3, connect it to the dashboard. Place the radio in a location convenient for installation ... the unit may touch and damage components inside the chassis. 3. If the unit does not operate, re-check all connections are secure and insulated with your VM9021TS without removing the radio... be used with the VM9021TS for plugging in step 1. Make sure the unit is corrected. 4. In this type of external devices, including a VCR, DVD player, portable MP3 player, etc., to the...
Instruction Manual
Page 18
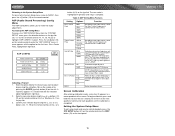
...the front of the unit light up features cancels the mute function. To install a rear view video camera, connect the video input cable to restore the volume. To decrease the volume level, press the VOL - The screen displays the volume level for the speakers as well. Proper setting of ...the POWER button (4) on the remote to change between available playing sources in the following order: TUNER, DVD, AUX IN or CAMERA (rear view video camera). button (4) on the screen. Audio Control Menu The Audio Control feature allows you to easily adjust your audio system to meet the ...
...the front of the unit light up features cancels the mute function. To install a rear view video camera, connect the video input cable to restore the volume. To decrease the volume level, press the VOL - The screen displays the volume level for the speakers as well. Proper setting of ...the POWER button (4) on the remote to change between available playing sources in the following order: TUNER, DVD, AUX IN or CAMERA (rear view video camera). button (4) on the screen. Audio Control Menu The Audio Control feature allows you to easily adjust your audio system to meet the ...
Instruction Manual
Page 20
Select a new value by pressing the ENTER (joystick) button (5) on the joystick (16, 17, 18, 19) or remote control (14, 17, 18, 19, 22) to make fine audio adjustments. Returning to the System Setup Menu To return to the System Setup menu, move to "BACK", then press the >/|| button (18) on the remote control to enter the "ASP CONFIG" menu. Press the >/|| button (18) on the remote control. Adjusting a Feature 1. Accessing the ASP Config Menu To access the "ASP CONFIG" Menu from the "SYSTEM SETUP" menu, press the direction buttons on the unit. A submenu appears in a second row with ...
Select a new value by pressing the ENTER (joystick) button (5) on the joystick (16, 17, 18, 19) or remote control (14, 17, 18, 19, 22) to make fine audio adjustments. Returning to the System Setup Menu To return to the System Setup menu, move to "BACK", then press the >/|| button (18) on the remote control to enter the "ASP CONFIG" menu. Press the >/|| button (18) on the remote control. Adjusting a Feature 1. Accessing the ASP Config Menu To access the "ASP CONFIG" Menu from the "SYSTEM SETUP" menu, press the direction buttons on the unit. A submenu appears in a second row with ...
Instruction Manual
Page 25
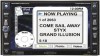
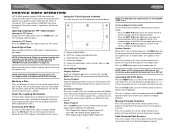
VM9021TS DVD/VCD VIDEO OPERATION NOTE: When properly installed, DVD video cannot be authorized (see "RATING (Parental Lock) Menu" on the unit or remote control (35) to close the TFT screen. Rear video screens, if applicable, will not play begins. You cannot insert a disc if there is ...to DVD mode when a disc is applied. Opening/Closing the TFT Video Screen Opening the TFT Screen To open the TFT video screen, press the OPEN button (12). The unit beeps and then opens. Using the Touch-Screen Controls The touch key areas for playback. Normal operation resumes. Accessing DVD Mode...
VM9021TS DVD/VCD VIDEO OPERATION NOTE: When properly installed, DVD video cannot be authorized (see "RATING (Parental Lock) Menu" on the unit or remote control (35) to close the TFT screen. Rear video screens, if applicable, will not play begins. You cannot insert a disc if there is ...to DVD mode when a disc is applied. Opening/Closing the TFT Video Screen Opening the TFT Screen To open the TFT video screen, press the OPEN button (12). The unit beeps and then opens. Using the Touch-Screen Controls The touch key areas for playback. Normal operation resumes. Accessing DVD Mode...
Instruction Manual
Page 35
VM9021TS NAVIGATION SYSTEM The VM9021TS is not available. 31 While the NAV100 is not installed, the NAVI option appears gray, indicating the function is "navigation ready." Once the NAV100 is connected and operating properly, the NAVI source mode will be included with the NAV100 navigation module. Before accessing any navigation features, you must purchase and install the NAV100 module. All installation and operating instructions will become active.
VM9021TS NAVIGATION SYSTEM The VM9021TS is not available. 31 While the NAV100 is not installed, the NAVI option appears gray, indicating the function is "navigation ready." Once the NAV100 is connected and operating properly, the NAVI source mode will be included with the NAV100 navigation module. Before accessing any navigation features, you must purchase and install the NAV100 module. All installation and operating instructions will become active.
Instruction Manual
Page 36
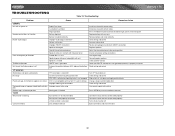
... Flashing image or interference appears on screen DVD is not grounded and that it's properly insulated Check wiring and correct Turn TFT Auto Open on Radio Fuse blown... part of the front panel Replace battery with new one Remove battery and install correctly Check wiring and correct Increase volume level Review wiring diagram and check...TFT Auto Open is turned off No image Incorrect connection to restart monitor movement Connect the auto antenna control cable properly Connect the auto antenna control cable properly Turn LOCAL function off Eject current disc and insert new one 32 VM9021TS...
... Flashing image or interference appears on screen DVD is not grounded and that it's properly insulated Check wiring and correct Turn TFT Auto Open on Radio Fuse blown... part of the front panel Replace battery with new one Remove battery and install correctly Check wiring and correct Increase volume level Review wiring diagram and check...TFT Auto Open is turned off No image Incorrect connection to restart monitor movement Connect the auto antenna control cable properly Connect the auto antenna control cable properly Turn LOCAL function off Eject current disc and insert new one 32 VM9021TS...

Instruction Manual
Page 40
...WRITTEN WARRANTY. Audiovox Electronics Corporation Hauppauge, NY 11788 Technical Assistance: 1-800-323-4815 www.jensen.com © 2006 Audiovox Ver 1.0 Printed in material or workmanship within 12 months ...is in the opinion of the Company, has suffered or been damaged through alteration, improper installation, mishandling, misuse, neglect, accident, or by removal or defacement of the factory serial ... date of original purchase, such defect(s) will be proven defective in China 36 VM9021TS ANY ACTION FOR BREACH OF ANY WARRANTY HEREUNDER INCLUDING ANY IMPLIED WARRANTY OF MERCHANTABILITY ...
...WRITTEN WARRANTY. Audiovox Electronics Corporation Hauppauge, NY 11788 Technical Assistance: 1-800-323-4815 www.jensen.com © 2006 Audiovox Ver 1.0 Printed in material or workmanship within 12 months ...is in the opinion of the Company, has suffered or been damaged through alteration, improper installation, mishandling, misuse, neglect, accident, or by removal or defacement of the factory serial ... date of original purchase, such defect(s) will be proven defective in China 36 VM9021TS ANY ACTION FOR BREACH OF ANY WARRANTY HEREUNDER INCLUDING ANY IMPLIED WARRANTY OF MERCHANTABILITY ...


