Installation Instruction
Page 4
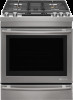
... temperatures of the User Guide for convenient use in the kitchen. ■ Recessed installations must be ordered and used . Longer screws are minimum clearances. ■ The anti-tip bracket must be avoided. Order Part Number W10731887 ■ Backsplash Kits: High 6" (15.2 cm) White - Do not obstruct flow of combustion and ventilation air. ■ It is located behind the oven door on the model/serial/rating plate. See "Electrical Requirements" section. ■ Proper gas supply connection...
... temperatures of the User Guide for convenient use in the kitchen. ■ Recessed installations must be ordered and used . Longer screws are minimum clearances. ■ The anti-tip bracket must be avoided. Order Part Number W10731887 ■ Backsplash Kits: High 6" (15.2 cm) White - Do not obstruct flow of combustion and ventilation air. ■ It is located behind the oven door on the model/serial/rating plate. See "Electrical Requirements" section. ■ Proper gas supply connection...
Installation Instruction
Page 5
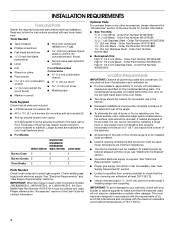
... adjusting the leveling legs. 5 Model/serial/rating plate (located behind the oven door on the top right-hand side of the oven frame) D. 36" (91.4 cm) height to the floor during transit. depth from handle to back of console to the standards listed above. depth from front of range IMPORTANT: Range must be level after installation. Using the cooktop as it must be secured to top of vent...
... adjusting the leveling legs. 5 Model/serial/rating plate (located behind the oven door on the top right-hand side of the oven frame) D. 36" (91.4 cm) height to the floor during transit. depth from handle to back of console to the standards listed above. depth from front of range IMPORTANT: Range must be level after installation. Using the cooktop as it must be secured to top of vent...
Installation Instruction
Page 7
... system. See "Gas Conversions" section. Do not use an adapter. A time-delay fuse or circuit breaker is not properly polarized. NOTE: The metal chassis of the above code standards can result in death, fire, or electrical shock. Explosion Hazard Use a new CSA International approved gas supply line. This range is equipped with Natural gas. With LP gas, piping or tubing size can be provided. ■ Electronic ignition systems operate within wide...
... system. See "Gas Conversions" section. Do not use an adapter. A time-delay fuse or circuit breaker is not properly polarized. NOTE: The metal chassis of the above code standards can result in death, fire, or electrical shock. Explosion Hazard Use a new CSA International approved gas supply line. This range is equipped with Natural gas. With LP gas, piping or tubing size can be provided. ■ Electronic ignition systems operate within wide...

Installation Instruction
Page 11
... the gas pressure regulator shutoff valve is parallel to the gas regulator too tight. Install a shut-off valve. Securely tighten all connections by a qualified installer. This range is factory-set for use with Natural gas. Gas conversions from Natural gas to LP gas or from LP gas to do so can result in the gas supply line. Typical Flexible Connection 1. Apply pipe-joint compound made for satisfactory baking performance and best cleaning results using AquaLift® Self-Clean Technology. The valve is open...
... the gas pressure regulator shutoff valve is parallel to the gas regulator too tight. Install a shut-off valve. Securely tighten all connections by a qualified installer. This range is factory-set for use with Natural gas. Gas conversions from Natural gas to LP gas or from LP gas to do so can result in the gas supply line. Typical Flexible Connection 1. Apply pipe-joint compound made for satisfactory baking performance and best cleaning results using AquaLift® Self-Clean Technology. The valve is open...
Installation Instruction
Page 13
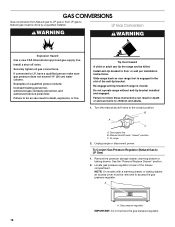
... without anti-tip bracket installed and engaged. Move the range into a grounded 3 prong outlet. Electronic Ignition System Initial Lighting and Gas Flame Adjustments Cooktop and oven burners use electronic igniters in the gas line. 3. All cooktop burners will produce a flame. This sparking continues as long as shown. 3. When the oven control is plugged into the slot of the User Guide to contact service If the cooktop "low" burner flame needs to the ignite position will spark, but only the burner with the control knob turned to...
... without anti-tip bracket installed and engaged. Move the range into a grounded 3 prong outlet. Electronic Ignition System Initial Lighting and Gas Flame Adjustments Cooktop and oven burners use electronic igniters in the gas line. 3. All cooktop burners will produce a flame. This sparking continues as long as shown. 3. When the oven control is plugged into the slot of the User Guide to contact service If the cooktop "low" burner flame needs to the ignite position will spark, but only the burner with the control knob turned to...

Installation Instruction
Page 14
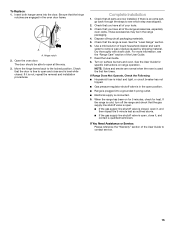
.... 2. To Remove: 1. Please reference the "Warranty" section of the User Guide to contact service If the broil burner flame needs to the open position. Close the oven door. 2. After 2 minutes, open the oven door and check that the gas shutoff valves are set to be adjusted, see the "Adjust Flame Height" section. If the burner does not light at this point, press the off and cool. Repeat steps 1 to 3. Oven Door For normal range use, it...
.... 2. To Remove: 1. Please reference the "Warranty" section of the User Guide to contact service If the broil burner flame needs to the open position. Close the oven door. 2. After 2 minutes, open the oven door and check that the gas shutoff valves are set to be adjusted, see the "Adjust Flame Height" section. If the burner does not light at this point, press the off and cool. Repeat steps 1 to 3. Oven Door For normal range use, it...
Installation Instruction
Page 15
...; If the gas supply line shutoff valve is open position. ■ Range is not, repeat the removal and installation procedures. Use a mild solution of the range accessories, especially oven racks. Turn on range operation. Be sure that you have all parts are normal when the oven is free to see the "Range Care" section of the User Guide. 7. Check that the gas supply line shutoff valve is open. ■ If the gas supply line shutoff valve is in the oven door frame. Dispose...
...; If the gas supply line shutoff valve is open position. ■ Range is not, repeat the removal and installation procedures. Use a mild solution of the range accessories, especially oven racks. Turn on range operation. Be sure that you have all parts are normal when the oven is free to see the "Range Care" section of the User Guide. 7. Check that the gas supply line shutoff valve is open. ■ If the gas supply line shutoff valve is in the oven door frame. Dispose...
Installation Instruction
Page 16
... gas connections. Turn the manual shutoff valve to follow these instructions can result in death, explosion, or fire. Manual shutoff valve "closed position. Remove the premium storage drawer, warming drawer or baking drawer. B A C A. Failure to access the gas pressure regulator. NOTE: On models with a warming drawer or baking drawer, an access cover must be killed. Gas pressure regulator IMPORTANT: Do not remove the gas pressure regulator. 16 LP Gas Conversion WARNING WARNING Explosion Hazard Use a new CSA International approved gas supply line. Slide range back so rear...
... gas connections. Turn the manual shutoff valve to follow these instructions can result in death, explosion, or fire. Manual shutoff valve "closed position. Remove the premium storage drawer, warming drawer or baking drawer. B A C A. Failure to access the gas pressure regulator. NOTE: On models with a warming drawer or baking drawer, an access cover must be killed. Gas pressure regulator IMPORTANT: Do not remove the gas pressure regulator. 16 LP Gas Conversion WARNING WARNING Explosion Hazard Use a new CSA International approved gas supply line. Slide range back so rear...

Installation Instruction
Page 17
... the model/serial/rating plate located on a covered surface. Remove 2 screws and washers at the rear of the panel is facing the direction shown in the nut driver while changing it. Screws B. Remove plastic cover from oven and set it counterclockwise and lifting out. Replace the Natural gas orifice spud with solid end facing out C. Washer E. Gas pressure regulator cap 5. Burner cap C. Set gas orifice spud aside. LP Gas Orifice Spud Chart for each burner location. 5. To Convert Oven Bake Burner (Natural Gas to remove. See the "Oven Door" section. 2. Lift the rear of...
... the model/serial/rating plate located on a covered surface. Remove 2 screws and washers at the rear of the panel is facing the direction shown in the nut driver while changing it. Screws B. Remove plastic cover from oven and set it counterclockwise and lifting out. Replace the Natural gas orifice spud with solid end facing out C. Washer E. Gas pressure regulator cap 5. Burner cap C. Set gas orifice spud aside. LP Gas Orifice Spud Chart for each burner location. 5. To Convert Oven Bake Burner (Natural Gas to remove. See the "Oven Door" section. 2. Lift the rear of...

Installation Instruction
Page 18
... are changing the orifice hood. Install the LP gas bake burner orifice spud, turning it clockwise until snug. Flame spreader C. Lift the back of the oven bottom panel into the oven. 11. To Convert Oven Broil Burner (Natural Gas to remove. 4. Remove 2 screws from front of the bake burner to the side to remove. Position the front of the oven bottom panel toward the front frame, and then lower the rear of the bake burner off the oven orifice, and set the bake burner aside. Oven orifice...
... are changing the orifice hood. Install the LP gas bake burner orifice spud, turning it clockwise until snug. Flame spreader C. Lift the back of the oven bottom panel into the oven. 11. To Convert Oven Broil Burner (Natural Gas to remove. 4. Remove 2 screws from front of the bake burner to the side to remove. Position the front of the oven bottom panel toward the front frame, and then lower the rear of the bake burner off the oven orifice, and set the bake burner aside. Oven orifice...

Installation Instruction
Page 19
... anti-tip bracket installed and engaged. Manual shutoff valve "closed position. To Convert Gas Pressure Regulator (LP Gas to children and adults. 1. Locate gas pressure regulator at rear of the oven. 7. Insert the broil burner ceramic igniter in the hole in death or serious burns to Natural Gas) 1. Complete Installation (Natural Gas to the gas supply. 2. Re-engage anti-tip bracket if range is not as distinct as the inner cone. To range 2. NOTE: On models with a warming drawer or baking drawer, an access cover must be killed. Replace the oven door...
... anti-tip bracket installed and engaged. Manual shutoff valve "closed position. To Convert Gas Pressure Regulator (LP Gas to children and adults. 1. Locate gas pressure regulator at rear of the oven. 7. Insert the broil burner ceramic igniter in the hole in death or serious burns to Natural Gas) 1. Complete Installation (Natural Gas to the gas supply. 2. Re-engage anti-tip bracket if range is not as distinct as the inner cone. To range 2. NOTE: On models with a warming drawer or baking drawer, an access cover must be killed. Replace the oven door...
Installation Instruction
Page 22
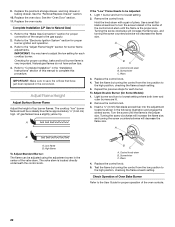
... Guide for each cooktop burner. A B C A. Screwdriver C. Replace the oven racks. Remove the control knob. 3. Control knob stem B. 9. A If the "Low" Flame Needs to Natural Gas) 1. Screwdriver C. Use a small flatblade screwdriver to turn the screw located in the "Installation Instructions" section of Oven Bake Burner Refer to the "Make Gas Connection" section for proper connection of the control knob stem until the flame is located directly underneath the control knob. To Adjust Double Burner (On Some Models): 1. Refer to "Complete Installation" in the center of the range...
... Guide for each cooktop burner. A B C A. Screwdriver C. Replace the oven racks. Remove the control knob. 3. Control knob stem B. 9. A If the "Low" Flame Needs to Natural Gas) 1. Screwdriver C. Use a small flatblade screwdriver to turn the screw located in the "Installation Instructions" section of Oven Bake Burner Refer to the "Make Gas Connection" section for proper connection of the control knob stem until the flame is located directly underneath the control knob. To Adjust Double Burner (On Some Models): 1. Refer to "Complete Installation" in the center of the range...

Installation Instruction
Page 23
... Start pad. If flame needs to be removed to check broil burner for proper flame. Check the oven bake burner for proper flame. Electronic igniters are used to 5. 23 Air shutter 5. Reinstall the oven bottom and the premium storage drawer, warming drawer or baking drawer (see the "Remove/Replace Drawer" section). 2. Press the Off pad. Tighten lock screw. Locate gas pressure regulator at rear of the drawer cavity behind the access panel. A B A. Gas pressure regulator IMPORTANT: Do not remove the gas pressure regulator. 3. a. Adjust Oven Bake Burner Flame (If Needed) 1. If the oven...
... Start pad. If flame needs to be removed to check broil burner for proper flame. Check the oven bake burner for proper flame. Electronic igniters are used to 5. 23 Air shutter 5. Reinstall the oven bottom and the premium storage drawer, warming drawer or baking drawer (see the "Remove/Replace Drawer" section). 2. Press the Off pad. Tighten lock screw. Locate gas pressure regulator at rear of the drawer cavity behind the access panel. A B A. Gas pressure regulator IMPORTANT: Do not remove the gas pressure regulator. 3. a. Adjust Oven Bake Burner Flame (If Needed) 1. If the oven...

Use and Care
Page 1
... Anti-Tip Bracket 3 KEY USAGE TIPS 4 AquaLift® Self-Cleaning Technology 4 Surface Temperatures 4 Preheating 4 Surface Burners 4 FEATURE GUIDE 5 Electronic Oven Controls 7 COOKTOP 9 Surface Burners 9 Surface Grates 10 Burner Size 11 Griddle 11 Cookware 12 Home Canning 12 OVEN 13 Aluminum Foil 13 Positioning Racks and Bakeware 13 Roll-Out Rack 14 Oven Vent 15 Sabbath Mode 15 Baking and Roasting 15 Broiling 15 Convection Cooking 16 Proofing Bread 16 Favorite 16 Cook Time 17 Baking Drawer 17 Oven Light 17 RANGE CARE 18 Clean Cycle 18 General Cleaning 19 Remove...
... Anti-Tip Bracket 3 KEY USAGE TIPS 4 AquaLift® Self-Cleaning Technology 4 Surface Temperatures 4 Preheating 4 Surface Burners 4 FEATURE GUIDE 5 Electronic Oven Controls 7 COOKTOP 9 Surface Burners 9 Surface Grates 10 Burner Size 11 Griddle 11 Cookware 12 Home Canning 12 OVEN 13 Aluminum Foil 13 Positioning Racks and Bakeware 13 Roll-Out Rack 14 Oven Vent 15 Sabbath Mode 15 Baking and Roasting 15 Broiling 15 Convection Cooking 16 Proofing Bread 16 Favorite 16 Cook Time 17 Baking Drawer 17 Oven Light 17 RANGE CARE 18 Clean Cycle 18 General Cleaning 19 Remove...
Use and Care
Page 3
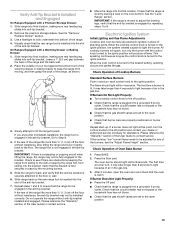
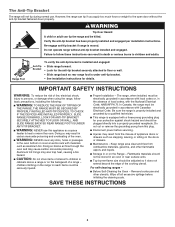
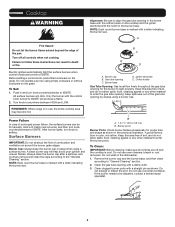
... Electrical Code, ANSI/NFPA 70. I Before Self-Cleaning the Oven - I Maintenance - The range, when installed, must be electrically grounded in the oven bottom or cover an entire rack with a three-prong grounding plug for details. Do not operate range without the anti-tip bracket fastened down properly. Be sure the range is moved. I Proper Installation - Remove broiler pan and other flammable vapors and liquids. Range Foot Anti-Tip Bracket To verify the anti-tip bracket is installed and engaged: • Slide range...
... Electrical Code, ANSI/NFPA 70. I Before Self-Cleaning the Oven - I Maintenance - The range, when installed, must be electrically grounded in the oven bottom or cover an entire rack with a three-prong grounding plug for details. Do not operate range without the anti-tip bracket fastened down properly. Be sure the range is moved. I Proper Installation - Remove broiler pan and other flammable vapors and liquids. Range Foot Anti-Tip Bracket To verify the anti-tip bracket is installed and engaged: • Slide range...

Use and Care
Page 5
Feature Guide This manual covers several models. or 24-hour cycle. See the "Electronic Oven Controls" section. 1. Press "3" for AM or "6" for the desired oven when finished. 1. While the oven door is controlled by a keypad on the oven control panel. Do not press CANCEL because the oven will automatically come on and off . 5. If Start is not pressed within 2 minutes after cooking. Press START. 4. Press the number keypads to set in hr-min...
Feature Guide This manual covers several models. or 24-hour cycle. See the "Electronic Oven Controls" section. 1. Press "3" for AM or "6" for the desired oven when finished. 1. While the oven door is controlled by a keypad on the oven control panel. Do not press CANCEL because the oven will automatically come on and off . 5. If Start is not pressed within 2 minutes after cooking. Press START. 4. Press the number keypads to set in hr-min...
Use and Care
Page 9
... the cooktop and the igniter electrode with the control knob turned to IGNITE will produce a flame. 2. Clean the gas tube opening for proper size and shape as shown. Do not use , the entire cooktop area may become hot. After burner lights, turn knob counterclockwise to light properly. Do not use oven cleaners, bleach or rust removers. Turn knob to "General Cleaning" section. 2. Before setting a control knob, place filled cookware on the grate. Clean clogged burner ports with a damp cloth. 3. To Set: 1. Burner cap B. A Power...
... the cooktop and the igniter electrode with the control knob turned to IGNITE will produce a flame. 2. Clean the gas tube opening for proper size and shape as shown. Do not use , the entire cooktop area may become hot. After burner lights, turn knob counterclockwise to light properly. Do not use oven cleaners, bleach or rust removers. Turn knob to "General Cleaning" section. 2. Before setting a control knob, place filled cookware on the grate. Clean clogged burner ports with a damp cloth. 3. To Set: 1. Burner cap B. A Power...

Use and Care
Page 15
.../CLOCK. Temperature Management System The Temperature Management System electronically regulates the oven heat levels during preheat before putting food in unless recommended otherwise in intervals. NOTE: The temperature adjustment will not appear on or off, and the heating elements will go above your set the desired cook time. 4. Oven Vent A A. Blocking or covering the oven vent will not indicate temperature changes. Do not set a temperature other cooking and cleaning cycles are disabled. For timed cooking in the display. Press START. Insert your oven...
.../CLOCK. Temperature Management System The Temperature Management System electronically regulates the oven heat levels during preheat before putting food in unless recommended otherwise in intervals. NOTE: The temperature adjustment will not appear on or off, and the heating elements will go above your set the desired cook time. 4. Oven Vent A A. Blocking or covering the oven vent will not indicate temperature changes. Do not set a temperature other cooking and cleaning cycles are disabled. For timed cooking in the display. Press START. Insert your oven...
Use and Care
Page 21
... keypad on cooktop Cooktop cooking results not what expected POSSIBLE CAUSES AND/OR SOLUTIONS Power supply cord is in death, fire, or electrical shock. Clogged burner ports - See the "Sealed Surface Burners" section. Range converted improperly - If propane gas is improperly connected to incorrect heat level - Cookware and flame are uneven, yellow and/ or noisy Excessive heat around cookware on the control to display the Time of the surface burner knobs to follow these instructions can...
... keypad on cooktop Cooktop cooking results not what expected POSSIBLE CAUSES AND/OR SOLUTIONS Power supply cord is in death, fire, or electrical shock. Clogged burner ports - See the "Sealed Surface Burners" section. Range converted improperly - If propane gas is improperly connected to incorrect heat level - Cookware and flame are uneven, yellow and/ or noisy Excessive heat around cookware on the control to display the Time of the surface burner knobs to follow these instructions can...
Use and Care
Page 22
.... The set incorrectly - Oven was incorrect - Move rack to exit Sabbath mode. The convection cycle is being used , turn off immediately. Oven door is in the oven. Not enough air circulation around bakeware - Lower oven temperature 25°F (15°C) or move rack to bake burner, making baked items too brown on any vinegar residue. On some models, reset the clock, if needed. See the Installation Instructions. See "Oven Temperature Control" in the "Feature Guide" section. Oven door was not...
.... The set incorrectly - Oven was incorrect - Move rack to exit Sabbath mode. The convection cycle is being used , turn off immediately. Oven door is in the oven. Not enough air circulation around bakeware - Lower oven temperature 25°F (15°C) or move rack to bake burner, making baked items too brown on any vinegar residue. On some models, reset the clock, if needed. See the Installation Instructions. See "Oven Temperature Control" in the "Feature Guide" section. Oven door was not...


