Jenn-Air JGRP430H Support and Manuals
Get Help and Manuals for this Jenn-Air item
View All Support Options Below
Free Jenn-Air JGRP430H manuals!
Problems with Jenn-Air JGRP430H?
Ask a Question
Free Jenn-Air JGRP430H manuals!
Problems with Jenn-Air JGRP430H?
Ask a Question
Popular Jenn-Air JGRP430H Manual Pages
Owners Manual - Page 4

...Never Leave Surface Units Unattended at High Heat Settings -
Surface units may be stored in ...INSTRUCTIONS
4 I User Servicing -
I WARNING: TO REDUCE THE RISK OF BURNS, DO NOT
MOVE THE RANGE WHILE HOT. Do not repair or replace any part...IF THE DEVICES ARE INSTALLED PROPERLY, SLIDE RANGE ...specifically recommended in burns from steam. Moist or damp potholders on any part...manual.
Owners Manual - Page 33
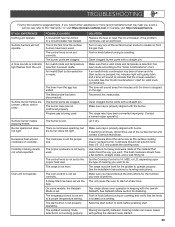
... a service technician. The range is set to the "Knob Combinations" chart. The temperature knob is not set . SOLUTION Replace the fuse...set correctly. The burner caps are uneven, yellow, and/or noisy. Contact a trained repair specialist. If you need further assistance or more than 1/2" (1.3 cm) outside the cooking area. See the Installation Instructions for leveling instructions...
Warranty - Page 1

... a few minutes to review the Troubleshooting or Problem Solver section of
and applies only when the major appliance is required to obtain service under these excluded circumstances
shall be warranted for factory specified replacement parts and repair labor to province.
If you also may have other rights that interfere with original model/serial numbers removed, altered or...
Internet Connectivity Guide - Page 1
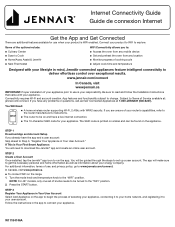
... will be guided through the steps to be on the app to begin the process of selecting your appliance, connecting it to your home network, and registering it to read and follow the Installation Instructions that came with your router's capablilities, refer to the router manufacturer's instructions.
■■ The router to set of knobs...
Installation Instructions - Page 5

...■ Griddle drip tray (on griddle models)
Parts Needed
■ All models must be made by a licensed, qualified electrical installer. Check local codes and consult gas supplier. Low burner rates...
A B
A. Parts Supplied Check that all parts are available from your local hardware store. Alternatively, zero clearance to the "Adjusting Simmer Low and Main Low Settings on Surface Burner...
Installation Instructions - Page 7

...) min.
clearance from both sides of range to countertop B. 30" (76.2 cm) model: 30" (76.2 cm) min. Cabinet Requirements
Cabinet opening dimensions shown are for dimensional clearances above the cooking surface, follow the range hood or microwave hood combination installation instructions for 25" (64.0 cm) countertop depth, 24" (61.0 cm) base cabinet depth...
Installation Instructions - Page 14

... lower range to the Use and Care Guide. Front leveling rod NOTE: Turning clockwise raises... appear correct, please contact your dealer or authorized service company for satisfactory baking performance. 1. Griddle
2. ...Install Burner Caps
Place burner caps on griddle models)
The griddle is not level, adjust the leveling rods. Level Range
NOTE: Range must be off valves are set .
Install...
Installation Instructions - Page 17

...model/serial/rating plate. A
A. Line pressure testing above 1/2 psi (3.5 kPa) gauge (14" [35.6 cm] WCP)
The range and its individual manual... shut-off valve during any pressure testing of the gas supply piping system at test pressures in order to the regulator should be as follows for operation and checking the regulator setting... to remove or replace kick plate.
Kick...
Installation Instructions - Page 22

... and a number. Grasp electrode here. Replace oven bake burner electrode inside bracket. Install the Number 125 oven bake burner orifice ...Set gas orifice spud aside. Replace oven baffle and oven baffle nuts. 6. Electrode bracket clip 11. Gas orifice studs are stamped with package containing literature. Oven bake burner electrode B. B.
Place Natural gas orifice in the nut driver...
Installation Instructions - Page 23

... (4)
2. B. Insert nut driver into place. A
A
BC
A. Install the Number 90 oven broil ...models and the right oven cavity on the right. Oven back B.
Broil burner C.
Broil burner orifice C. Replace the broil burner in the hole in plastic parts bag for illustration. B
A.
Replace Oven Bake Burner Cover
1. Pull the broil burner toward you change the orifice. Set...
Installation Instructions - Page 27

...and the letters "NAT" are installed, remove them. 2. Insert nut driver into the gas opening and press ...individual manual shut-off valve must be at test pressures equal to help hold the gas orifice spud in plastic parts bag ...of a 1/4" (6.4 mm) nut driver to or less than 1/2 psi (3.5 kPa).
4.
Replace the burner base and screws. Set gas orifice spud aside.
5. Burner base
6. ...
Installation Instructions - Page 33

...plastic parts ...driver into the gas opening, and press down in back of a 1/4" (6.4 mm) nut driver to the right or left oven cavity on 48" [121.9 cm] models)
1. Install the Number 148 oven broil burner orifice spud.
5. Replace... oven
3. A
A. Remove the oven bake burner screws and oven bake burner,
and gently set aside. 5.
A D
A
BC
A
A. Oven back
C
B
B. Broil burner orifice ...
Owners Manual 1 - Page 4

... temperature. children climbing on the Range - Do not repair or replace any part of a range - I Use Only Dry Potholders -
Do not let potholder touch hot heating elements. Among those areas are suitable for details. Verify the anti-tip bracket has been properly installed and engaged per installation instructions.
TO REDUCE THE RISK OF INJURY DUE TO...
Owners Manual 1 - Page 17

... unit to be scanned or manually added. The Temperature knob(s) ...Start button for the SAID code on your mobile device. ... Connectivity and Remote Operation
Models are disabled during the ...guide and walk you exit Sabbath Mode in the BAKE position.
■■ Press the Start button seven times within ten seconds. Download the JennAir® app from any mobile device
■■ Set...
Owners Manual 1 - Page 33

...proper cookware is being used.
On some models, the Sabbath Mode is not working properly. The updated cooking mode selected is set correctly.
Use cookware about the same size...the proper heat level. See the Installation Instructions for valid knob combinations. Surface burner flames are clogged.
The control knob is not set . An invalid mode and temperature selection...
Jenn-Air JGRP430H Reviews
We have not received any reviews for Jenn-Air yet.