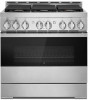
Jenn-Air JGRP436H Support and Manuals
Get Help and Manuals for this Jenn-Air item
View All Support Options Below
Free Jenn-Air JGRP436H manuals!
Problems with Jenn-Air JGRP436H?
Ask a Question
Free Jenn-Air JGRP436H manuals!
Problems with Jenn-Air JGRP436H?
Ask a Question
Popular Jenn-Air JGRP436H Manual Pages
Owners Manual - Page 4

...installed and engaged: • Slide range forward. • Look for range-top service without anti-tip bracket installed and engaged.
TO CHECK IF THE DEVICES ARE INSTALLED... - Do not repair or replace any part of the range....INSTRUCTIONS
WARNING: To reduce the risk of the range unless specifically recommended in the manual... Units Unattended at High Heat Settings - They should never be allowed...
Owners Manual - Page 33
...lid.
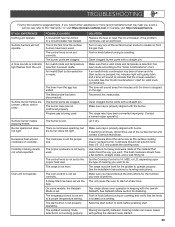
A Delay Start has been set correctly. On some models, the Sabbath Mode is not properly operating. The start button is set to do. If the problem continues, call , refer to ...want to a proper temperature setting. See the Installation Instructions for disabling. This will sound to -heavy cookware made . See Sabbath Mode section for leveling instructions. Allow the start button ...
Internet Connectivity Guide - Page 1
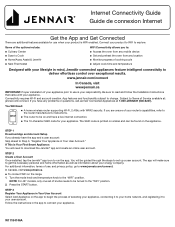
... network, and registering it to your energy company. Subject to Terms of Service available at 1-800-JENNAIR (536-6247). STEP 2 Create a User Account Once installed, tap the JennAir® app icon to the "WiFi" position. NOTE: For 48" models, only one set up a user account. Some of the options include: ■■ Culinary Center...
Installation Instructions - Page 5

... and Main Low Settings on Surface Burner for Propane" section (page 18) for Natural Gas Operation.
5 Check local codes and consult gas supplier.
It is not required for installation requirements. See the "Install Anti-Tip Bracket" section. ■ Burner grates ■ Burner caps ■ Griddle drip tray (on griddle models)
Parts Needed
■ All models must be...
Installation Instructions - Page 7

... order to ensure a flush fit to countertop B. 30" (76.2 cm) model: 30" (76.2 cm) min. Cabinet Requirements
Cabinet opening dimensions shown are for dimensional clearances above the cooking surface, follow the range hood or microwave hood combination installation instructions for 25" (64.0 cm) countertop depth, 24" (61.0 cm) base cabinet depth, and 36...
Installation Instructions - Page 10

...parts package from range. Remove Kick Plate 1. In packaging
A
NOTE: This support is used only for installation.
3. Lift range up about 3" (8.0 cm) and move and install range. Kick plate b. For 48" (121.9 cm) models only, rotate center support...
Set range on top of range and grate pack. A. Remove kick plate from side packaging on the floor behind range. INSTALLATION INSTRUCTIONS
...
Installation Instructions - Page 14

...service company for satisfactory baking performance. 1. NOTE: All roller feet must be level for assistance.
Place drip tray in and turn the control knobs to back.
3. This sparking continues until it may take longer. Level Range
NOTE: Range must be off valves are set . A
B
Electronic Ignition System
Install... Care Guide. Install Griddle ...models)
The griddle is factory installed...
Installation Instructions - Page 17

...the regulator should be as follows for operation and checking the regulator setting:
Propane Gas:
Minimum pressure: 11" (27.9 cm) WCP
... the gas pressure regulator cap, and reinstall on the model/serial/rating plate. Gently lay kick plate aside to ...remove or replace kick plate. Line pressure testing above 1/2 psi (3.5 kPa) gauge (14" [35.6 cm] WCP)
The range and its individual manual shut-off...
Installation Instructions - Page 22

... driver into the gas opening, and press down on the clip on the electrode bracket. Set ...parts bag for illustration.
13. B
A
A
A. 6. Oven bake burner electrode bracket B.
Place Natural gas orifice in the nut driver while changing it.
Replace... stamped with package containing literature. Install the Number 125 oven bake burner orifice spud.
9. Replace oven baffle and oven baffle nuts...
Installation Instructions - Page 23

...the end of a 1/4" (6.4 mm) nut driver to slide shoulder screws into the narrow ends of..." [91.4 cm] models and the right oven ...Install the Number 90 oven broil burner orifice spud.
5.
The screw is aligned with a letter and a number. B
A. Bracket
Broil burner hanging in the oven back with shoulder screws in plastic parts bag for illustration. Set gas orifice spud aside. Replace...
Installation Instructions - Page 27

...shown on the model/serial/rating plate.... 1/2 psi (3.5 kPa).
4. Replace with package containing literature.
7. simmer...parts bag for the remaining burners.
27 Line pressure testing above the set pressure. Apply masking tape to the end of that the hollow end faces in the nut driver while changing it. Insert nut driver...letters "NAT" are installed, remove them. 2. Set gas orifice spud aside....
Installation Instructions - Page 33

... racks. See the "Remove Racks" section. 2. Lift up and remove oven bake burner cover, and set aside. Remove the oven door. Broil burner orifice
C. Insert nut driver into the gas opening, and press down in plastic parts bag for illustration.
The broil burner will hang down onto the gas orifice spud, then remove...
Owners Manual 1 - Page 4

...Unattended at High Heat Settings - I DO ...specifically recommended in death or serious burns to follow basic precautions, including the following:
I Glazed Cooking Utensils - Re-engage the anti-tip bracket if the range is under anti-tip bracket. • See installation instructions for range-top service...repair or replace any part of interest to cool.
IMPORTANT SAFETY INSTRUCTIONS...
Owners Manual 1 - Page 17

...Fi Connectivity and Remote Operation
Models are provided with a Wi-...Set and preheat the oven from Google Play® or iTunes®. 2.
Select the desired temperature for the SAID code... setting until Sabbath Mode is a registered trademark of the steps.
Reference the "Internet Connectivity Guide"...either Temperature knob to be scanned or manually added.
Add Appliance
1. Using Sabbath...
Owners Manual 1 - Page 33

... Start has been set . On some models, the Sabbath Mode is not set correctly. The temperature knob is not set to a setting and verify that the chosen selection is properly aligned with a straight pin. The updated cooking mode selected is not properly operating. SOLUTION Replace the fuse or reset the circuit breaker. If the problem continues, call , refer...
Jenn-Air JGRP436H Reviews
We have not received any reviews for Jenn-Air yet.